By: CS2103T W13-4
- 1. Introduction
- 2. Quick Start
- 3. Getting Started
- 4. Features
- 5. Coming in v2.0
- 5.1. Managing budgets (coming in v2.0):
budget - 5.2. Goal setting (coming in v2.0):
goal - 5.3. Managing categories (coming in v2.0):
category - 5.4. Viewing reports (coming in v2.0):
report - 5.5. Aliases (coming in v2.0):
alias - 5.6. Import and export (coming in v2.0):
import,export - 5.7. Getting help with specific commands (coming in v2.0):
help
- 5.1. Managing budgets (coming in v2.0):
- 6. Scripting API
- 7. FAQ
- 8. Command Summary
1. Introduction
Budget Buddy is an all-in-one expense tracking application for students from the School of Computing (SoC) at the National University of Singapore (NUS) who prefer to use a desktop app to manage their expenses. More importantly, Budget Buddy is optimized for those who prefer to work with a Command Line Interface (CLI) while still having the benefits of a Graphical User Interface (GUI). If you type fast, Budget Buddy can get your expense management tasks done faster than traditional GUI apps. Furthermore, Budget Buddy allows users with computing know-how to add their own functions through customized JavaScript files, as well as set rules to simplify expense tracking through automation.
This user guide provides in-depth documentation of Budget Buddy’s current and upcoming features. It also includes the setup process and answers some commonly asked questions. For the hands-on person, check out the Quick Start section right below.
2. Quick Start
Ensure that Java 11 is installed on your system.
Download the latest version of Budget Buddy here.
Place the budgetbuddy.jar file in your desired home folder. This folder will contain all data saved into Budget Buddy.
Double click the budgetbuddy.jar file to launch Budget Buddy.
Launching for the first time
-
A default account will be created.
-
Type
txn dn/out x/100 d/This is my first transaction!to add a new spending. -
To view your accounts, type
account list -
To view other available commands, type
help
If the application does not run, follow the instructions below based on your operating system:
-
Mac/Linux:
-
Launch Terminal
-
Navigate to the home folder where budgetbuddy.jar is, using the
cdcommand, e.g.cd ~/Documents/BudgetBuddy -
Execute the jar file using
java -jar budgetbuddy.jar
-
-
Windows:
-
Launch Cmd, or Windows' Command Prompt
-
Navigate to the home folder where budgetbuddy.jar is, using the
cdcommand, e.g.cd Documents\BudgetBuddy -
Execute the jar file using
java -jar budgetbuddy.jar
-
3. Getting Started
Welcome to the Budget Buddy User Guide! You can scroll down to get an in-depth look at each of Budget Buddy’s features, or jump straight to a specific section from the Table of Contents above.
4. Features
Budget Buddy comes with many tools to help you manage your expenses better. You can create different accounts, record your transactions, track money you owe people or that people owe to you, and even instantly split a bill between you and your friends!
What’s more? Automate processes with rules. Typing the same description for transactions again and again? Set the description of a transaction automatically by using a keyword! Sort your spendings into different categories automatically! Automate everything!
If you know how to code in JavaScript, there’s great news for you too. Write and evaluate your own scripts within Budget Buddy. Do complicated things in a snap. You can even integrate your scripts into your own custom rules!
Before diving into the commands you can execute in Budget Buddy, you should first familiarize yourself with the syntax that will be used throughout this guide.
Command Format
-
Commands start with a category, and a command type usually follows, e.g.
rule add -
Words written using
<>brackets are parameters to be supplied by the user. -
Parameters within
[]brackets are optional and can be omitted. -
|indicates that a choice must be made between multiple parameters. -
…indicates a variable number (at least 1) of the specified parameter.
Budget Buddy also comes with various keyboard shortcuts for a better user experience with the CLI.
| Shortcut | Purpose |
|---|---|
F1 |
Executes the |
Ctrl+Shift |
Switches focus to the input text box |
Ctrl+Tab |
Switches the current active tab to the next tab in the list |
Ctrl+D |
( Loan tab only ) Switches between the loan list and split list, more details here |
From this point on, each of Budget Buddy’s commands will be discussed in detail.
4.1. Viewing help: help
This command opens a window containing a link to this user guide, which can be useful should you ever forget how to execute a certain command.
Format: help
4.2. Managing transactions: txn
Transactions form the core of Budget Buddy. They can be used to track any purchases you make, or any money that you receive. Transactions can further be filtered by various criteria, if you want to find out how much money you’ve spent in a certain time period, or in a certain category of spending.
4.2.1. Add a transaction: txn out|in
This command will add a new transaction of the specified amount and with the given description.
Format: txn dn/out|in x/<amount> d/<description> [a/<account>] [c/<category>] [w/<date>]
Examples:
-
txn dn/out x/3 d/apples a/food c/fruits w/5/4/2019 -
txn dn/in x/50 d/pocket money a/school
4.2.2. Edit a transaction: txn edit
This command will edit the specified transaction, setting the specified fields. At least one field should be provided for editing.
Format: txn edit <id> dn/out|in [x/<amount>] [d/<description>] [a/<account>] [c/<category>] [w/<date>]
Examples:
-
txn edit 1 x/50 d/apple juice c/groceries -
txn edit 4 a/personal
4.2.3. Delete a transaction: txn delete
This command will delete the transaction with the specified ID in the displayed list of transactions.
Format: txn delete <id>
Examples:
-
txn delete 3
4.2.4. List transaction(s): 'txn list'
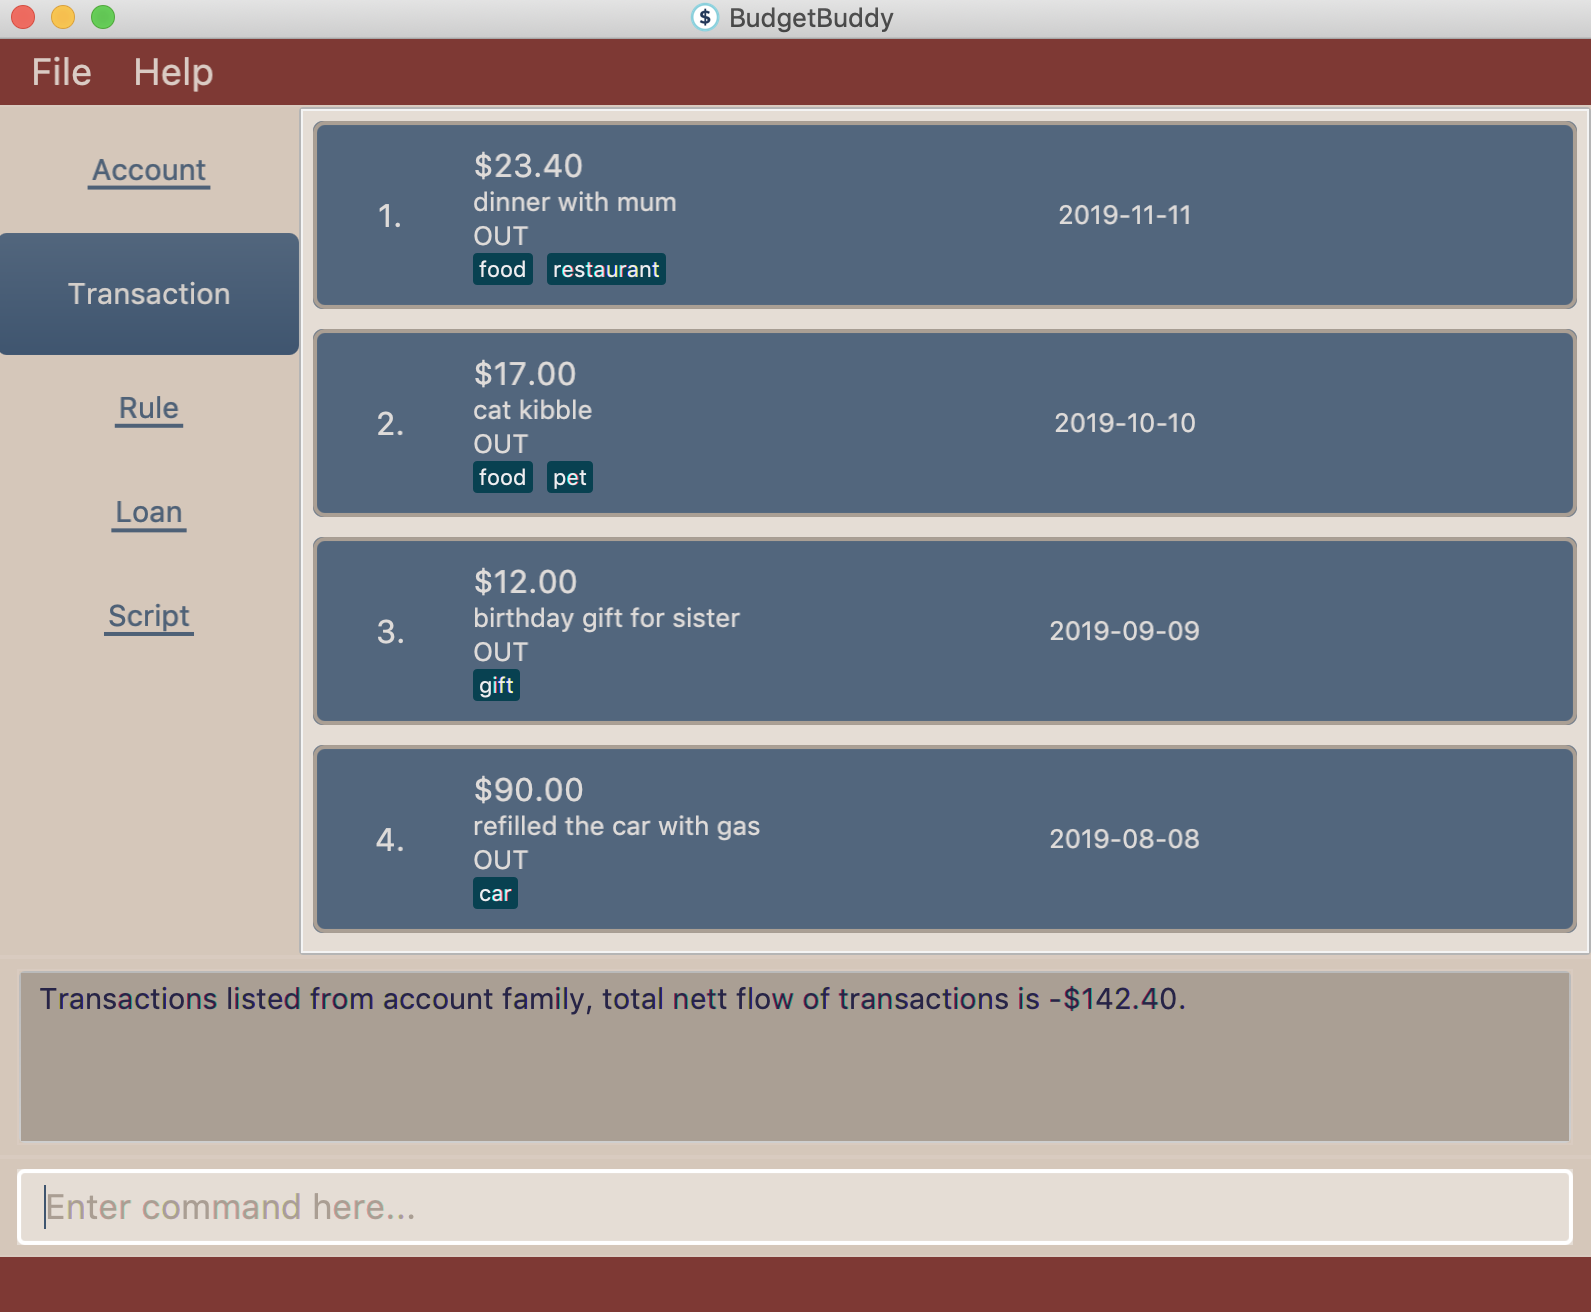
This will list the transactions from the currently active account, and you can optionally filter/sort them as well.
Format: txn list [c/category] [f/from date] [u/until date] [af/from amount] [au/until amount] [d/description]
[s/aw|dw|ax|dx|ad|dd]
Examples:
-
txn list c/food u/10/4/2019 af/5 au/10 d/fruits s/ad
4.3. Managing accounts: account
4.3.1. Add an account: account add
You can create a new account. Each account has a unique ID and name. You can choose to customise a description to describe the use of the account.
Format: account add n/<name> [d/<description>]
Examples:
-
account add n/Japan trip
You have created an account with the name 'Japan trip'. -
account add n/Japan trip d/expense spent in Japan
You have created an account with the name 'Japan trip' and description 'expense spent in Japan'.
4.3.2. List accounts: account list
If you want to see the full list of accounts you currently own, you can enter this command and a list of all accounts will be displayed.
Format: account list
4.3.3. Edit an account: account edit
You can edit the account that you think needs modifiying. You can choose to edit either the name or the description of the account, or both.
Format: account edit <id> [n/<name>] [d/<description>]
Examples:
-
account edit 1 n/food
The name of your first account will be changed to 'food'. -
account edit 1 d/money spent on food
The name of your first account will be changed to 'money spent on food'. -
account edit 1 n/food d/money spent on food
The name of your first account will be changed to 'food', at the same time the description of the same account will be changed to 'money spent on food'.
4.3.4. Delete account: account delete
You can delete the account with the specified ID, as in account list.
Note: you cannot delete an account if there are transactions associated with the account.
Format: account delete <id>
Examples:
-
account delete 2
You have deleted the second account in your account list.
4.3.5. Find account: account find
If you want to see a specific type of account you have, or find a specific account, you can find the account(s) with a specified keyword. A list of account(s) containing the keyword in their names will be displayed.
Format: account find <keyword>
Examples:
-
account find trip
You can see a list of accounts with the word 'trip' contained in their names.
4.3.6. View report of an account: account report
If you want to see the details of a particular account, you can choose to view the report of the specified account. The report contains the balance, the total expenses, the total income, and the categories involved in the specified account.
Format: account report <id>
Example:
-
account report 2
You can view the report of the first account.
4.3.7. Switch the active account: account switch
To switch the active account to another in the account list, specify the ID of the new account to switch to.
Format: account switch <id>
Example:
-
account switch 3
You have switched the active account to the third one in the list. The active account will be highlighted in dark blue color.
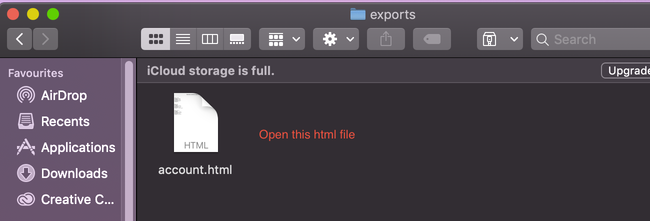
4.3.8. Export the overview of all accounts: account overview
If you want to see the overview of all accounts, Budget Buddy allows you to export the overview of all accounts in a HTML file. In the overview, you are able to see the balance, the total expenses, the total income, and the categories involved in each account.
Format: account overview
Step 1. Type account overview in the command textfield input.
Step 2. Successful message displayed, and you can navigate to the exports folder in the same directory of the source file.
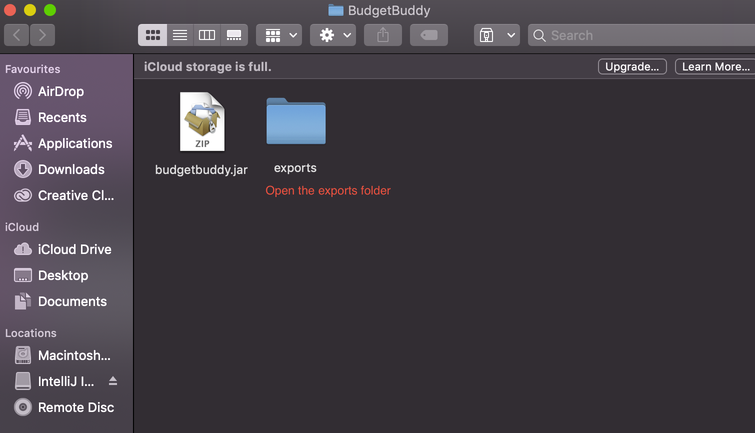
Step 3. Open the HTML file in the exports folder to see the overview of all accounts.
4.4. Managing loans: loan
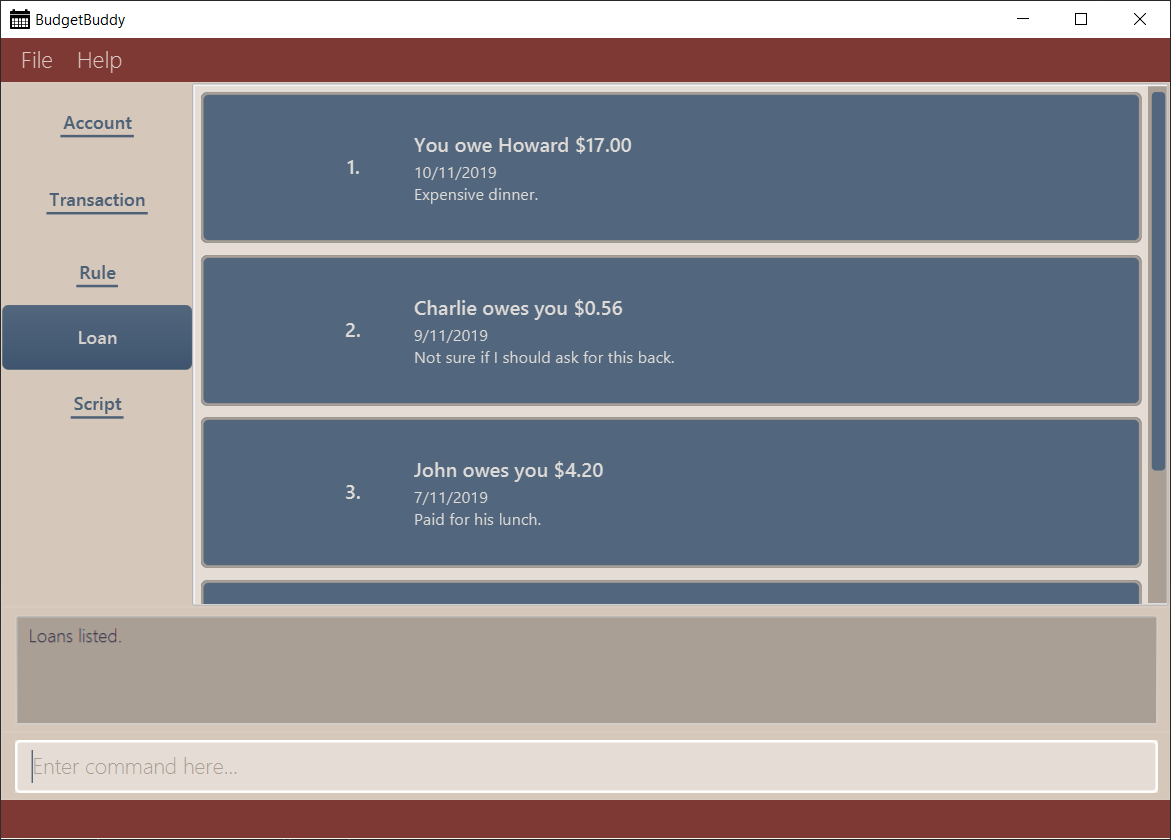
Budget Buddy comes with the ability for you to keep track of who owes you money and exactly how much they owe you. Never again allow those small sums you lend out to accumulate into a massive pile of forgotten gold. You can also record who you owe money to, saving you the embarrassment of being publicly reminded by your loan shark friends. Finally, it can help you calculate who owes who how much when you and said friends wake in the morning after an expensive night out.
Your loans can be viewed in the Loan tab, as seen in the figure below:
4.4.1. Add a new loan: loan out|in
This command adds a new entry to the loan list in the main display panel. The loan will be inserted into an appropriate position based on the list’s current sort order. For example, if the list is sorted by amount in descending order and the new loan has the largest amount, it will appear at the top of the list.
To execute this command, type the details of the loan in the following format.
Format: loan out|in p/<person> x/<amount> [w/<date>] [d/<description>]
If a date is not provided, the loan’s date is set to the current date.
Examples:
-
loan out p/John Doe x/50 w/23/04/2019
Adds a new loan of $50 out to John Doe on the date 23/04/2019. -
loan in p/Jane Doe x/100 d/Lent me some money for booze.
Adds a new loan of $100 in from Jane Doe, with the description "Lent me some money for booze.".
4.4.2. List loans: loan list
This command displays the list of loans in the main display panel. Arguments can be added to sort and filter the list. The full command format with all its possible arguments is as follows.
Format: loan list [out|in|unpaid|paid …] [p/<person> …] [x/<amount> …] [w/<date> …] [d/<description> …] [s/w|x|p]
Examples:
-
loan list out unpaid p/John Doe
Lists all unpaid loans out to the person named "John Doe". -
loan list s/p
loan list s/p
Lists all loans sorted by persons in alphabetical order. Then lists all loans again, but sorted by persons in reverse alphabetical order.
4.4.3. Edit loan: loan edit
This command edits the details of an existing loan in the list. Once edited, the loan will be re-sorted into an appropriate position based on its new details and the current sort order. For example, if the list is sorted by date with the newest loan first, editing the loan at the top of the list to have the oldest date will move it to the bottom of the list.
To execute this command, type the index of the loan (as seen in the main display panel) and the details to be edited in the following format.
Format: loan edit <index> [<p/person>] [x/<amount>] [d/<description>] [w/<date>]
Examples:
-
loan list
loan edit 1 x/500 d/Dude owes me so much money I can’t even.
Lists all loans, then edits the amount and description of the first loan in the list to the given values.
4.4.4. Mark loan(s) as paid: loan paid
This command marks one or more loans in the list as paid. A paid loan can be visually distinguished by a large "tick" icon to the left of its index:

Multiple loans can be marked at once. This can be done by specifying several indices or at least one person to target. The format of the command is as follows.
Format: loan paid [<index …>] [<p/person …>]
Examples:
-
loan list
loan paid 1 2 3
Lists all loans, then marks the first three loans in the list as paid. -
loan paid p/John p/Adam
Marks all loans pertaining to John and Adam as paid.
4.4.5. Mark loan(s) as unpaid: loan unpaid
This command marks one or more loans in the list as unpaid. When a paid loan is marked as unpaid, its tick icon will disappear:

This command is executed in an identical manner to loan paid.
Its format is as follows.
Format: loan unpaid [<index …>] [<p/person …>]
4.4.6. Delete loan(s): loan delete
This command deletes one or more loans from the list.
Similarly to loan paid and loan unpaid, multiple loans can be targeted at once.
Its format is as follows.
Format: loan delete [<index …>] [<p/person …>]
4.4.7. Calculate loans: loan split
This command takes a group of persons and a list of amounts each person has paid, before calculating which persons need to pay which other persons such that the total amount paid is split equally among all the group’s members.
For example, let’s say you’re out for dinner with two friends.
When the hundred-dollar bill arrives, you pay for the first sixty and one of your two friends pays for the remaining forty.
The loan split command can now help you to calculate how much your two friends owe you,
such that the hundred-dollar bill is split equally among you three.
This command comes with many optional arguments, all of which are explained below. The format of the command is as follows.
Format: loan split p/<person> x/<amount paid> [max/<limit>] … [me/<your name> [w/<date>] [d/<description>]]
To switch between your loan list and split list, press Ctrl+D (or Cmd+D for Mac) while on the Loan tab.
| The split list will initially be empty, but once a list is calculated it will persist in the Loan tab across sessions (until a new calculation is made). |
Examples:
-
loan split p/John x/0 p/Mary x/40 p/Peter x/60
Calculates the money owed betweenJohn,MaryandPeterfor a scenario where (initially)Marypaid40andPeterpaid60. The resulting display should show thatJohnowesMary$6.66 and also owesPeter$26.67, as seen in the image below.

-
loan split p/John x/0 max/10 p/Mary x/10 p/Peter x/90 me/Mary d/Dinner.
In this scenario,Marypaid10andPeterpaid90.max/10restricts the final amountJohnpays/owes to10, despite the total amount being0 + 10 + 90 = 100. Furthermore,me/MarymarksMaryas the user (you), so any debtsMaryowes/is owed will be added to the normal loan list with the descriptionDinner.. The resulting display should show thatJohnowesPeter$10 andYouowePeter$35, as seen below.

The latter debt will also have been added to your loan list,
which can be checked using the command loan list or by pressing the hotkey mentioned above.
4.5. Automating with rules: rule
Introducing the Rule Engine. A way for you to automate certain actions based on a certain predicate. Spend less time typing repetitive commands, and spend more time keeping track of your expenses!
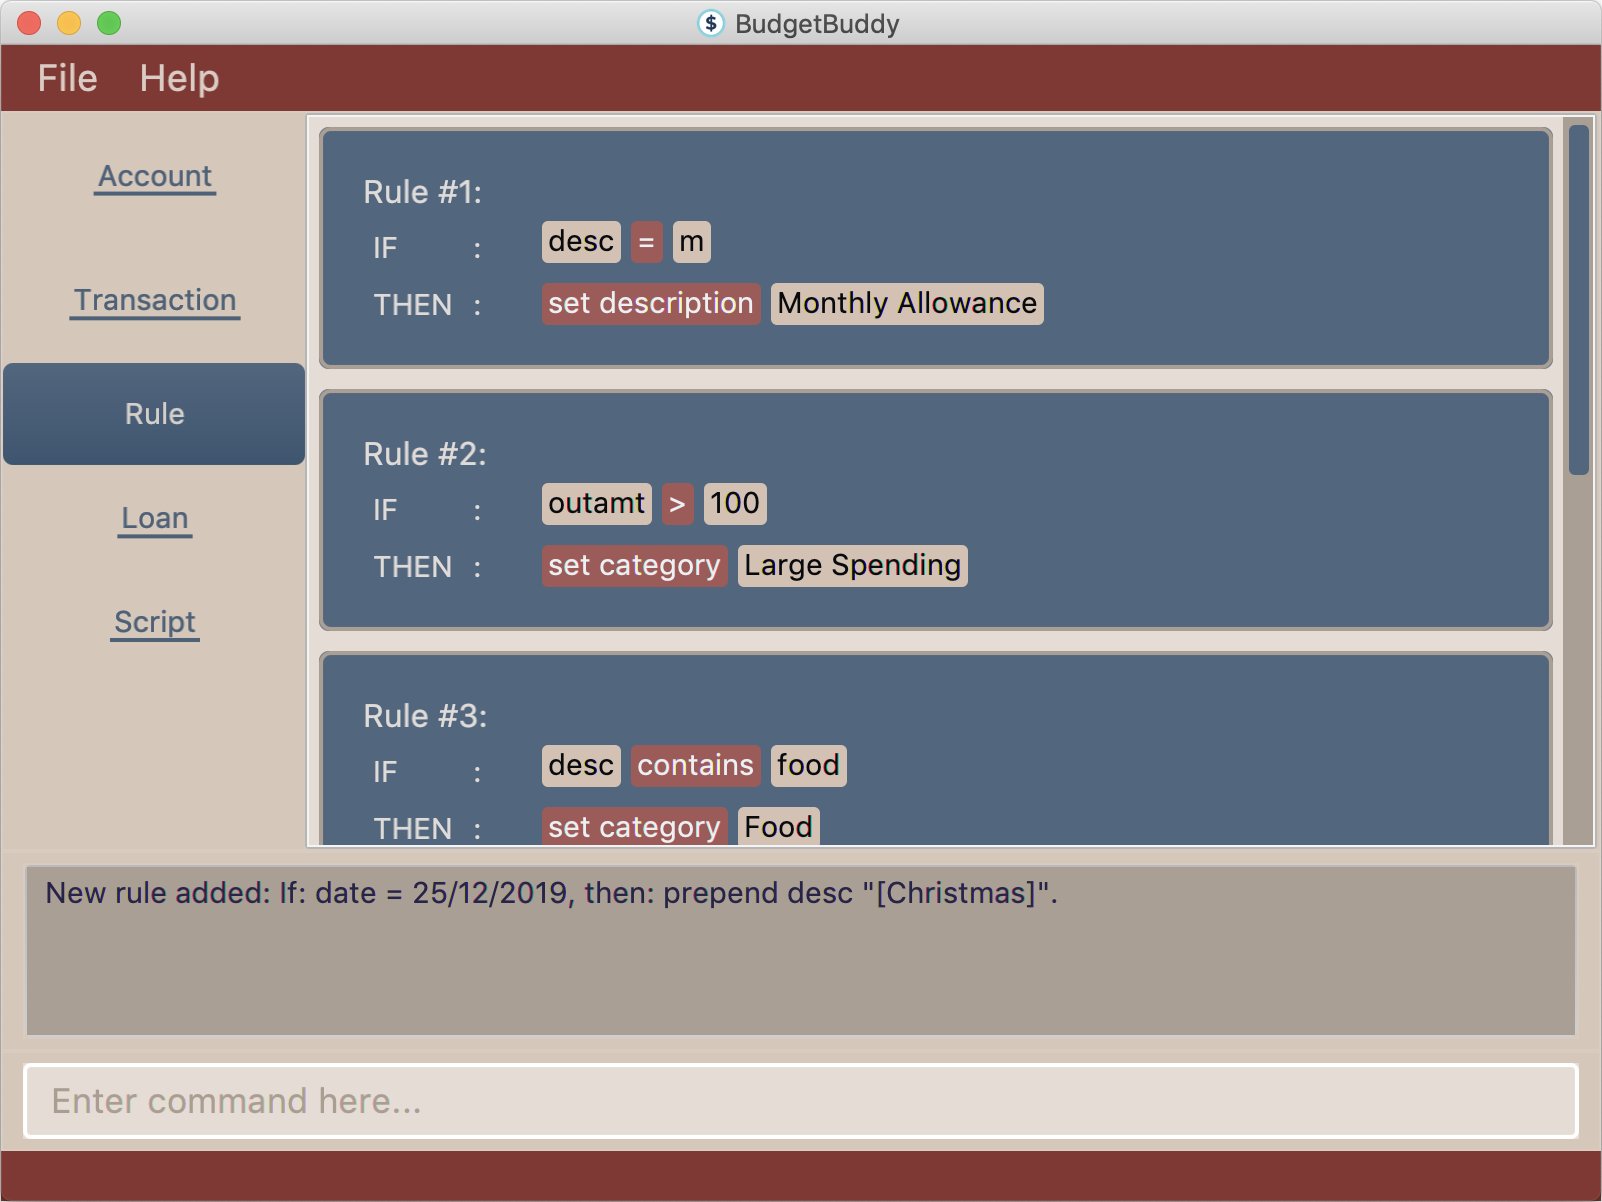
Rules have the following structure: if "predicate" is true, then perform "action". By creating a predicate which defines the condition you set, you can perform any action you create whenever a transaction is added/edited, if the transaction satisfies that condition.
All rules in the Rule Engine will be executed on a transaction, when:
-
It is a new transaction and has been successfully added into an account. OR
-
It is an existing transaction and has been successfully edited.

The picture above shows a transaction added with the command:
txn dn/out x/200 d/Treat friends to buffet food!
As you can see, two of the rules from the example list of rules above were applied on the transaction, and added categories to it.
| All rules will be executed from the top of the list downwards. Typically, this is the order in which the rules were added. Rules with conflicting actions will therefore be allowed. |
4.5.1. Add a new rule: rule add
Adds a new rule to the rule engine. Both the predicate and action have to be specified. A rule can be formed using either expressions or scripts, or both.
Format: rule add p/<expression|script name> a/<expression|script name>
| Note that scripts used in rules are not validated; make sure they are free from error. Predicate scripts that do not return a boolean will be executed, but will therefore implicitly return false. Action scripts will be executed if the predicate returns true, and any return value will be discarded. |
Examples:
-
rule add p/outamt >= 100 a/prep_desc [Large Spending]
Adds a new rule that specifies that if an outward transaction has an amount more than or equal to $100, prepend the transaction’s description with "[Large Spending]". -
rule add p/desc contains food a/set_cat Food
Adds a new rule that specifies that if a transaction description contains "food", add the category "Food" to that transaction. -
rule add p/IsMonthlyAllowance a/set_desc Monthly Allowance
Adds a new rule that specifies that if the script named "IsMonthlyAllowance" returns true, change the transaction’s description to "Monthly Allowance".
4.5.2. List rules: rule list
Displays the list of all existing rules in the Rule Engine. Rules are sorted by the order in which they were added.
Format: rule list
4.5.3. Edit a rule: rule edit
Edits the specified fields in the rule with the specified ID. Both the predicate and action can be modified.
Format: rule edit <rule ID> [p/<expression|script>] [a/<expression|script>]
Examples:
-
rule edit 1 p/inamt <= 10
Edits the predicate of the first rule in the list to check if an inward transaction has an amount less than or equal to 10. -
rule edit 4 a/set_in
Edits the action of the 4th rule in the list to set the direction of a transaction to be inwards.
4.5.4. Delete a rule: rule delete
Deletes a rule with the specified rule ID.
Format: rule delete <rule ID>
Examples:
-
rule delete 5
Deletes the 5th rule in the list.
4.5.5. Swap two rules: rule swap
| Ths will affect the execution order of the rules. Rules will be executed from the top of the list downwards. |
Swaps the position of two specified rules in the Rule Engine.
Format: rule swap <rule 1 ID> <rule 2 ID>
Examples:
-
rule swap 2 4
Swaps the ordering of the 2nd rule and the 4th rule.
4.6. Scripting: script
The scripting engine allows you to evaluate arbitrary scripts to perform complex operations on your transaction data, as well as extend the application and add commands and features of your own.
The scripting language is JavaScript (specifically, ECMAScript 5.1). For more details on the scripting environment and API, see here.
| Scripts have full access to the application’s internals, as well as all Java standard library classes and APIs. It is possible to corrupt the application state by execution of a malicious or buggy script. There are no guarantees on application behaviour if scripts are used. |
4.6.1. Evaluate a script: script eval
Evaluates a script and displays the result, which is the last expression evaluated in the script.
Format: script eval <script>
Examples:
-
script eval 1Evaluates to:
1 -
addTxn(1000, 'out', 'Lunch')Adds an out-transaction for $10 with description "Lunch".
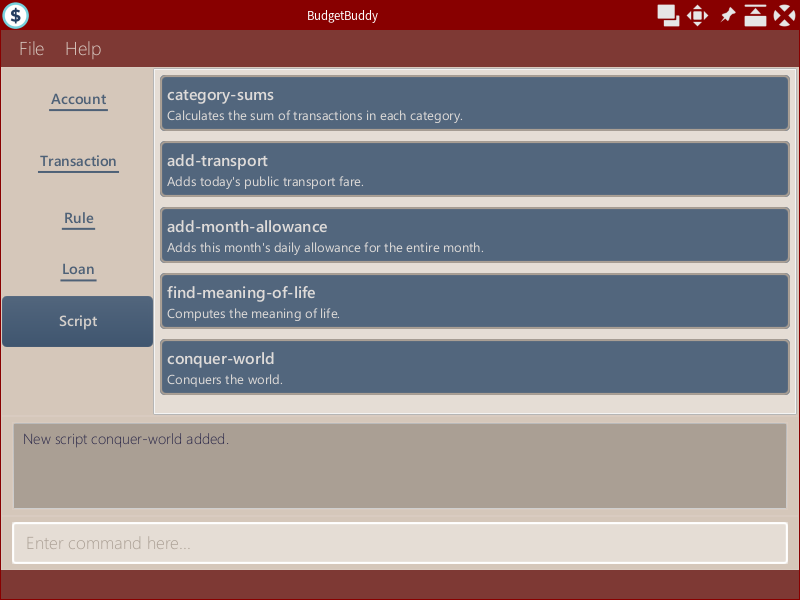
4.6.2. Add a stored script: script add
Stores a script for future invocation. If a script with the same name already exists, that script is replaced.
Format: script add <script name> [d/<description>] [p/<file path>|s/<script>]
| The script is not checked for correctness before it is stored. Any syntax errors will be reported only when the script is run. |
Examples:
-
script add hello-world s/"Hello world!"Adds a script named
hello-worldthat simply results in "Hello world!" being printed. -
script add add-transport d/Adds today’s transport fare.Adds a script named
add-transportwith description "Adds today’s transport fare.". A file picker is opened for you to select the script file.
4.6.3. Delete a stored script: script delete
Deletes a previously-stored script.
Format: script delete <script name>
4.6.4. Run a stored script: script run
Runs a previously-stored script and displays the result, which is the last expression evaluated in the script.
Format: script run <script name> [<argument>]
Examples:
-
script run add-transportRuns the script named
add-transport.argvis an empty array. -
script run echo Hello world!Runs the script named
echo, withargv[0]set to"Hello world!".
4.6.6. Reset the scripting environment: script reset
Resets the scripting environment. This clears all previously defined variables, and restores all global variables and functions that may have been modified by scripts.
Format: script reset
5. Coming in v2.0
Look forward to these features coming up in version 2.0 of Budget Buddy!
5.1. Managing budgets (coming in v2.0): budget
Budgets allow you to keep track of your spending limits! See how much money you still have left for the week, month, or year! With budgets, you can plan out your expenses easier than ever.
5.1.1. View budgets: budget list
Views the list of budgets currently stored. All budgets within the specified period will be displayed.
Format: budget list [f/<from date> t/<to date>|p/<this month|last month|this week|last week|today|yesterday>]
5.1.2. Add budgets: budget add
This command adds a new budget of a certain amount, with the specified date range or period.
Format: budget add x/<amount> [f/<from date> t/<to date>|p/<this month|last month|this week|last week|today|yesterday>]
5.1.3. Remove budgets: budget delete
This command removes a budget from the list given the budget ID.
Format: budget delete <budget ID>
5.2. Goal setting (coming in v2.0): goal
5.2.1. Add a goal: goal add
Adds a goal on the specified account to reach the specified amount by the target date or at the end of the specified period.
5.2.2. View goals: goal list
List all goals.
5.2.3. Delete goal(s): goal delete
Deletes the goal with the specified goal ID.
5.3. Managing categories (coming in v2.0): category
5.3.1. Add a category
Categories do not need to be added; you can simply use the category name and a new category will be created if no such one exists.
5.3.2. List categories: category list
Lists all categories.
5.3.3. Rename a category: category rename
Renames the specified category.
Note that this is the same as setting the category of all transactions of category old name to new name.
Format: category rename o/<old name> n/<new name>
5.3.4. Delete a category: category delete
Deletes the specified category. Note that this is the same as un-categorising all transactions under the specified category.
Format: category delete n/<name>
5.4. Viewing reports (coming in v2.0): report
Displays a report of every statistic recorded in Budget Buddy.
Format: report [[f/<from date>] [t/<to date>] | [p/<this month|last month|this week|last week|today|yesterday>]] [total|category]
5.5. Aliases (coming in v2.0): alias
5.5.1. Add an alias: alias add
Adds an alias.
Format: alias add <alias name> c/<alias replacement>
| Built-in commands take precedence. If you add an alias with the same name as a built-in command, it will have no effect. |
5.6. Import and export (coming in v2.0): import, export
5.6.1. Import a file: import
Imports transactions from the file at the given path.
Format: import [f/<format>] [p/<file path>]
5.6.2. Export transactions: export
Exports all transactions to the given path.
Format: export [p/<file path>]
5.7. Getting help with specific commands (coming in v2.0): help
Displays detailed help for a specific command.
Format: help <command word>
6. Scripting API
The Nashorn scripting engine is used. All features and Java class access of the Nashorn engine are available. See the Nashorn documentation for more details.
Budget Buddy defines a few global variables and functions to ease script writing. These are documented below.
Due to the nature of JavaScript, scripts may modify these variables and functions. To reset the script
environment, use the script reset command.
|
6.1. Global variables
The following global variables are predefined in the script environment.
-
bb: The application’s model, of typeModelManager.Modifying data through the model directly can result in inconsistent state, or corrupted data. Where possible, you are strongly recommended to use the helper functions documented below.
To discourage use of
bb, the API is intentionally left undocumented. You may refer to the Java source code if you wish to usebb.
6.2. Functions
The following helper functions are predefined in the script environment.
6.2.1. Account functions
-
refreshAccountView()Refreshes the account list after accounts have been added, modified or deleted. This does not activate the account tab.
-
getAccounts() → List<Account>Gets the list of all accounts.
-
getShownAccounts() → List<Account>Gets the list of accounts currently shown in the accounts tab. (This depends on the previous execution of the command
account find.)
-
getActiveAccount() → AccountGets the current active account.
-
setActiveAccount(index) → AccountSets the current active account.
Parameters:
-
index: the zero-based index of the account, as ingetShownAccounts()
-
-
getAccount(nameOrIndex) → AccountGets an account by name or index.
Parameters:
-
nameOrIndex: the zero-based index of the account, as ingetAccounts(), or the account’s name (case-sensitive) as astring
-
-
getShownAccount(index) → AccountGets an account by index.
Parameters:
-
index: the zero-based index of the account, as ingetShownAccounts()
-
-
addAccount(name, description) → AccountAdds an account with the given name and description.
Parameters:
-
name: the name of the account, as astring -
description: the description of the account, as astring
-
-
morphAccount(oldAccount, { name, description }) → AccountReturns a new
Accountthat is the same asoldAccountexcept for the specified properties changed.Parameters:
-
oldAccount: theAccountto morph -
The remaining parameters are as in
addAccount. -
If a parameter is not specified, then the associated property is not changed.
-
-
editAccount(nameOrIndex, { name, description }) → AccountEdits the specified account, changing the specified properties, and returns the edited account.
Parameters:
-
nameOrIndex: the zero-based index of the account, as ingetAccounts(), or the account’s name (case-sensitive) as astring -
The remaining parameters are as in
addAccount. -
If a parameter is not specified, then the associated property is not changed.
-
-
deleteAccount(nameOrIndex)Deletes the specified account.
Parameters:
-
nameOrIndex: the zero-based index of the account, as ingetAccounts(), or the account’s name (case-sensitive) as astring
-
-
accountName(account) → stringGets the account’s name.
-
accountDescription(account) → stringGets the account’s description.
-
accountBalance(account) → numberGets the account’s balance, in cents.
-
accountTxns(account) → List<Transaction>Gets the list of transactions of the account.
6.2.2. Transaction functions
-
refreshTxnView()Refreshes the transaction list after transactions have been added, modified or deleted. This does not activate the transaction tab.
-
addTxn(amount, direction, description, { account, date, categories }) → TransactionAdds a transaction with the given information.
Parameters:
-
amount: the amount in cents as anumber -
direction: the direction, either'IN'or'OUT' -
description: the description as astring -
account: theAccountto add the transaction to; defaults togetActiveAccount() -
date: the date of the transaction, either as aLocalDateor astringparsable byparseDate; defaults to today’s date -
categories: the categories of the transaction, as an array ofstring; defaults to empty
-
-
morphTxn(oldTxn, { amount, direction, description, date, categories }) → TransactionReturns a new
Transactionthat is the same asoldTxnexcept for the specified properties changed.Parameters:
-
oldTxn: theTransactionto morph -
The remaining parameters are as in
addTxn. -
If a parameter is not specified, then the associated property is not changed.
-
-
editTxn(account, oldTxn, { amount, direction, description, date, categories }) → TransactionEdits the given transaction, changing the specified properties, and returns the edited transaction.
Parameters:
-
account: theAccountcontainingoldTxn -
oldTxn: theTransactionto edit -
The remaining parameters are as in
addTxn. -
If a parameter is not specified, then the associated property is not changed.
-
-
deleteTxn(account, txn)Deletes the given transaction from the given account.
-
getShownTxn(index) → TransactionGets a transaction by index.
Parameters:
-
index: the zero-based index of the transaction, as ingetShownTxns()
-
-
editShownTxn(index, { amount, direction, description, date, categories }) → TransactionEdits a transaction, changing the specified properties, and returns the edited transaction.
Parameters:
-
index: the zero-based index of the transaction, as ingetShownTxns() -
The remaining parameters are as in
addTxn. -
If a parameter is not specified, then the associated property is not changed.
-
-
deleteShownTxn(index)Deletes a transaction.
Parameters:
-
index: the zero-based index of the transaction, as ingetShownTxns()
-
-
getShownTxns() → List<Transaction>Gets the list of transactions currently shown in the transactions tab. (This depends on the current active account as well as the last time the view was refreshed.)
-
txnAmount(txn) → numberGets the amount of the transaction, in cents.
-
txnDescription(txn) → stringGets the description of the transaction.
-
txnDate(txn) → LocalDateGets the date of the transaction.
-
txnDirection(txn) → string ("IN" | "OUT")Gets the direction of the transaction.
-
txnCategories(txn) → [string]Gets the categories the transaction is in, as an array of
strings.
6.2.3. Loan functions
-
addLoan(amount, direction, person, { description, date, paid }) → LoanAdds a loan with the given information.
Parameters:
-
amount: the amount in cents as anumber -
direction: the direction, either'IN'or'OUT' -
person: the name of the other party as astring -
description: the description as astring; defaults to empty -
date: the date of the loan, either as aLocalDateor astringparsable byparseDate; defaults to today’s date -
paid: whether the loan is paid; eithertrueorfalse; defaults tofalse
-
-
morphLoan(loan, { amount, direction, person, description, date, paid }) → LoanReturns a new
Loanthat is the same asloanexcept for the specified properties changed.Parameters:
-
loan: theLoanto morph -
The remaining parameters are as in
addLoan. -
If a parameter is not specified, then the associated property is not changed.
-
-
editShownLoan(index, { amount, direction, person, description, date, paid }) → LoanEdits the given loan, changing the specified properties, and returns the edited loan.
Parameters:
-
index: the zero-based index of the transaction, as ingetShownLoans() -
The remaining parameters are as in
addLoan. -
If a parameter is not specified, then the associated property is not changed.
-
-
deleteShownLoan(index)Deletes the specified loan.
Parameters:
-
index: the zero-based index of the transaction, as ingetShownLoans()
-
-
getShownLoans() → List<Loan>Gets the loans currently shown in the loans tab. (This depends on the previous execution of the command
loan list.)
-
getLoans() → List<Loan>Gets all loans.
-
loanAmount(loan) → numberGets the amount in cents of the loan.
-
loanDirection(loan) → string ("IN" | "OUT")Gets the direction of the loan.
-
loanPerson(loan) → stringGets the name of the other party in the loan.
-
loanDate(loan) → LocalDateGets the date of the loan.
-
loanDescription(loan) → stringGets the loan’s description.
-
loanIsPaid(loan) → booleanReturns
trueif the loan is paid;falseotherwise.
6.2.4. Miscellaneous functions
-
parseDate(date) → LocalDateParses a date.
Parameters:
-
date: The date, as astringin the formatd/M/yyyy, e.g."1/1/2011"
-
-
makeDate(year, month, day) → LocalDateConstructs a date from the year, month and day, passed as
numbers.
-
showAlert(title, message)Shows an alert dialog and waits for the user to dismiss the dialog.
-
executeCommand(command) → CommandResultExecutes a command.
This may only be executed from the JavaFX application thread. Behaviour is undefined if this is called from a background thread.
While Budget Buddy does not by itself run commands from background threads, scripts are free to create threads. Parameters:
-
command: The command, as astring.You are recommended not to use this, where possible, and instead use the other helper functions documented above.
Use of this function may result in undefined behaviour.
-
7. FAQ
Q: Which version of Java do I require to run this application?
A: Java 11
Q: How do I switch between the different tabs without clicking on them?
A: Simply execute the list command for that category, e.g. rule list.
Executing any command from that category will switch you over as well.
You can also use the hotkey Ctrl+D to jump between consecutive tabs in the list.
Q: How do I reset the application data?
A: All data is stored within the same folder as your execution path, under the data/ folder.
Deleting that folder will reset the application data upon rebooting the application.
8. Command Summary
8.1. Help
-
help- Get the link to the user guide
8.2. Transactions
-
txn out|in- Add a new transaction -
txn list- List transactions for the active account -
txn edit- Edit a transaction -
txn delete- Delete a transaction
8.3. Accounts
-
account add- Add a new account -
account list- List accounts -
account switch- Switch the current active account -
account edit- Edit an account -
account find- Find accounts -
account report- Print a report of an account -
account overview- Export HTML overview of all accounts -
account delete- Delete an account
8.4. Loans
-
loan out|in- Add a new loan -
loan list- List loans -
loan edit- Edit a loan -
loan paid- Mark loan(s) as paid -
loan unpaid- Mark loan(s) as unpaid -
loan delete- Delete loan(s) -
loan split- Split a bill
8.5. Rules
-
rule add- Add a new rule -
rule list- List rules -
rule swap- Swap rule positions -
rule edit- Edit a rule -
rule delete- Delete a rule
8.6. Script
-
script eval- Evaluate a script -
script add- Add a script -
script list- List scripts -
script run- Run an added script -
script delete- Delete a script -
script reset- Reset the scripting environment