By: CS2103T W13-4
1. Setting up
Refer to the guide here.
2. Design
2.1. Architecture
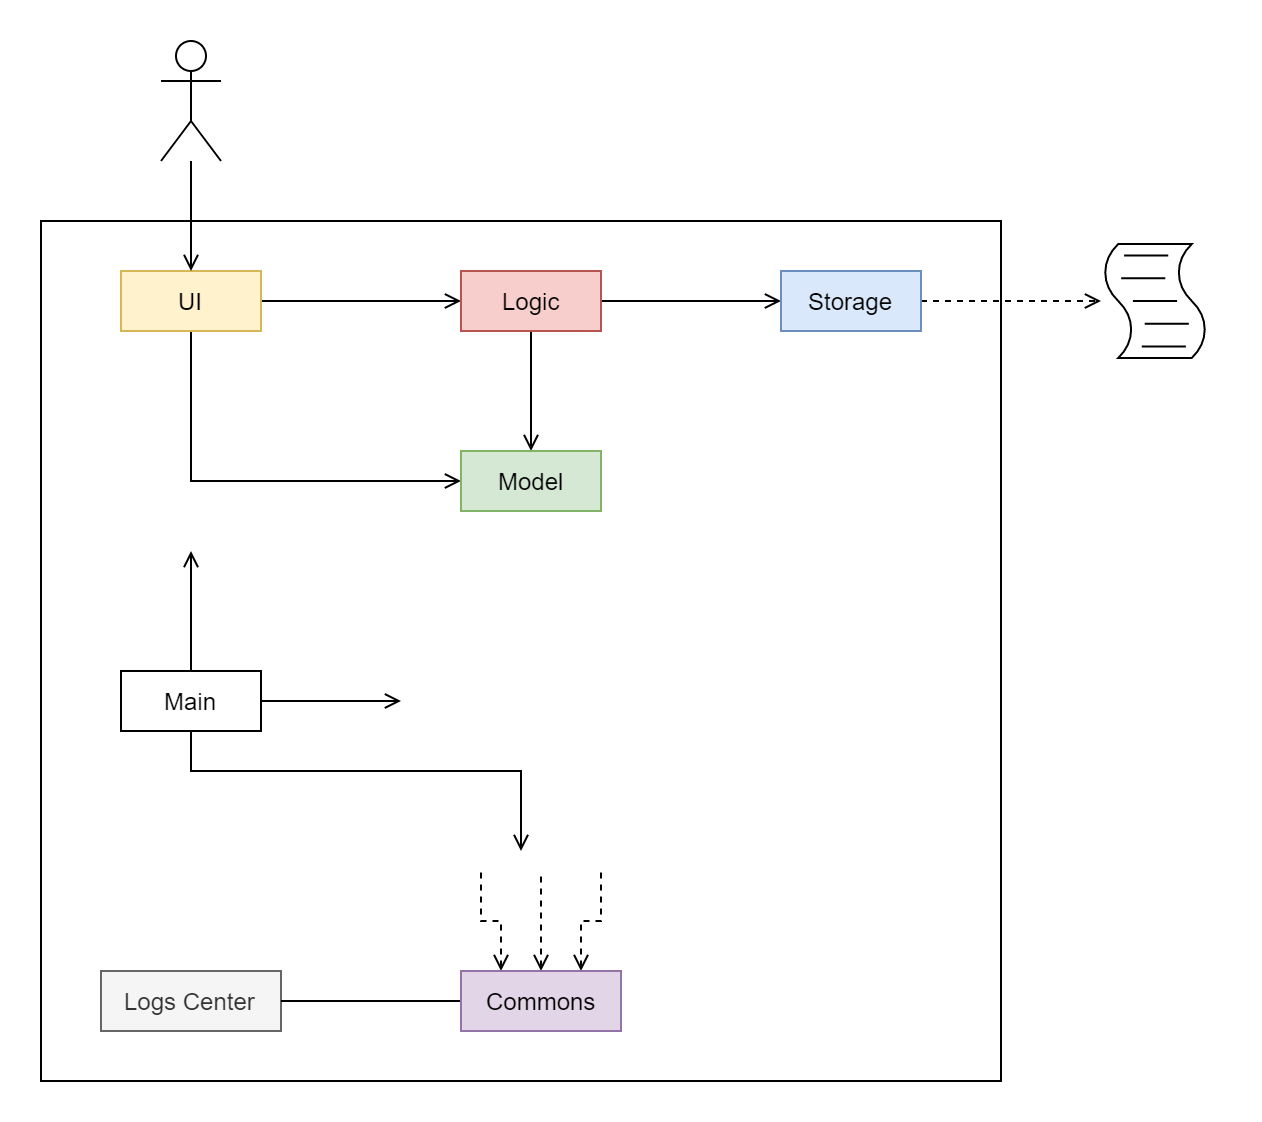
The Architecture Diagram given above explains the high-level design of the App. Given below is a quick overview of each component.
-
At app launch, initialising the components in the correct sequence, and connecting them up with each other.
-
At shut down, shutting down the components and invoking cleanup methods where necessary.
Commons represents a collection of classes used by multiple other components.
The following class plays an important role at the architecture level:
-
LogsCenter: Used by many classes to write log messages to the App’s log file.
The rest of the App consists of four components.
Each of the four components
-
Defines its API in an
interfacewith the same name as the Component. -
Exposes its functionality using a
{Component Name}Managerclass.
For example, the Logic component (see the class diagram given below) defines it’s API in the Logic.java interface and exposes its functionality using the LogicManager.java class.
How the architecture components interact with each other
The Sequence Diagram below shows how the components interact with each other
for the scenario where the user issues the command account delete 1.
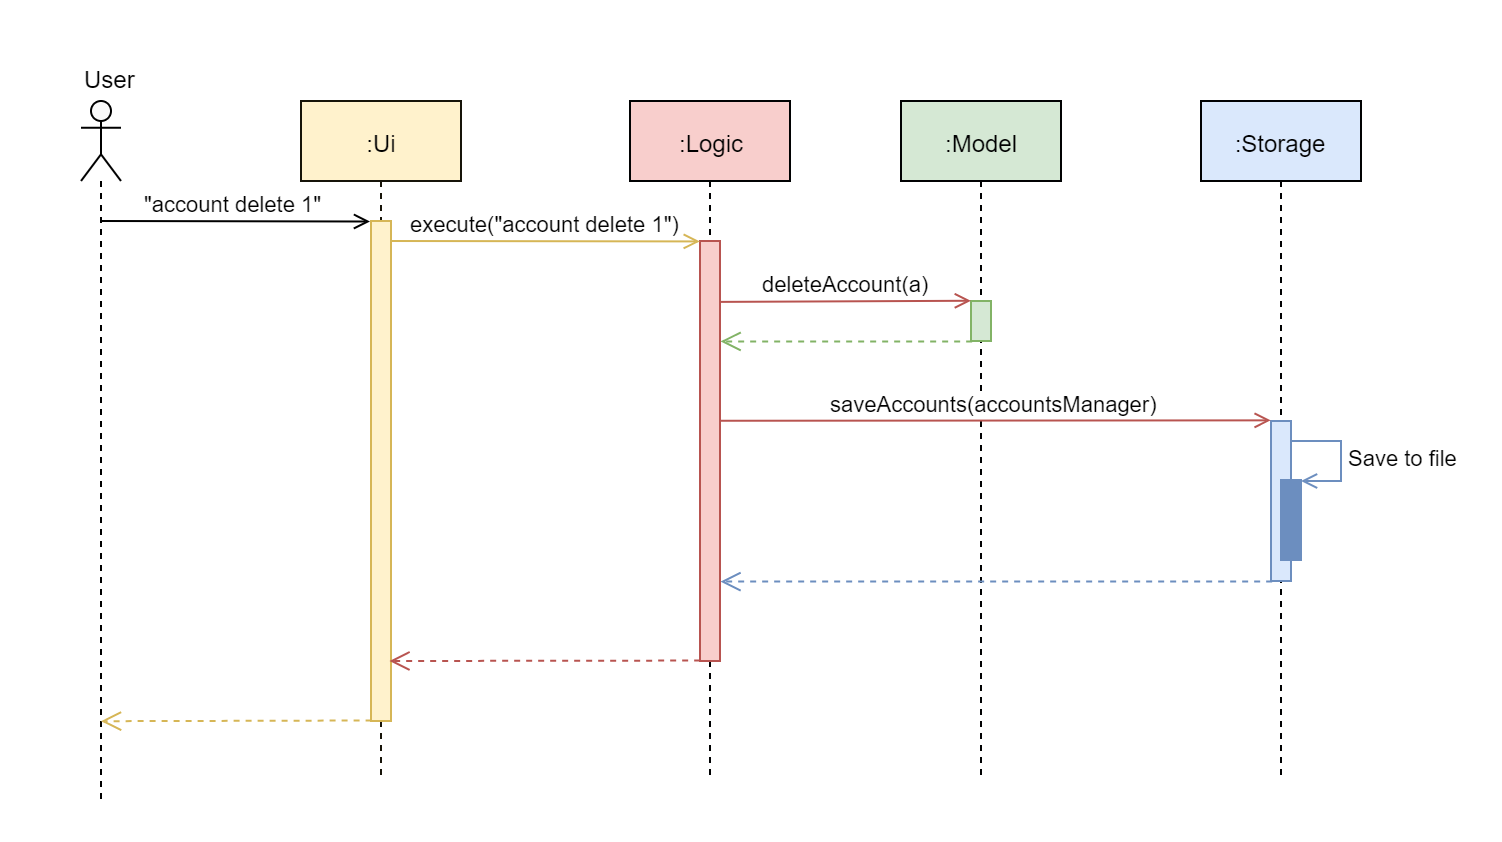
account delete 1 commandThe sections below give more details of each component.
2.2. UI component
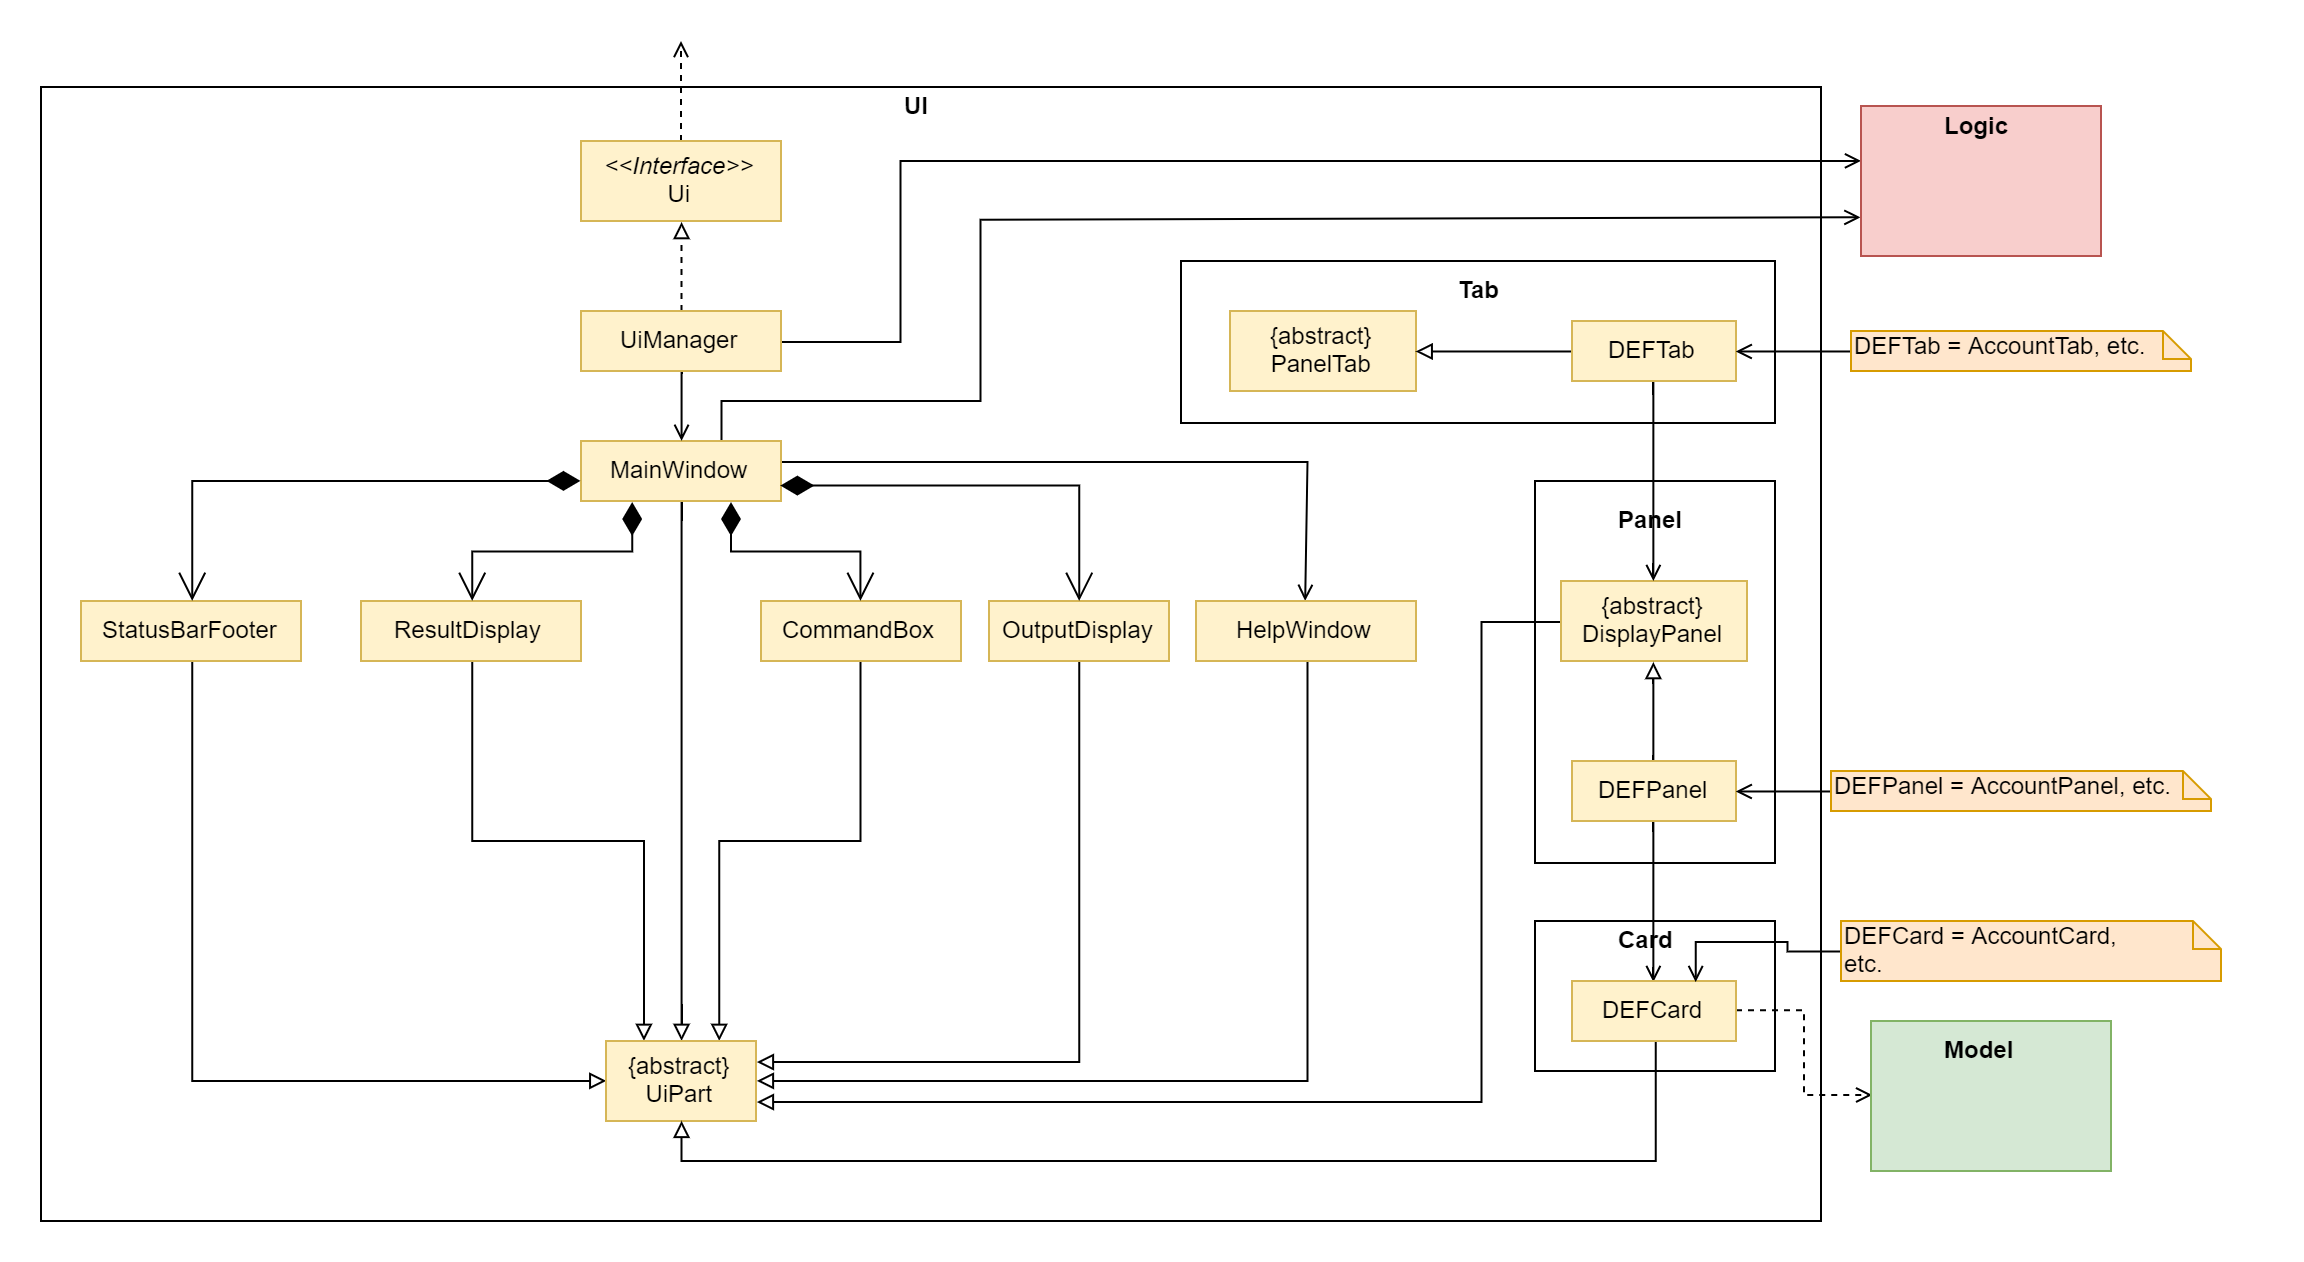
API : Ui.java
The UI consists of a MainWindow that is made up of parts e.g.CommandBox, ResultDisplay, ListPanel, StatusBarFooter etc. All these, including the MainWindow, inherit from the abstract UiPart class.
The UI component uses JavaFx UI framework. The layout of these UI parts are defined in matching .fxml files that are in the src/main/resources/view folder. For example, the layout of the MainWindow is specified in MainWindow.fxml
The UI component,
-
Executes user commands using the
Logiccomponent. -
Listens for changes to
Modeldata so that the UI can be updated with the modified data.
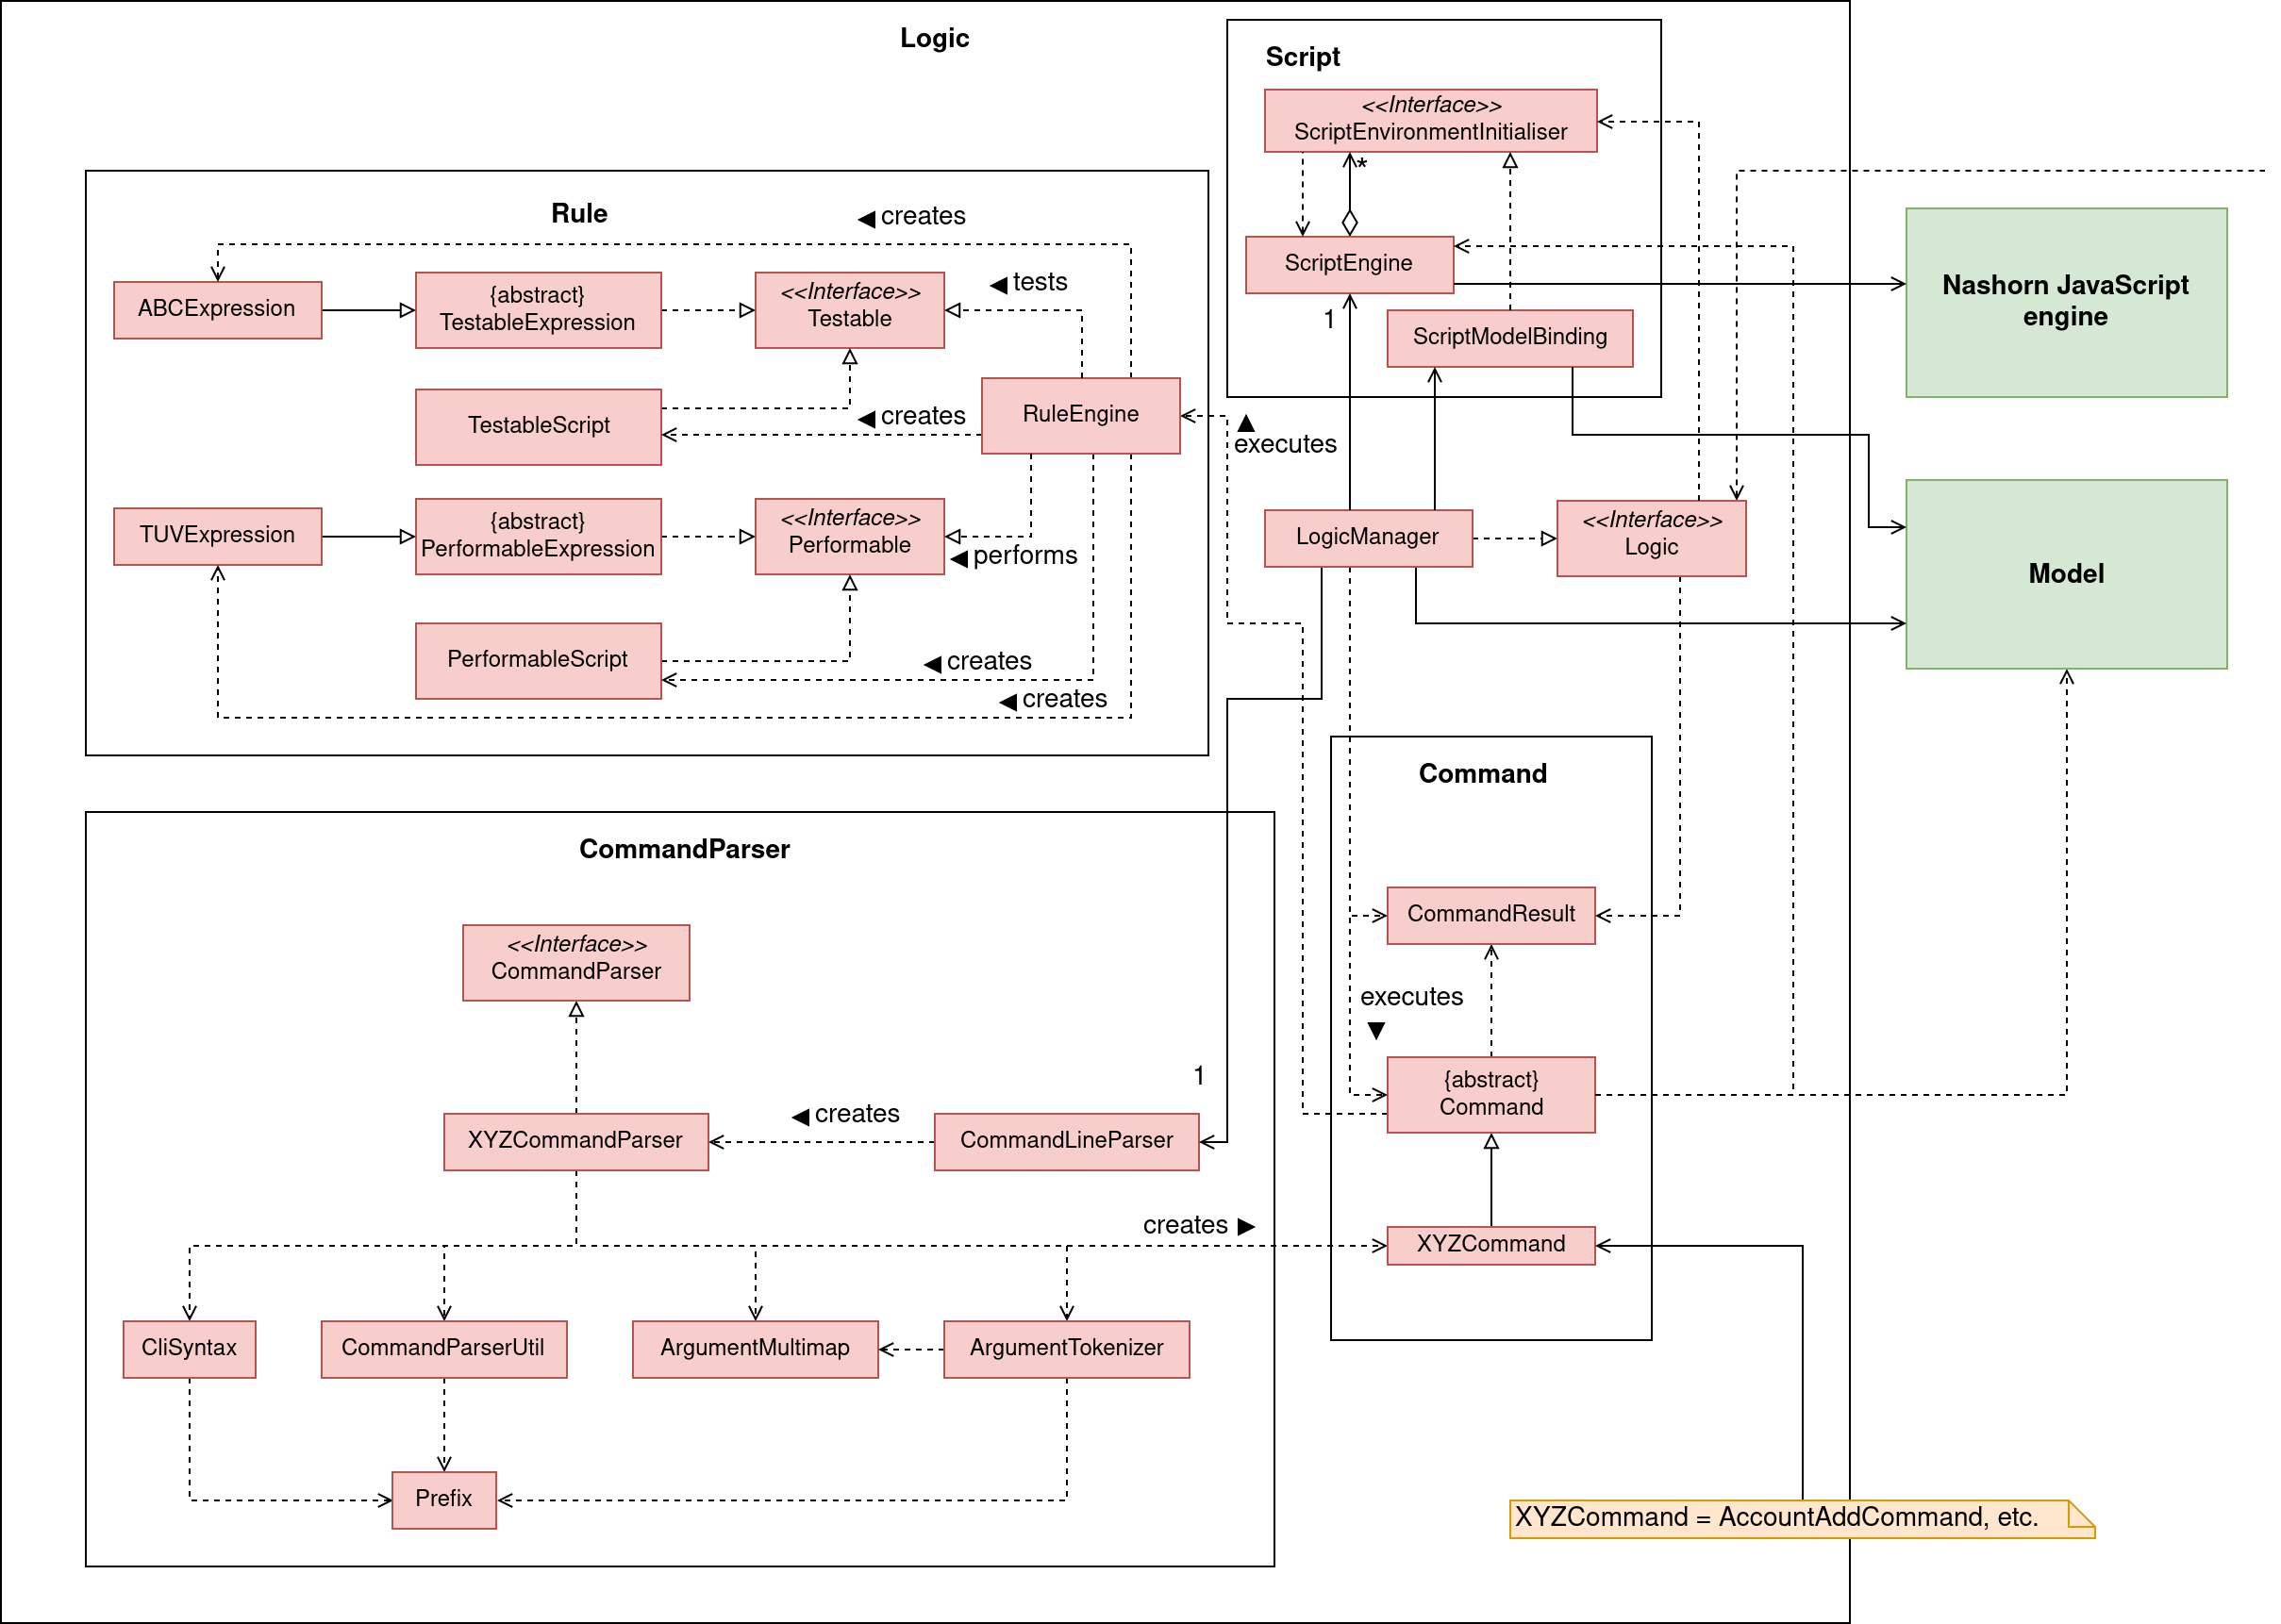
2.3. Logic component
API :
Logic.java
-
Logicuses theCommandLineParserclass to parse the user command. -
This results in a
Commandobject which is executed by theLogicManager. -
The command execution can affect the
Model(e.g. adding a loan). -
The result of the command execution is encapsulated as a
CommandResultobject which is passed back to theUi. -
The
CommandResultis used to display feedback to the user and update the current active tab based on itsCommandCategory. -
For certain commands (e.g.
help,script add) theCommandResultwill have aCommandContinuationthat will perform further actions or return a newCommandResultto evaluate again.
Given below is the Sequence Diagram for interactions within the Logic component for the execute("account delete 1") API call.
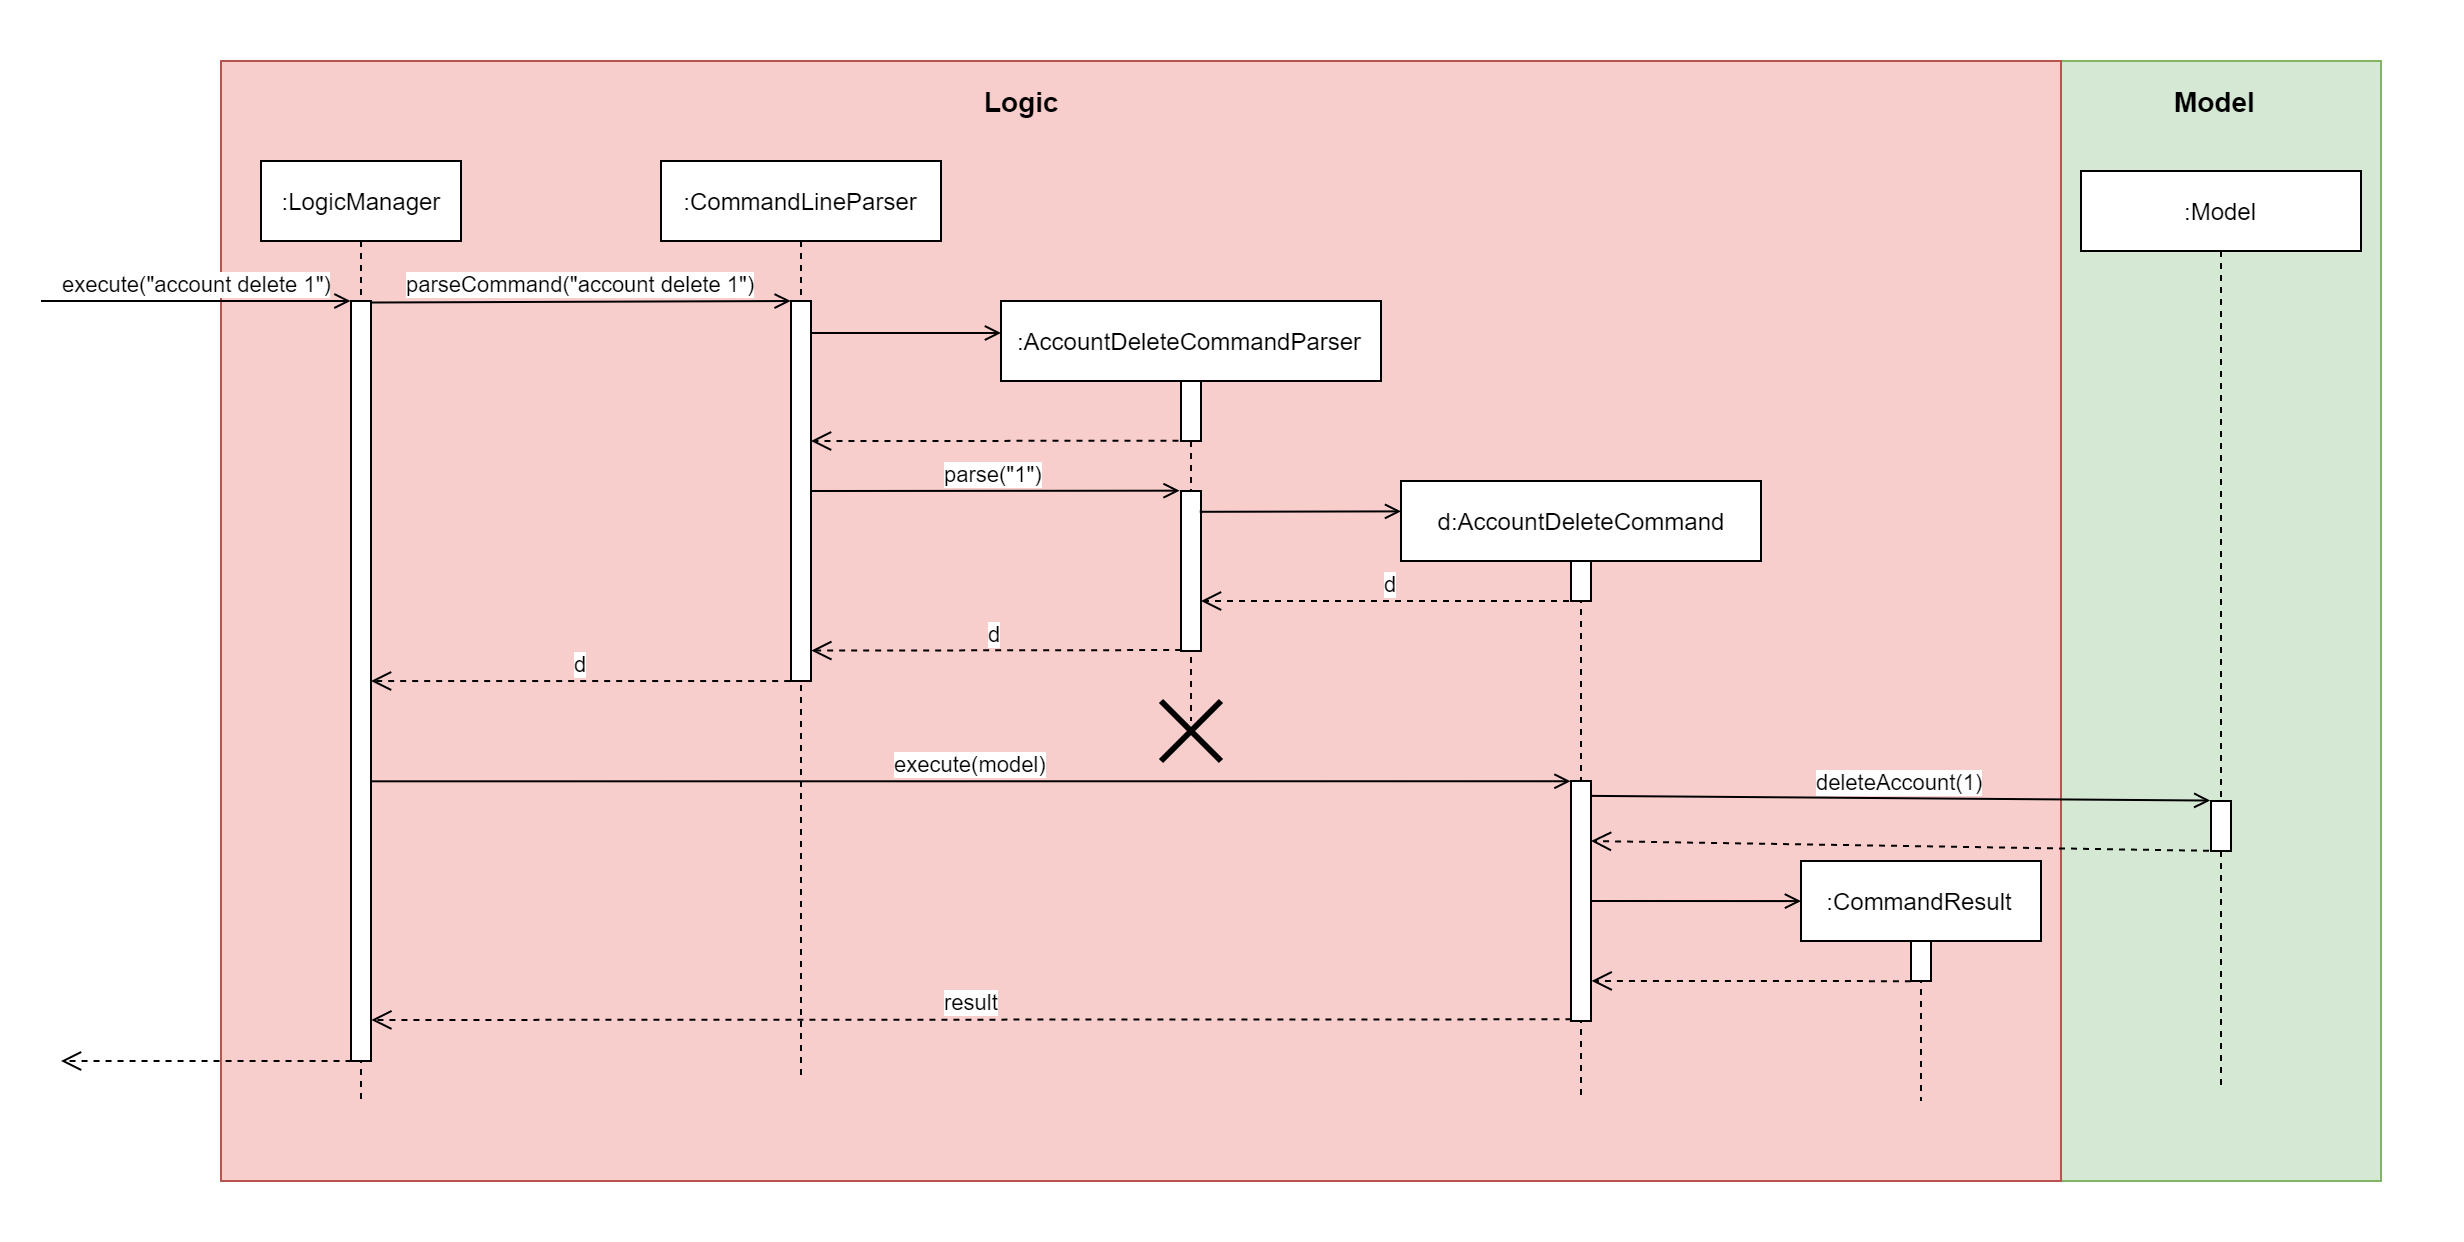
account delete 1 Command2.4. Model component
The lower levels of each XYZManager class can be viewed in their respective sections in the Implementation section.
For example, a more detailed class diagram of the AccountsManager can be found in Section 3.1.1.
|
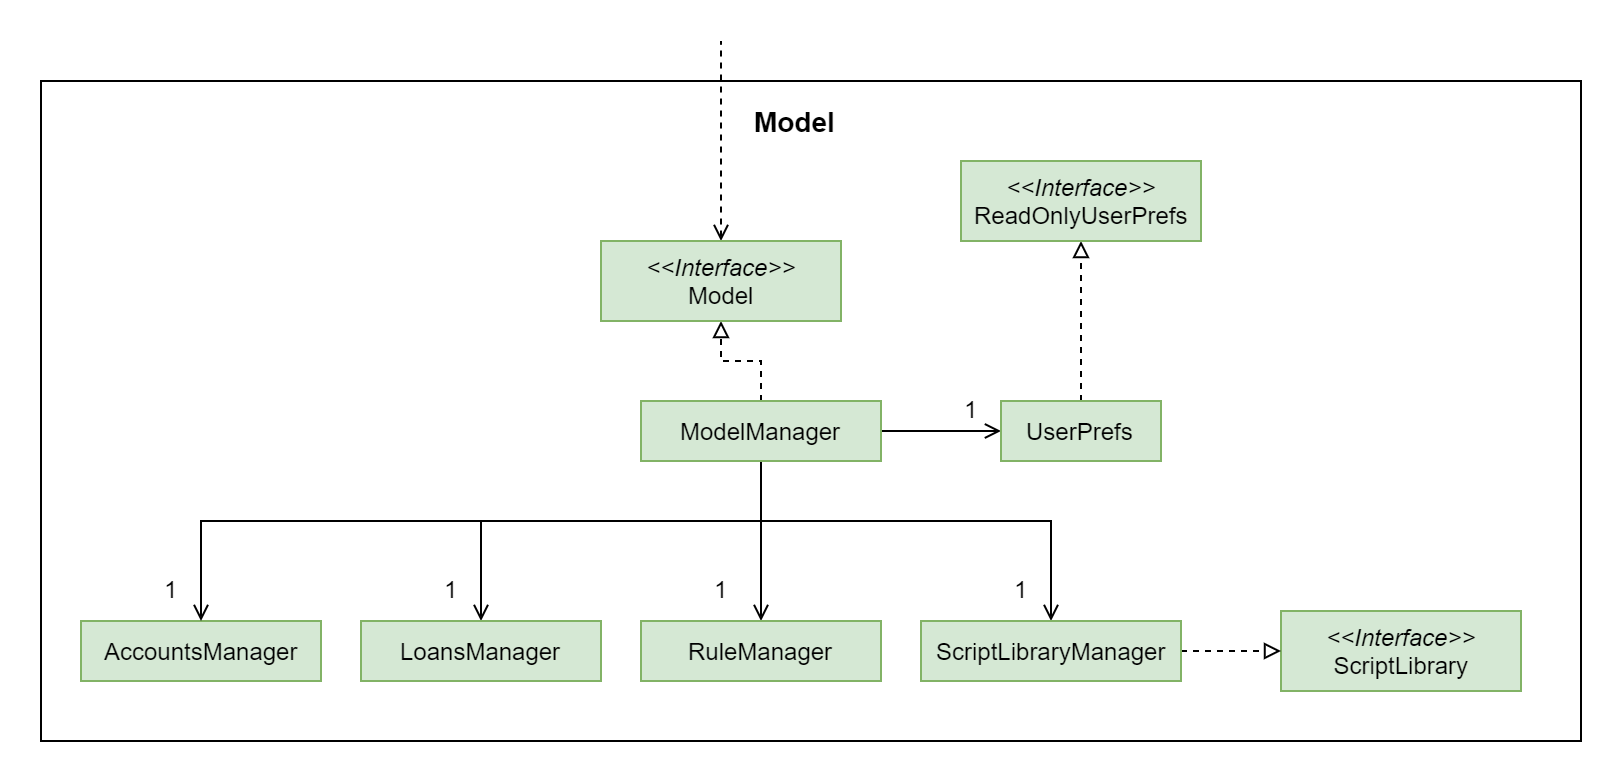
API : Model.java
The Model,
-
stores a
UserPrefobject that represents the user’s preferences. -
stores Budget Buddy’s data.
-
exposes multiple unmodifiable
ObservableLists that can be 'observed' e.g. the differentDisplayPanels in UI are bound to these lists so that the UI automatically updates when the data in the lists change. -
does not depend on any of the other three components.
2.5. Storage component
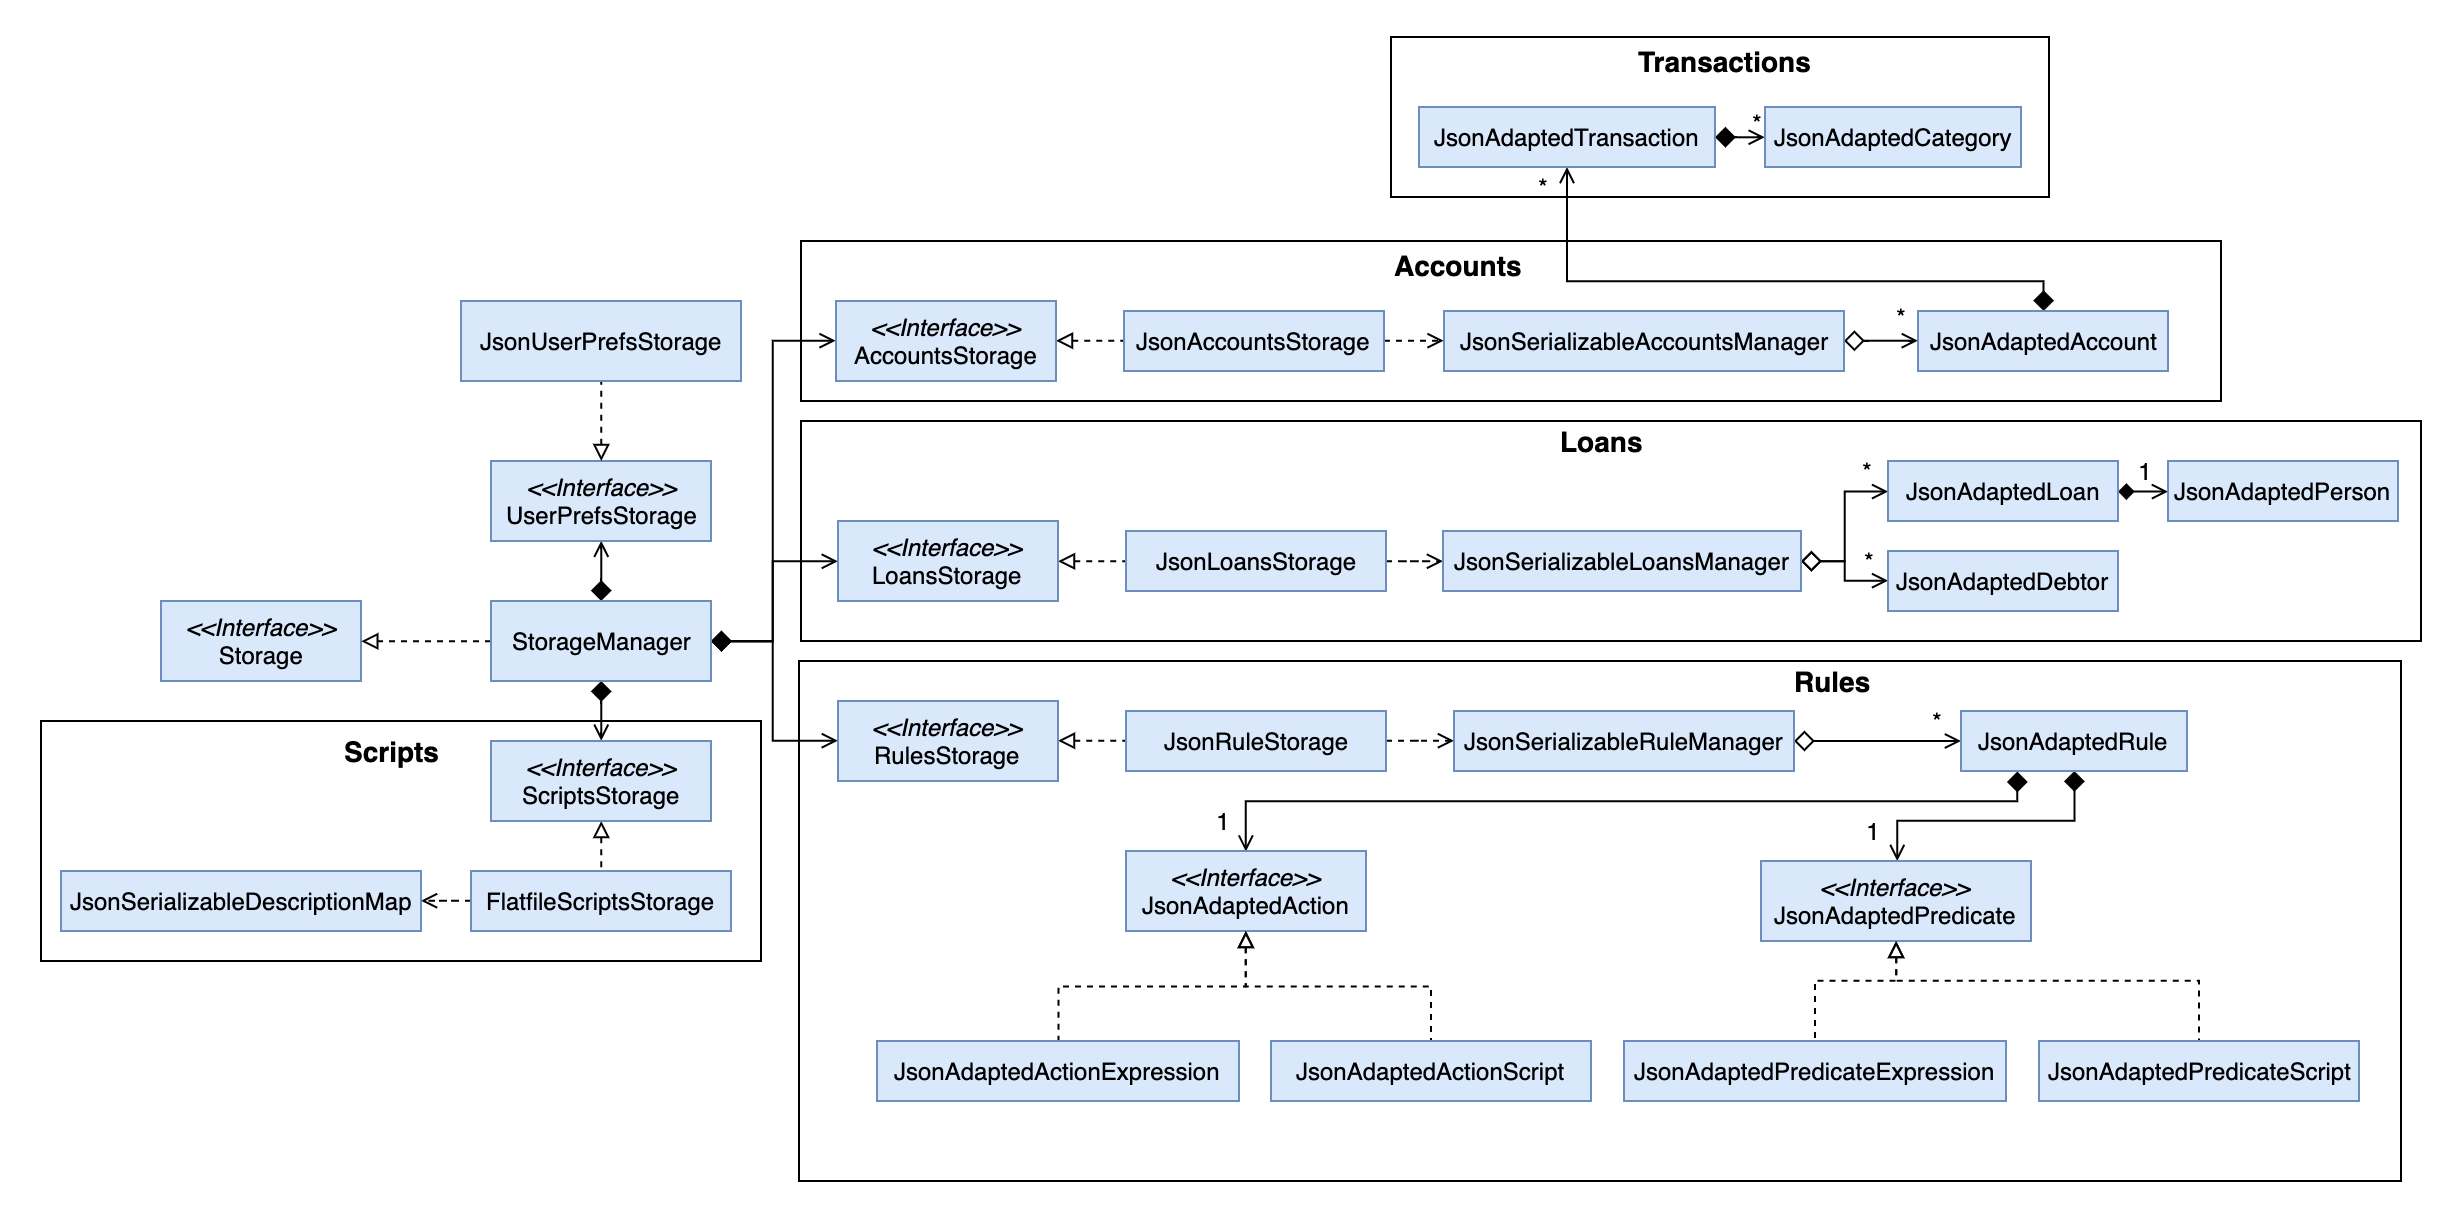
API : Storage.java
The Storage component
-
can save
UserPrefobjects in JSON format and read it back. -
can save Budget Buddy’s data in JSON format and read it back.
Budget Buddy saves its data in a few different JSON files,
namely accounts.json, loans.json, rules.json and /scripts/descriptions.json.
In addition, the user’s custom scripts are saved in the /scripts/ folder.
2.6. Common classes
Classes used by multiple components are in the budgetbuddy.commons package.
3. Implementation
This section describes some noteworthy details on how certain features are implemented.
3.1. Accounts Feature
3.1.1. Implementation
The Accounts Feature allows the users to manage their accounts.
It is managed by AccountsManager, with Account objects stored internally in an accounts and filteredAccounts.
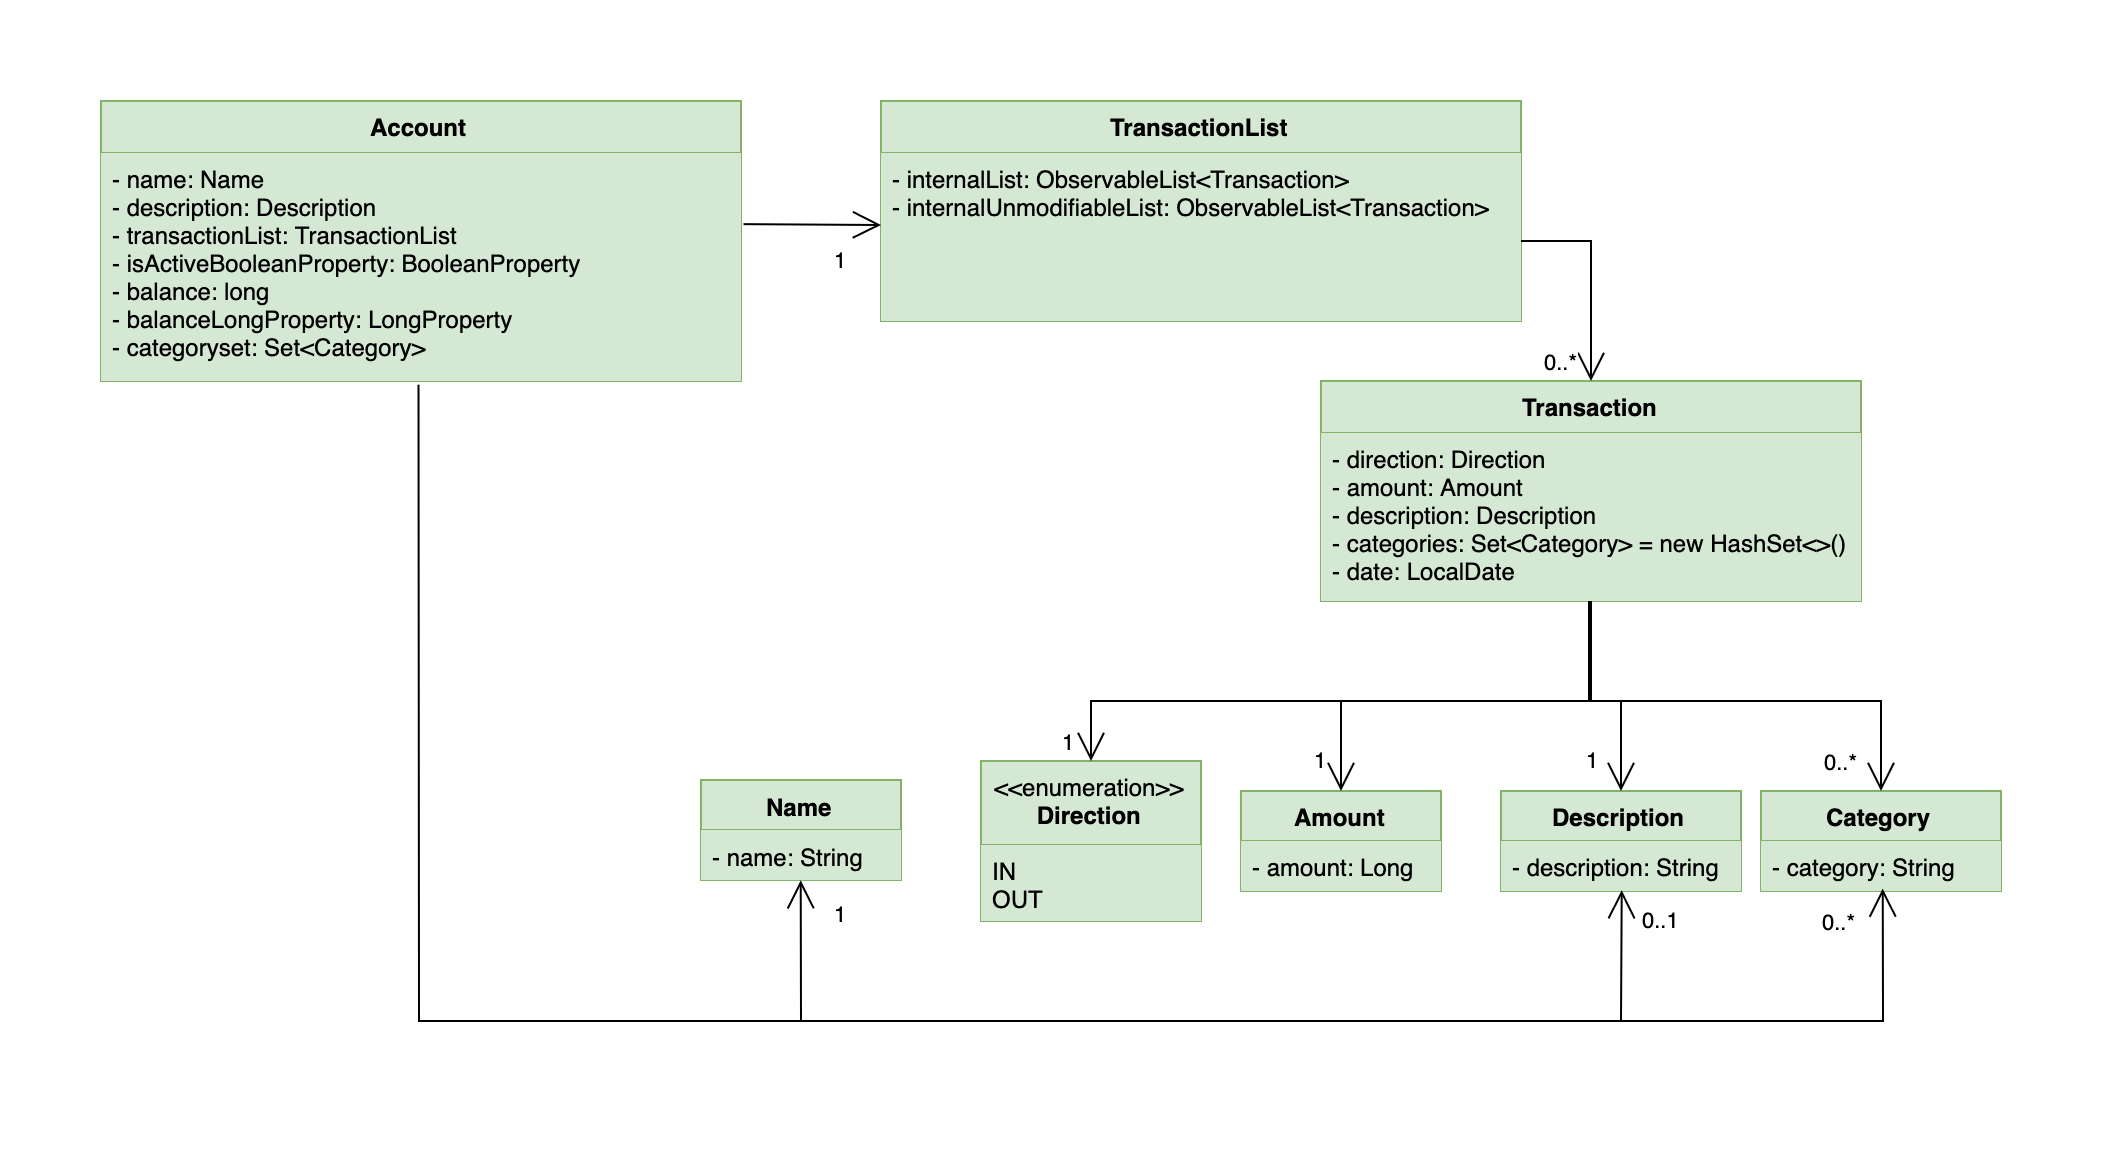
The class diagram below shows how the AccountsManager manages its list of Account objects:
![][width=85%](images/accountclassdiagram.png)
Each Account object has the following attributes:
-
name:Name— The name of account created. -
description:Description— A description of the account to describe the use of the account. -
transactionList:TransactionList— The list of transactions associated with the account. -
isActiveBooleanProperty:BooleanProperty— The boolean property indicating whether an account is active or inactive. -
balance:long— The balance of the account, calculated by the net sum of expenses and income. -
balanceLongProperty:LongProperty— The Long property of the balance. -
categoryset:Set<Category>— The set of categories involved in the account.
To facilitate the manipulation of Account objects, AccountsManager implements the following operations:
-
AccountsManager#updateFilteredAccountList(Predicate<Account> predicate)— Updates the predicate offilteredAccounts. -
AccountsManager#getFilteredAccountList()— Gets the list offilteredAccountsafter applying itspredicate. -
AccountsManager#resetFilteredAccountList()— ResetfilteredAccountsso that all accounts present inaccountsexist infilteredAccounts. -
AccountsManager#getActiveTransactionList()— Gets theactiveTransactionListof the active account. -
AccountsManager#getAccounts()— Gets the list ofaccounts. -
AccountsManager#size()— Gets the size of theaccountslist. -
AccountsManager#addAccount(Account toAdd)— Adds theAccount toAddtoaccounts. -
AccountsManager#deleteAccount(Account toDelete)— Deletes the account atIndex toDeletefromaccounts. -
AccountsManager#editAccount(Index toEdit, Account editedAccount)— Edits the account atIndex Editto matchAccount editedAccount. -
AccountsManager#switchActiveAccount(Index targetAccountIndex)— Inactivate the current active account, and activate the target account. -
AccountsManager#unsetActiveAccount()— Inactivate any currently active account. -
AccountsManager#setActiveAccount(Index toSet)— Activate the target account. -
AccountsManager#getAccount()— Gets the target account. -
AccountsManager#getActiveAccountIndex()— Gets the index of the currently active account. -
AccountsManager#getActiveAccount()— Gets the currently active account. -
AccountsManager#transactionListSwitchSource(Account account)— Switches the account source for the TransactionList. -
AccountsManager#transactionListUpdateSource()— Updates the transactionList linked to the currentActiveAccount. -
AccountsManager#exportReport()— Exports the overview report of all accounts. When the user inputs a command, several of the above operations are carried out. For example,account editwill callAccountsManager#resetFilteredAccountListto update thefilteredAccounts, so that all accounts present inaccountswill be present infilteredAccounts, thenAccountsManager#editAccountto edit the account, finallyAccountsManager#getFilteredAccountList()to display the list of accounts.
After each command, the list of accounts is saved in accounts.json,
which is stored in a data folder in the same directory as budgetbuddy.jar.
Given below is an example usage scenario and how the AccountsManager behaves at each step.
Step 1. The user launches the application.
If this is the first time it is launched,
accounts.json is created and the AccountsManager initializes with an accounts containing a default account.
Otherwise, the data in accounts.json is loaded into accounts.
Step 2. The user executes account add n/Japan trip d/expense spent in Japan to add a new account.
This creates a new account toAdd with the name as Japan trip and description as expense spent in Japan.
AccountsManager#addAccount(Account toAdd) adds toAdd to accounts.
filteredAccountList will be automatically updated to match accounts.
Step 3. The user executes the command account find trip to find account contains the keyword trip specified.
AccountsManager#updateFilteredAccountList sets the predicate of filteredAccounts according to the input parameters.
Finally, AccountsManager#getFilteredAccounts retrieves an immutable version of filteredAccounts (filtered) to display to the user.
In this case, an account with the name as Japan trip and description as expense spent in Japan will be displayed.
The following sequence diagram shows how finding the accounts containing specified keyword works:
![][width=85%](images/AccountSequenceDiagram.png)
Most of the commands and operations behave in the same way. The only difference will be the the action taken by the operation (e.g. finding account or adding account).
Step 4. The user executes account delete 2 to delete the second account in the accounts.
Firstly, AccountsManager#resetFilteredAccountList will update the filteredAccounts,
so that all accounts present in accounts will be present in filteredAccounts,
then AccountsManager#deleteAccount deletes toDelete account from accounts.
Step 5. The user executes account edit 3 n/food to edit the name of the first account.
A new editedAccount is created, which is the same as the first third account except for its name which is food.
AccountsManager#editAccount(Index toEdit, Account editedAccount replaces the account at index toEdit with editedAccount.
The activity diagram below shows what happens when the user executes account edit:
![][width=85%](images/AccountActivityDiagram.png)
Step 6. The user executes account report 2 to view the details of the second account.
Firstly, AccountsManager#resetFilteredAccountList will update the filteredAccounts,
so that all accounts present in accounts will be present in filteredAccounts,
then AccountsManager#getAccount and Account#getAccountInfo are used to display the details of the second account.
Step 7. The user executes account overview to view the report of all accounts in an html export file.
Firstly, AccountsManager#resetFilteredAccountList will update the filteredAccounts,
so that all accounts present in accounts will be present in filteredAccounts,
then AccountsManager#exportReport generates the overview of all accounts html file to the exports folder.
For account edit, account delete and account report,
if the user targets an index beyond the last index,
an error message is displayed.
|
3.1.2. Design Considerations
Aspect: Interaction with ui - the list retrieved by LogicManager
In the mainWindow of ui, AccountTab is associated with a list of accounts. However, two lists of accounts are required.
One stores all the current accounts present in accounts, the other one stores the filteredAccounts with the filtered accounts after account find executes.
-
Alternative 1 (current choice):
AccountTabis only associated withfilteredAccountsasfilteredAccountsstores all accounts. After each command,AccountsManager#resetFilteredAccountListis called to reset the predicate to be true, so thatfilteredAccountsmatchesaccounts.-
Pros: Only one list of accounts is associated with
LogicManager. -
Cons: It is counter-intuitive as
filteredAccountsis supposed to stored the accounts that have been selected.
-
-
Alternative 2:
AccountListPanelis associated with bothfilteredAccountsandaccounts, and the display of the list switches when necessary.-
Pros: Easy to understand and align with the common sense.
-
Cons: Hard to implement.
-
3.2. Active Account
3.2.1. Implementation
The active Account allows operations on Transaction objects to not have to specify the concerning Account when
the command is entered. This allows for a more user-friendly and intuitive experience with managing finances. By updating
ActiveAccountIndex where appropriate, the activeAccount is implemented on the idea that users want to continue to
manipulate transactions within the same Account that they last interacted with.
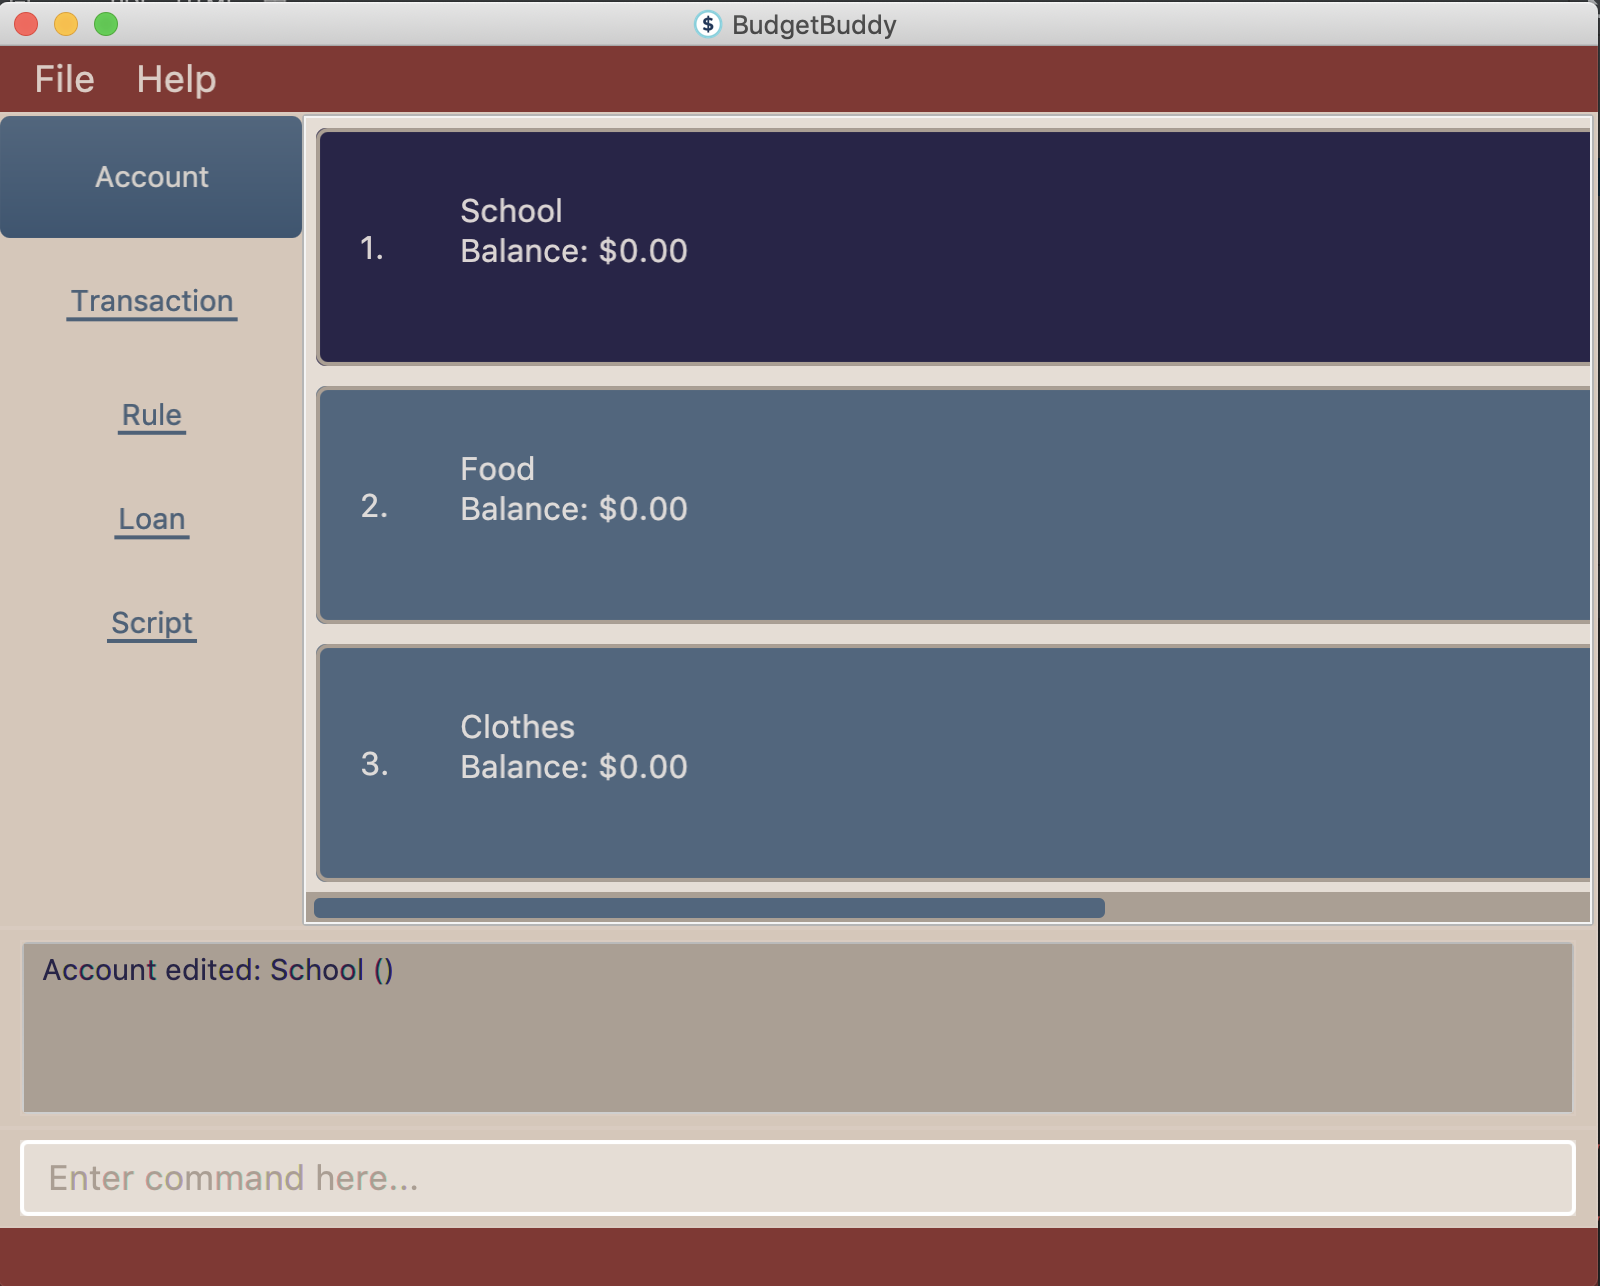
The current active Account is indicated in the UI by a highlight as shown below.
The following user commands, if executed successfully, can change the active account:
-
AccountAddCommand— The addedAccountbecomes the active account. -
AccountDeleteCommand— If the activeAccountis deleted, a new activeAccountwill be selected. -
AccountEditCommand— The editedAccountbecomes the active account. -
AccountFindCommand— The firstAccountin the list is set as the activeAccount. -
AccountListCommand— The firstAccountin the list is set as the activeAccount. -
AccountReportCommand— The targetAccountis set as the new activeAccount. -
AccountSwitchCommand— The targetAccountis set as the new activeAccount. -
TransactionAddCommand— The targetAccountis set as the new activeAccount. -
TransactionEditCommand— The targetAccountis set as the new activeAccount.
3.2.2. Design Considerations
Aspect: responsive UI for showing the active Account
An Extractor is used to update the UI when an Account is set as active, or when the balance is updated. This is because
the FilteredList<Account> only updates automatically when the Accounts themselves are changed, but not when their internal
elements are altered.
-
Alternative 1 (current choice): Use an
Extractorto listen for changes toisActiveBooleanPropertyandbalanceLongProperty.-
Pros: Less overhead/unnecessary movement of accounts
-
Cons: Not as easy for new developers to understand and implement.
-
-
Alternative 2: Refresh the account list by forcing removal and re-addition of each of the accounts.
-
Pros: Easy to implement, no need to change members to adapt to the
Propertyclass, and easier for newer developers to read and understand. -
Cons: High overhead, as more and more accounts are added to the BudgetBuddy.
-
3.3. Transaction Model
3.3.1. Implementation
Transactions are the main elements of the BudgetBuddy’s expenses tracker. Within each Account, a TransactionList is
stored, and inside each TransactionList, Transaction objects are stored internally in the internalList of the
TransactionList.
The class diagram below shows how Transaction objects are stored within an Account.
Each Transaction object must have:
-
direction: Direction— The direction of the transaction (eitherINfor money inflow orOUTfor money outflow). -
amount: Amount— The amount of money transacted. -
date: LocalDate— The date of the transaction.
Optional attributes for Transaction objects:
-
description: Description— A short description about the transaction. -
categories: Set<Category>— ASetofCategoryobjects that categorize the transaction.
Because Transaction and TransactionList objects are contained within Account objects, which are in turn stored within the
AccountsManager, it is called when any operations is made on a Transaction. Additionally, AccountsManager has an
activeTransactionList which holds the TransactionList of the current active Account. activeTransactionList is then
wrapped by a SortedList and FilteredList to enable the sorting and filtering of the Transaction objects.
These methods in AccountsManager below that manipulate the activeTransactionList are called when the list of
transactions needs to be filtered/sorted:
-
AccountsManager#getFilteredTransactionList()— Returns anObservableListof the filtered transactions. -
AccountsManager#updateFilteredTransactionList(Predicate<Transaction> predicate)— Updates thePredicate<Transaction>of theFilteredListto filter by the givenPredicate<Transaction> -
AccountsManager#resetFilteredTransactionList()— Resets and removes any filter on theFilteredList. -
AccountsManager#updateSortedTransactionList(Comparator<Transaction> comparator)— Updates theComparator<Transaction>of theSortedListto sort by the givenComparator<Transaction> -
AccountsManager#resetSortedTransactionList()— Resets theComparatoron theFilteredListto the default comparator.
When Transaction objects are added/edited/deleted, the following implemented methods are called from Account:
-
Account#addTransaction(Transaction toAdd)— Adds aTransactionto thetransactionList. -
Account#updateTransaction(Index txnIndex, Transaction editedTxn)— Sets aTransactionto thetransactionListat the specifiedIndex. -
Account#deleteTransaction(Transaction toDelete)— Deletes aTransactionfrom thetransactionList.
Transaction objects are saved within their respective Account objects after every command, and they are saved
into the file accounts.json, stored in the same directory as the JAR executable.
3.3.2. Design Considerations
Aspect: Reference to respective Account in Transaction
-
Alternative 1 (current choice):
Transactionhas no reference toAccount; any commands that create/edit/deleteTransactionobjects are called via the activeAccount.-
Pros: Reduced coupling, which makes testing/maintenance easier.
-
Cons: More methods are required to ensure the logic of
Transactioncommands and the current activeAccount, instead of calling getAccount() on aTransaction.
-
-
Alternative 2:
Transactionholds a reference toAccount; commands that create/edit/deleteTransactionobjects directly reach theAccountthrough theTransaction.-
Pros: It would result in shorter code by avoiding having to go through
AccountsManagerto find the respectiveAccount. -
Cons: This would result in a circular dependency between
TransactionandAccount, as well as high coupling. This lowers testability and increases the risk of bugs.
-
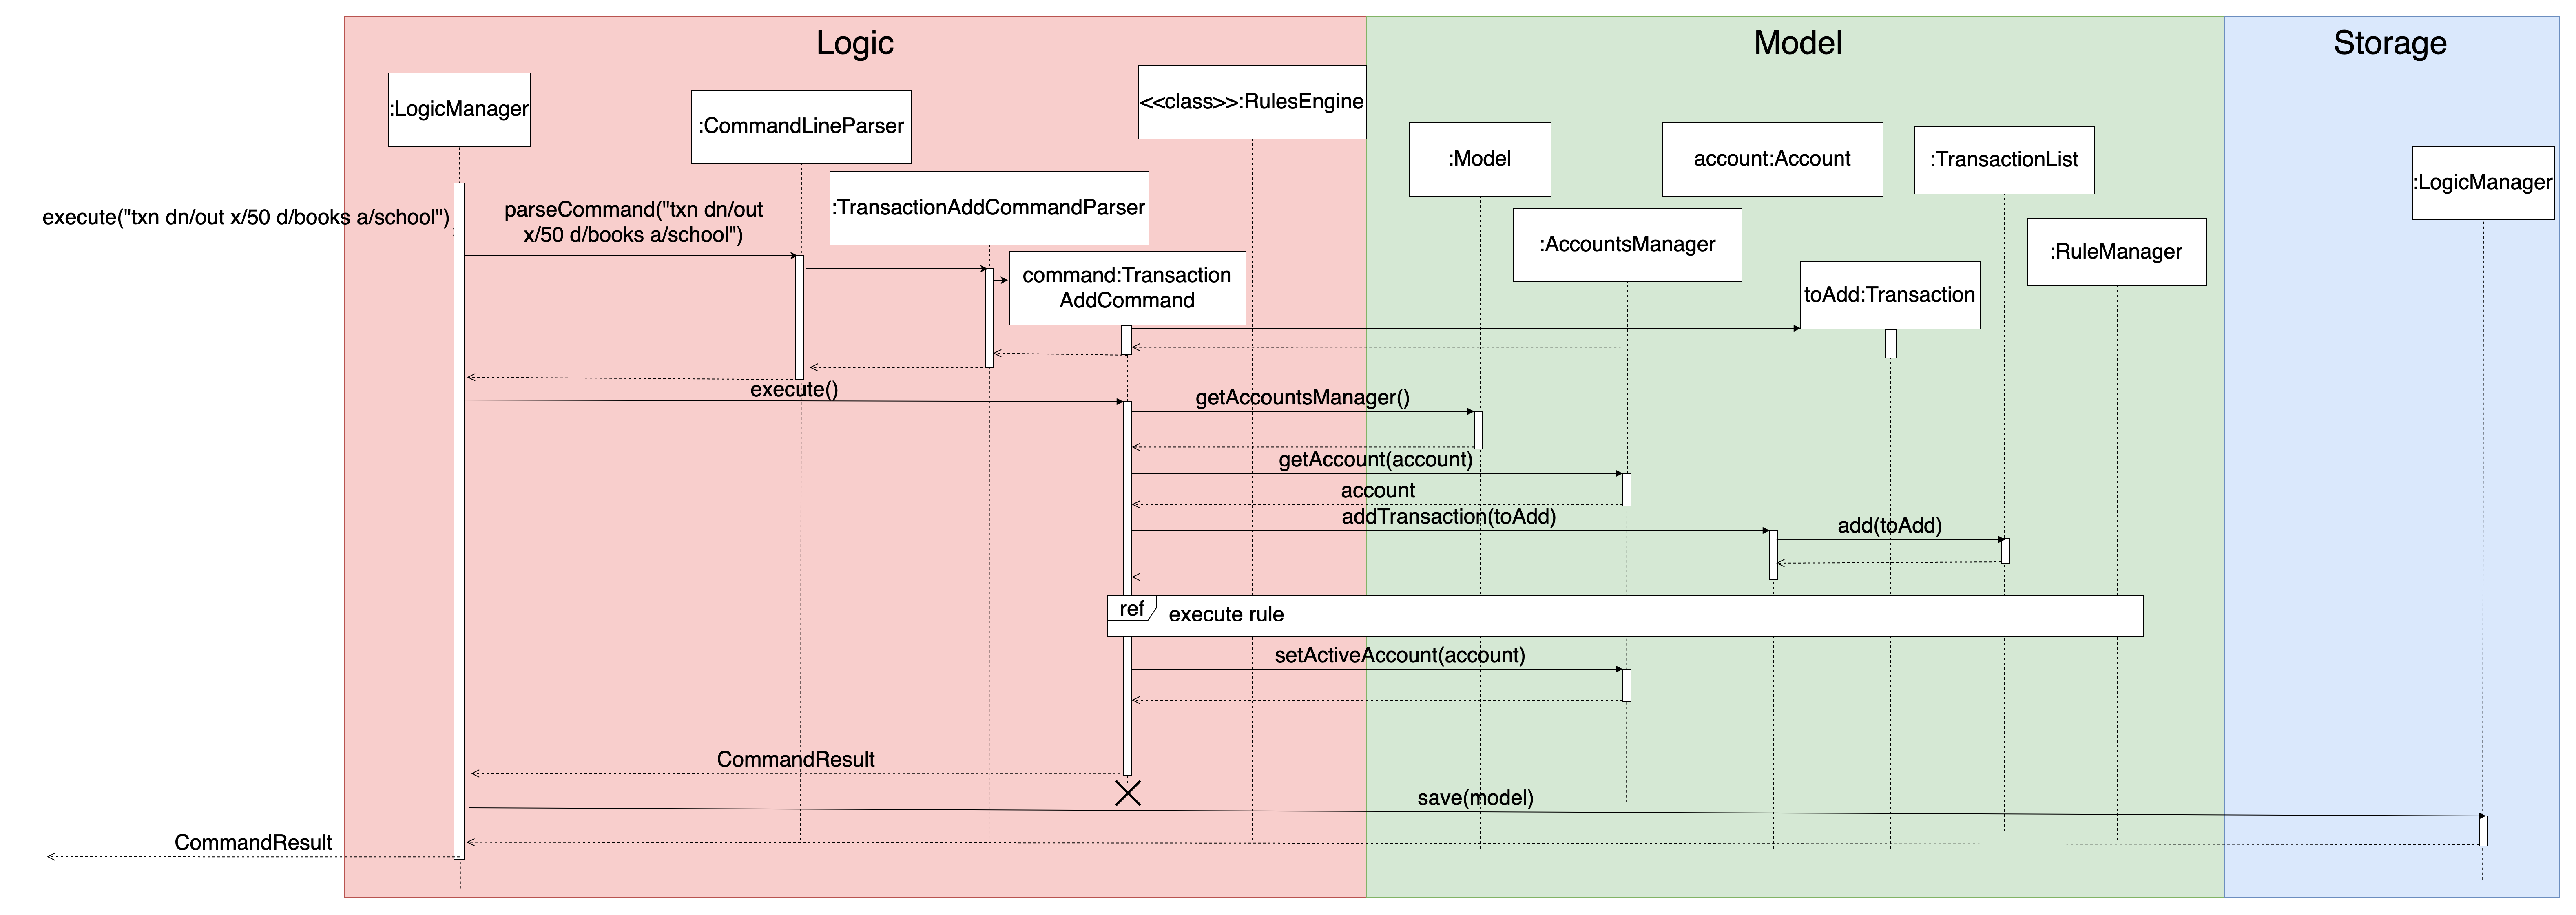
3.4. Adding Transactions: txn
Given below is an example usage scenario and how the txn command is processed and executed at each step.
Step 1: The user (ideally an NUS Computing Student) executes txn dn/out x/50 d/books a/school to add a purchase of $50 worth of
books, to be added to the school Account.
Step 2: LogicManager calls parseCommand on the command string txn dn/out x/50 d/books a/school
Step 3: CommandLineParser creates a new TransactionAddCommandParser by identifying the txn String that represents a
TransactionAddCommand
Step 4: TransactionAddCommandParser parses the rest of the command string dn/out x/50 d/books a/school and return a
new TransactionAddCommand with the parsed details.
Step 5: LogicManager then calls execute() on the TransactionAddCommand, which gets the Account school from the
AccountsManager
Step 6: addTransaction is called on the returned Account to add the Transaction to the TransactionList of
the Account`.
Step 7: After adding the Transaction, RuleEngine is called to execute its rules over the newly added Transaction.
The full diagram sequence diagram for this step can be found below, in the Implementation of the Rules Execution feature.
Step 8: The Account which was added to is set as the active Account with setActiveAccount().
Step 9: Finally, TransactionAddCommand returns a CommandResult to the LogicManager.
Step 10: Before LogicManager returns the CommandResult, it calls save(Model model) on the StorageManager, which
saves all the Account objects.
The following sequence diagram illustrates the scenario as described above (the execution of txn dn/out x/50 d/books a/school):
3.5. Editing transactions: txn edit
txn edit allows users to edit any attribute of the Transaction. It uses a TransactionEditDescriptor to store the details
of the new Transaction, then uses getUpdatedTransaction to generate the edited Transaction as well as validate that
changes have been made to the transaction.
Below is an example scenario to demonstrate how a Transaction is edited, as well as certain additional steps that are taken when certain
attributes of the Transaction are edited, for example to edit the Account or to edit the categories. The activity diagram
accompanies this explanation, to help visualise the steps that might take place.
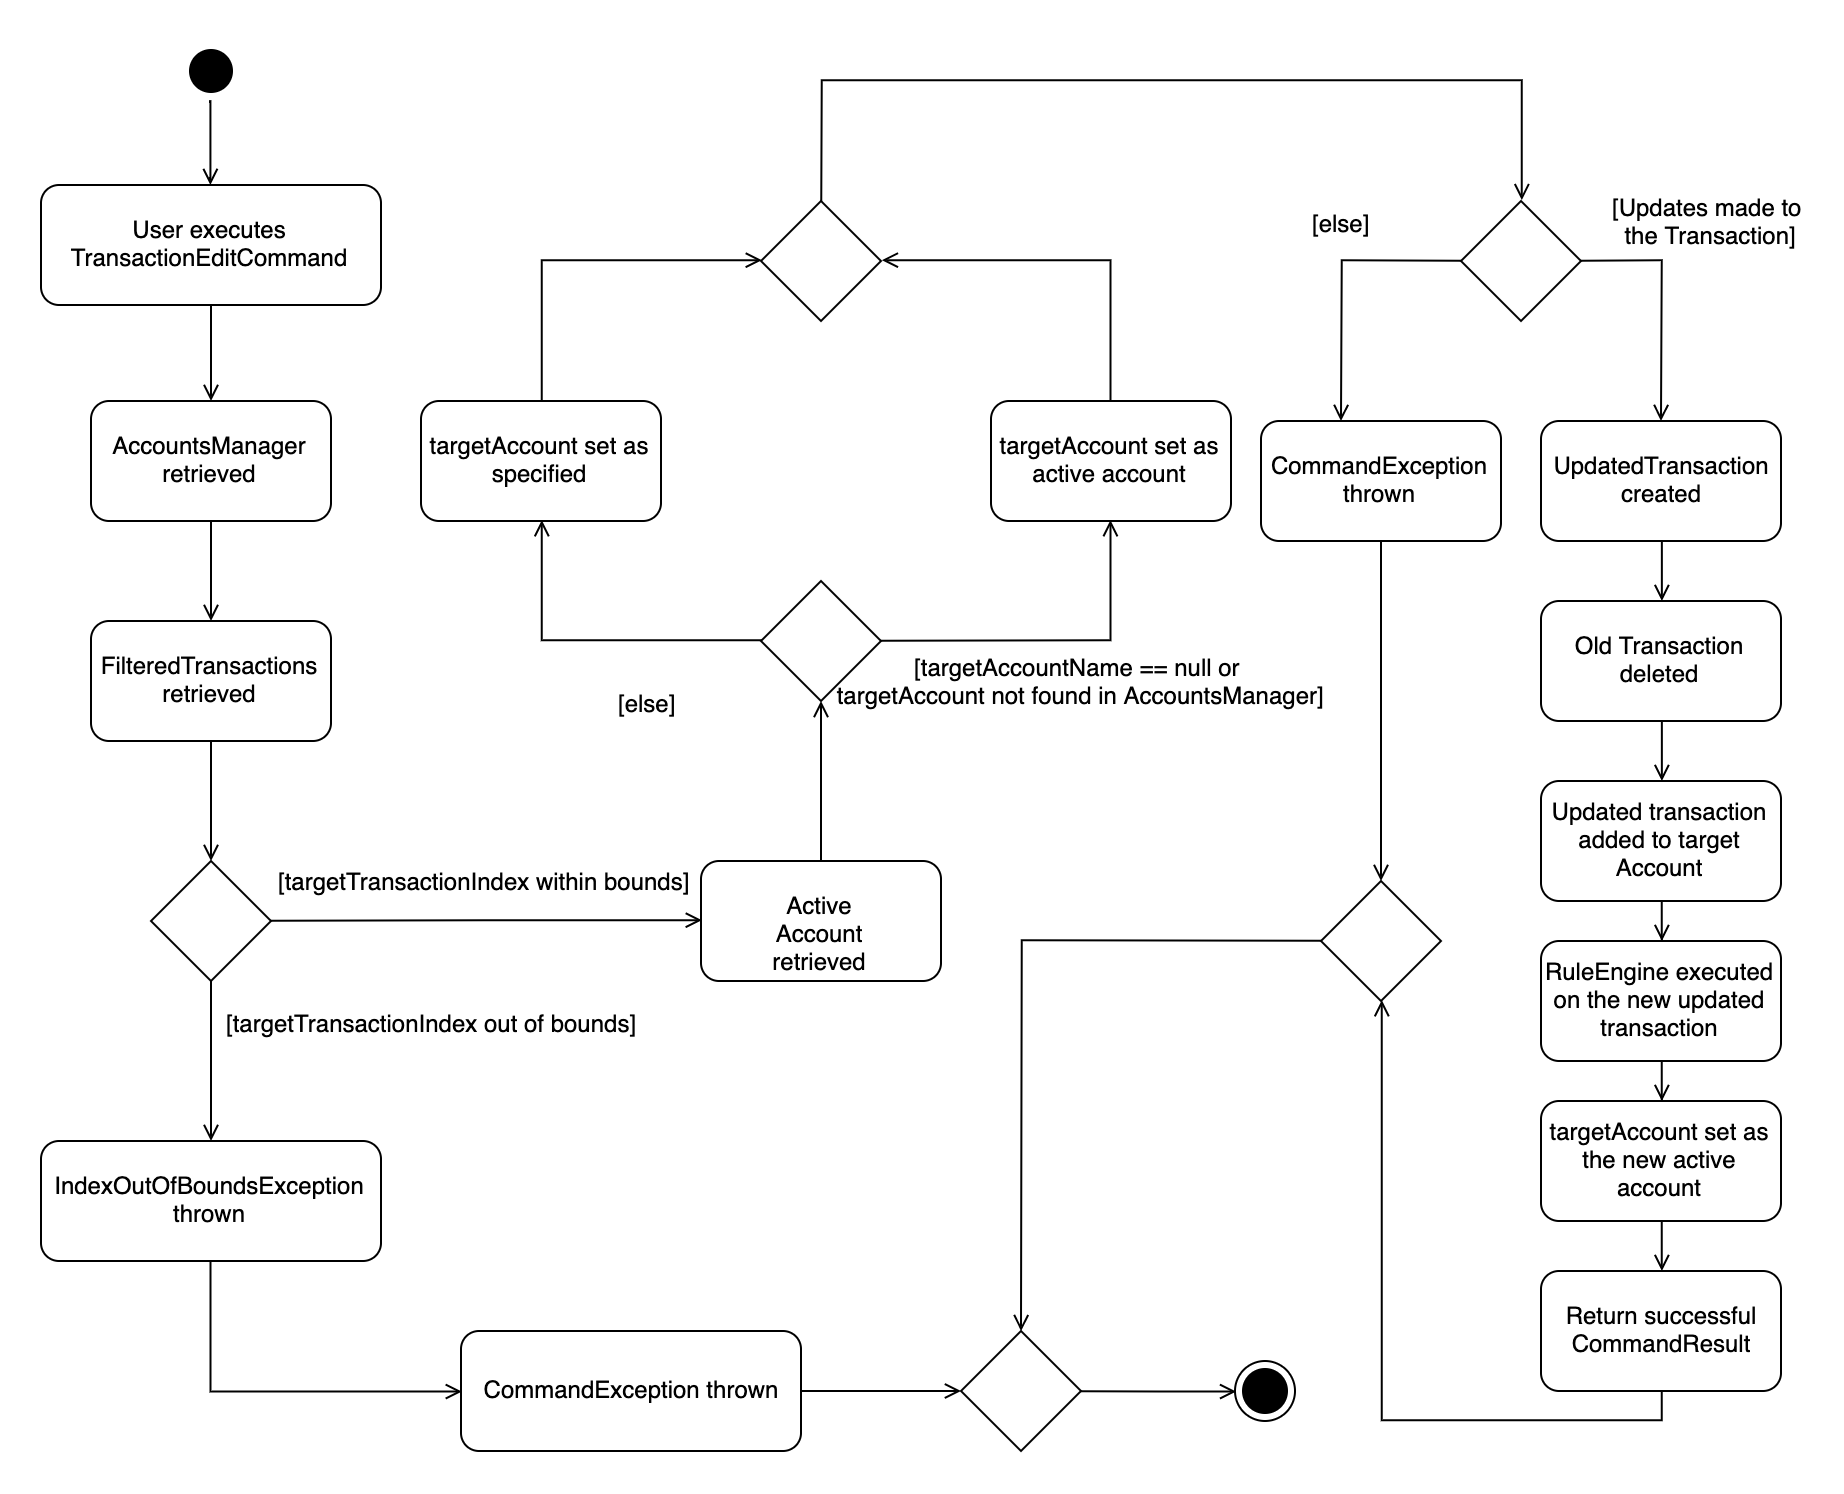
Assume that txn add dn/out x/20 d/bill a/home was just executed, and that the Transaction shows up in the first index:
Step 1: The user (ideally an NUS Computing Student) executes txn edit 1 x/28 d/phone bill a/personal c/phone c/bill
to edit the previously added Transaction to a $28 phone bill, to be added to the personal Account.
Step 2: LogicManager calls parseCommand on the command string txn edit 1 x/28 d/phone bill a/personal c/phone c/bill
Step 3: CommandLineParser creates a new TransactionEditCommandParser by identifying the txn edit String that represents a
TransactionAddCommand
Step 4: TransactionAddCommandParser parses the rest of the command string 1 x/28 d/phone bill a/personal c/phone c/bill and return a
new TransactionEditCommand along with the TransactionEditDescriptor and the updatedAccountName, which represents the
Name of the new target Account. A new Set<Categories> is also created from the c/phone and c/bill arguments provided.
Step 5: LogicManager then calls execute() on the TransactionEditCommand. Then, the original Transaction is obtained,
followed by the target Account and the edited Transaction via getUpdatedTransaction. Meanwhile, validation occurs
at every step, to ensure that the parsed attributes conform to the requirements to edit the `Transaction.
Step 6: deleteTransaction is called on the Account containing the Transaction to be edited.
Step 7: addTransaction is called on the target Account, followed by the execution of the RulesEngine, similar to the
situation as shown further below.
Step 8: The Account which was added to is set as the active Account with setActiveAccount().
Step 9: Finally, TransactionAddCommand returns a CommandResult to the LogicManager.
Step 10: Before LogicManager returns the CommandResult, it calls save(Model model) on the StorageManager, which
saves all the Account objects.
3.6. Loans Feature
3.6.1. Implementation
The Loans feature exists outside of the Account/Transaction mechanisms.
It adds a separate LoansManager alongside the main AccountsManager, with Loan objects stored internally in an internalList.
The following class diagram demonstrates the association between the LoansManager and Loan objects.
Miscellaneous methods (such as LoansManager#getLoans and LoansManager#getLoansCount) are omitted.
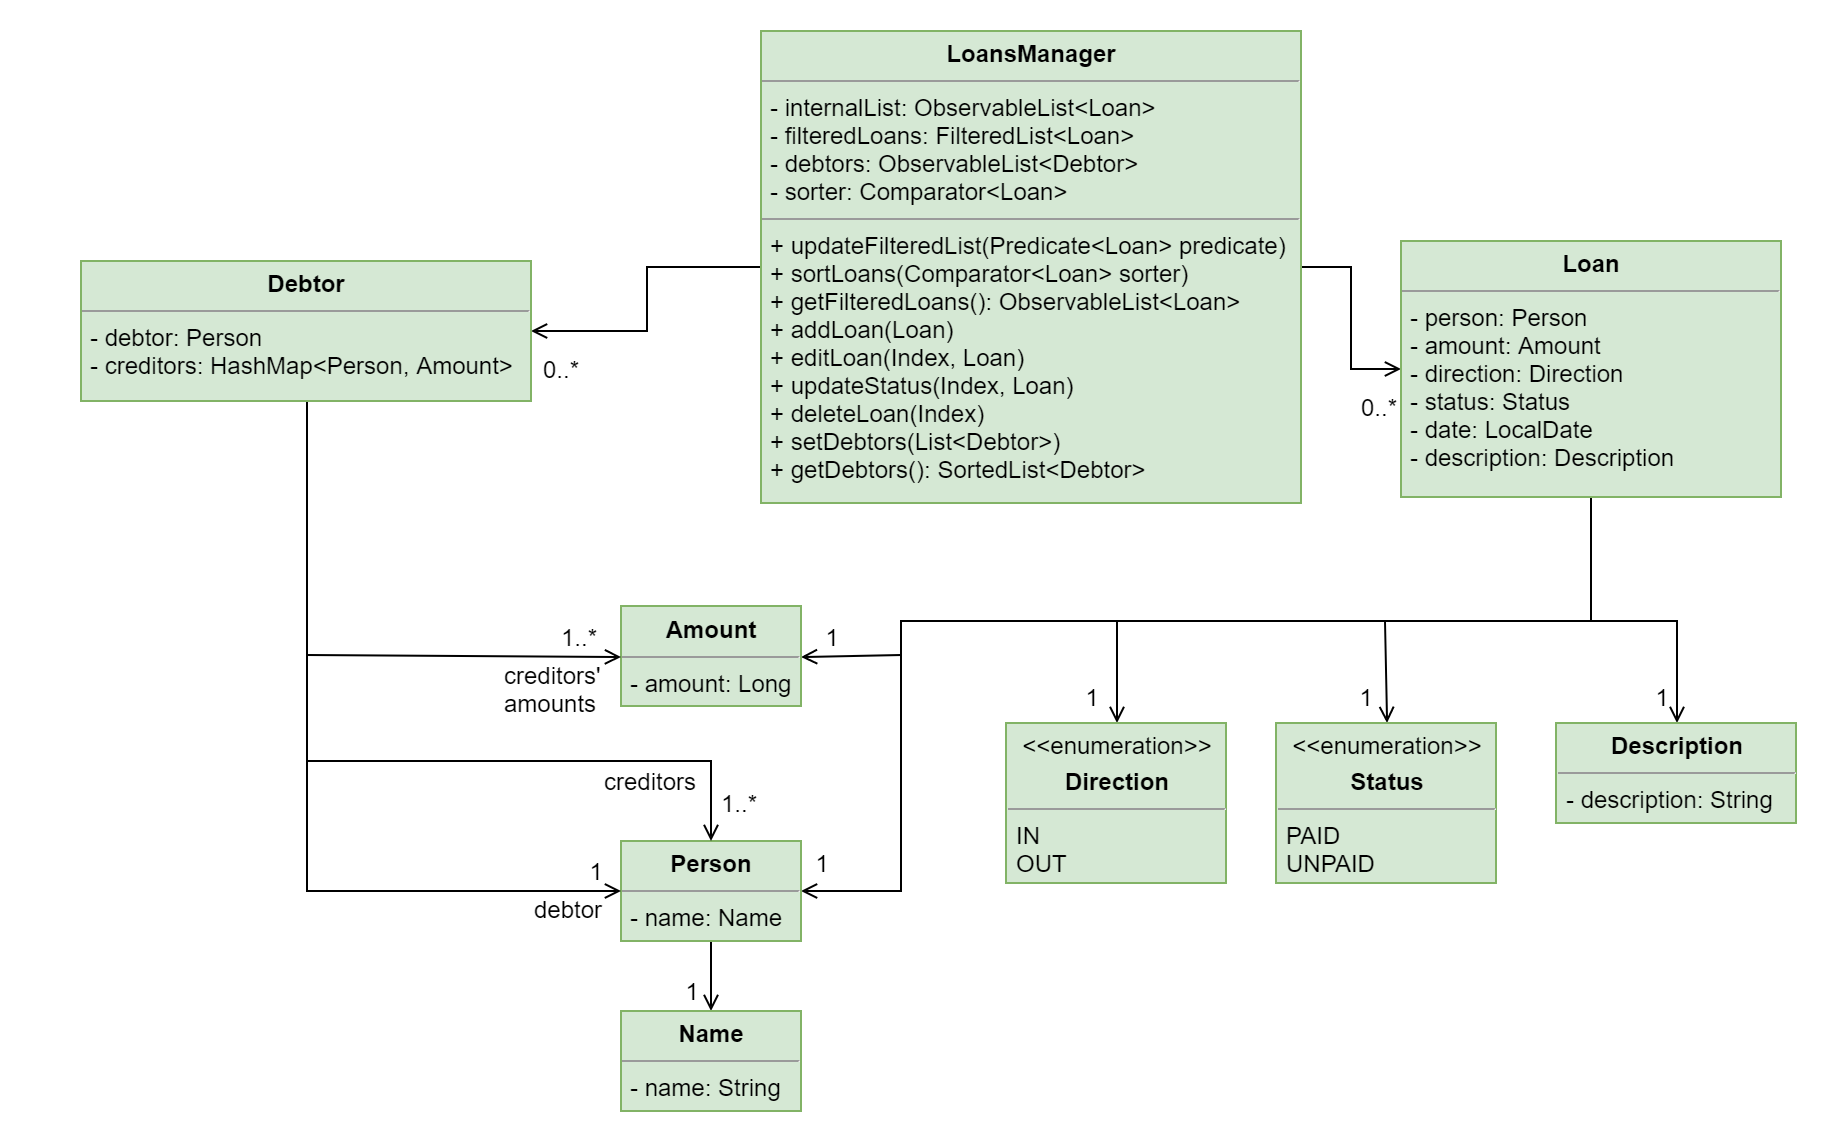
The Debtor class, LoansManager#debtors, LoansManager#setDebtors and LoansManager#getDebtors can be ignored for now.
They are depicted here for the sake of completion,
but will only be used when discussing the loan split command in a later section.
|
Each Loan object has the following attributes:
-
person:Person— The person that the user lent/borrowed money to/from. -
amount:Amount— The amount of money loaned. -
direction:Direction— The direction of the loan (eitherINorOUT). -
status:Status— The status of the loan (eitherPAIDorUNPAID). -
date:LocalDate— The date of the loan. -
description:Description— A description of the loan.
To facilitate the manipulation of Loan objects, LoansManager implements the following operations:
-
LoansManager#updateFilteredList(Predicate<Loan> predicate)— Updates the current predicate offilteredLoanstopredicate. -
LoansManager#sortLoans(Comparator<Loan> sorter)— SortsinternalListusing the givensorter. -
LoansManager#getFilteredLoans()— GetsfilteredLoans, representing the loans ininternalListafter filtering. -
LoansManager#addLoan(Loan toAdd)— Adds theLoan toAddtointernalList. -
LoansManager#editLoan(Index toEdit, Loan editedLoan)— Replaces the loan atIndex toEditwithLoan editedLoan. -
LoansManager#updateStatus(Index toUpdate, Loan updatedLoan)— Replace the loan atIndex toUpdatewithLoan updatedLoan. -
LoansManager#deleteLoan(Index toDelete)— Deletes the loan atIndex toDeletefrominternalList.
Each user-given command will call at least one of the above operations.
For example, loan delete will call LoansManager#deleteLoan to delete the targeted loan(s),
then LoansManager#getFilteredLoans to display the remaining loans.
After each command, the state of internalList is saved in the file loans.json.
loans.json is stored on the local hard disk in a data folder,
which is in the same directory as budgetbuddy.jar.
Given below is an example usage scenario and how the LoansManager behaves at each step.
Step 1.
The user launches the application.
If loans.json exists on the hard disk, its data is loaded into internalList.
Otherwise, loans.json is created and the LoansManager initializes with an internalList containing a few sample loans.
Step 2.
The user executes the command loan out p/John x/4.20 d/Paid for his lunch to add a new loan.
This creates a new loan toAdd of amount 4.20 out to the person John, with the description Paid for his lunch.
Since the user did not provide a date, the current system date is used for the date of toAdd.
LoansManager#addLoan(Loan toAdd) is called and
(after verifying that toAdd does not already exist in internalList)
toAdd is added to internalList.
The following sequence diagram illustrates the process of adding a loan:
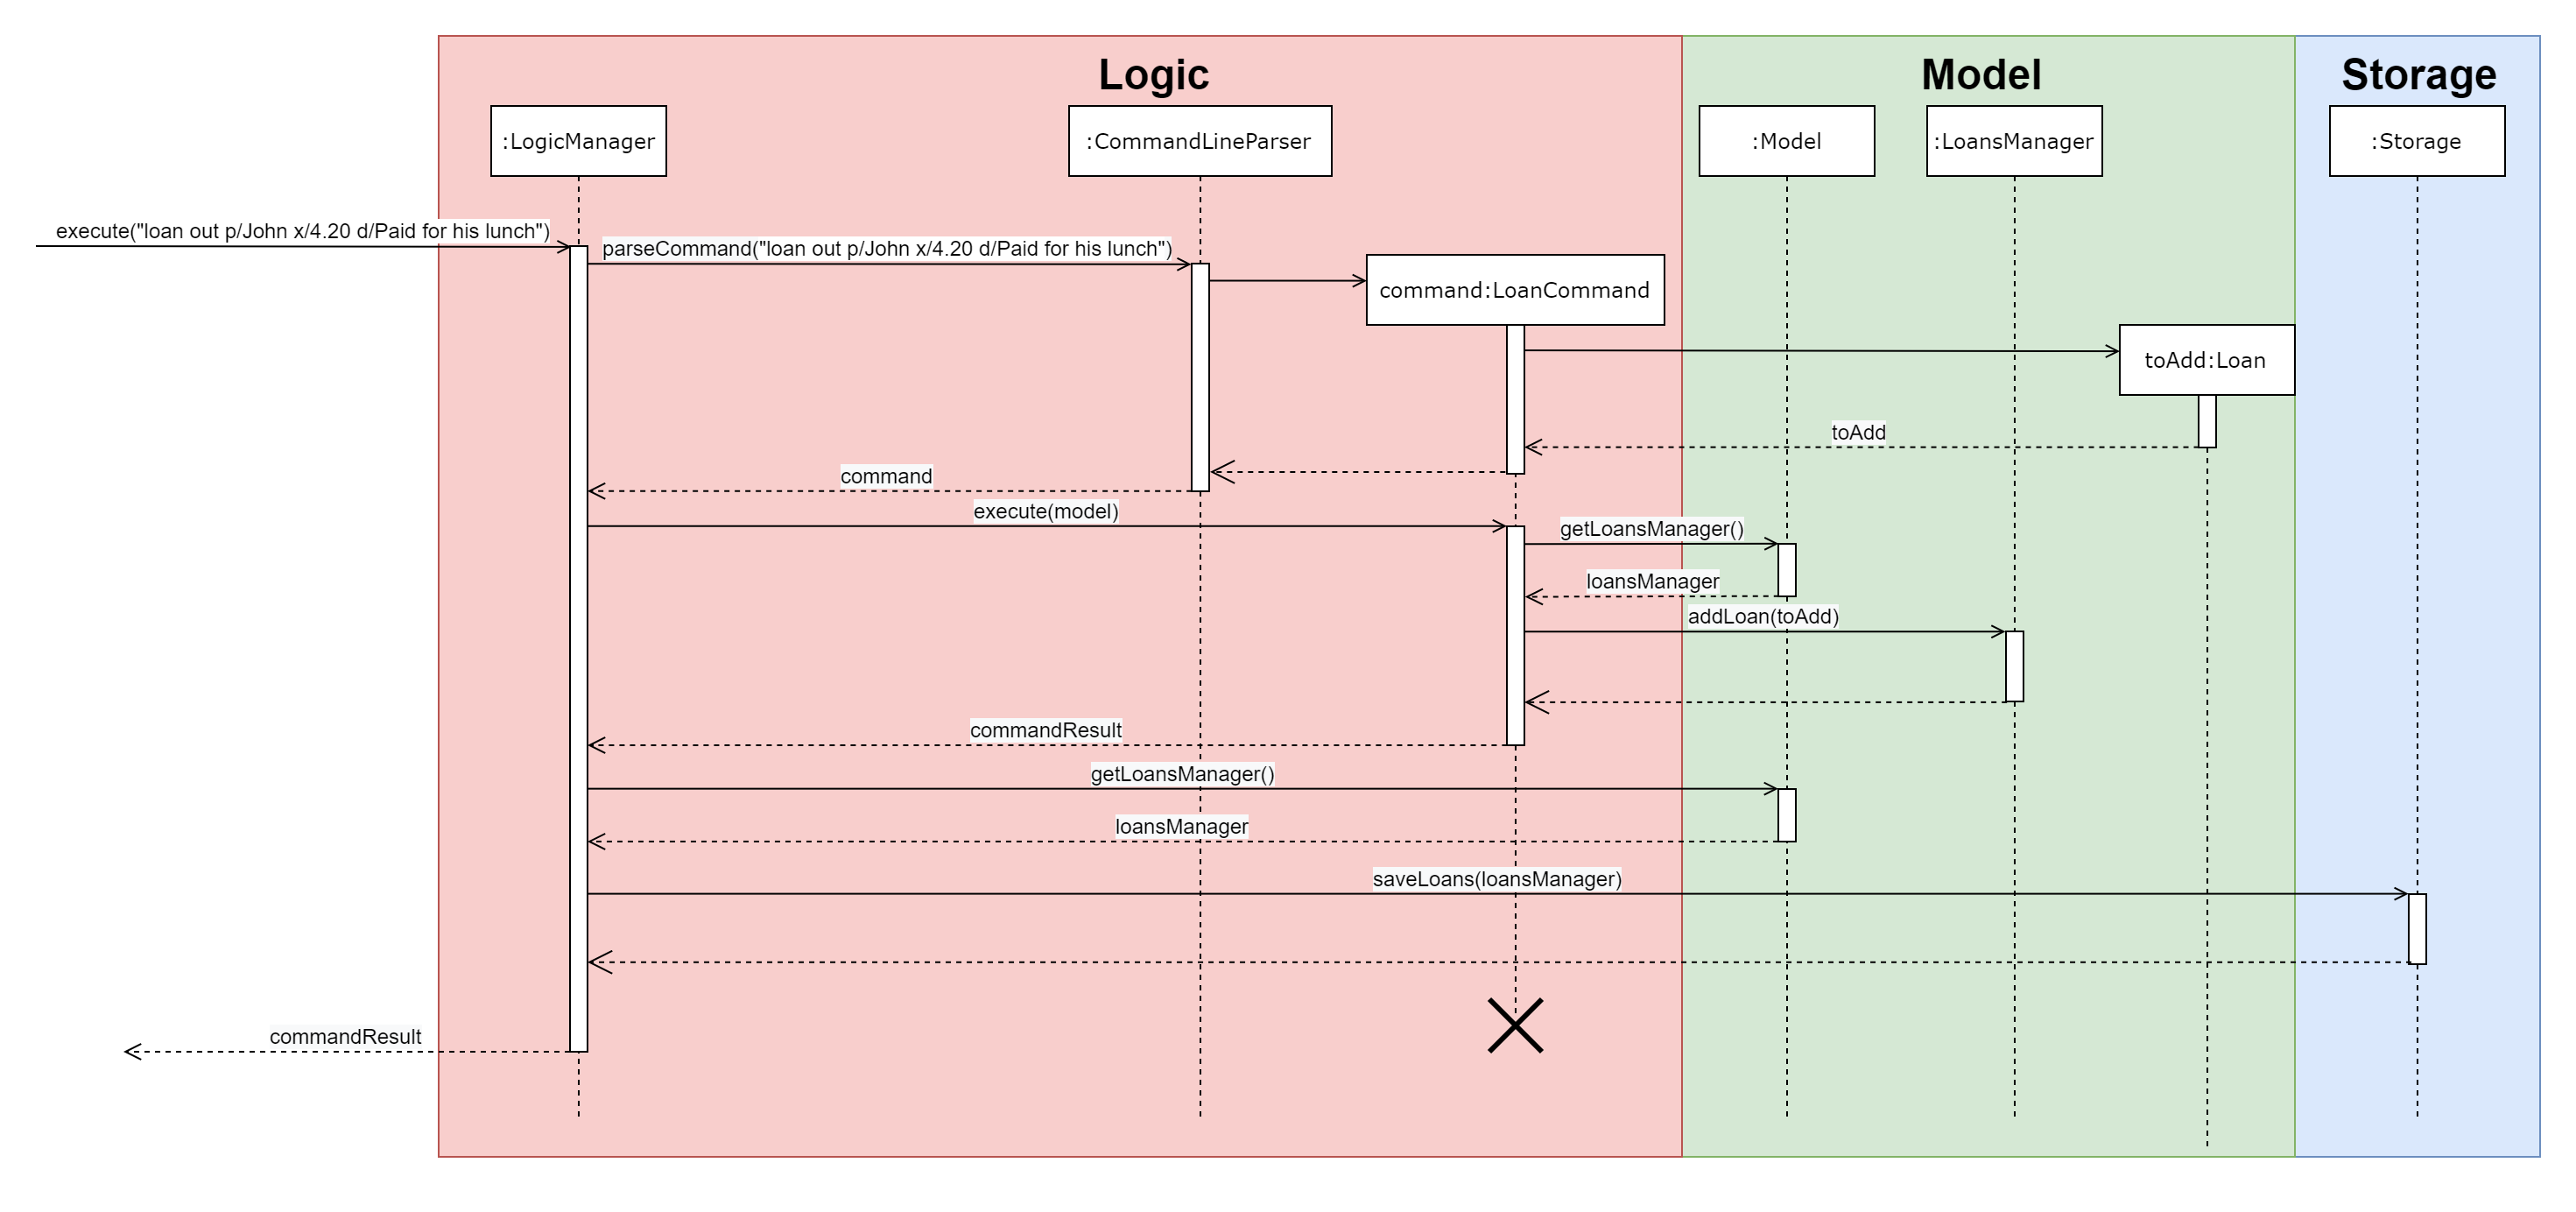
In general, the rest of the operations work using a similar sequence of steps.
Some commands might create a new Loan object (as shown above) while others might just use the Index of a loan (e.g. loan delete).
Step 3.
The user executes the command loan list out p/John w/1/11/2019 s/x
to see all loans out to John dated 1/11/2019, sorted by amount.
First, LoansManager#sortLoans is called to sort the loans in internalList by their amounts in ascending order.
LoansManager#updateFilteredList is then called to set the predicate of filteredLoans;
the new predicate filters the list to loans out to the person John on 1/11/2019.
Finally, LoansManager#getFilteredLoans is called to display the (sorted and filtered) list to the user.
Step 4.
The user executes the command loan paid 1 to update the status of the first loan in the list to PAID.
This creates a new updatedLoan identical to the first loan in internalList, except that updatedLoan has the status PAID.
LoansManager#updateStatus(Index toUpdate, Loan updatedLoan) is called
(where toUpdate is the index of the first loan in internalList)
and the loan at index toUpdate is replaced with updatedLoan.
The command loan unpaid works identically to loan paid, except that the status of updatedLoan is set to UNPAID.
|
Step 5.
The user executes the command loan edit 1 x/500 to edit the amount of the first loan in the list to 500.
LoansManager#editLoan(Index toEdit, Loan editedLoan) is called
and the loan at index toEdit is replaced with an editedLoan that has an amount of 500.
While this operation appears identical to LoansManager#updateStatus,
LoansManager#editLoan implements an extra check to ensure that editedLoan does not already exist in internalList.
LoansManager#updateStatus does not implement the check for a duplicate loan
as the status of a Loan is not considered when comparing two loans for equality.
internalList is already guaranteed to have no identical loans due to the checks in
LoansManager#addLoan and LoansManager#editLoan.
|
Step 6.
The user executes the command loan delete 1 to delete the first loan in the list.
LoansManager#deleteLoan(Index toDelete) is called
(where toDelete is the index of the first loan in internalList)
and the loan at index toDelete is removed from internalList.
For the commands loan paid, loan unpaid and loan delete,
if the user targets a loan outside of the list (e.g. index greater than list size)
an error message will be displayed.
|
Multi-Loan Targeting
The user can target and act on multiple loans with a single command.
For example, loan paid 1 3 4 can be used to mark the first, third and fourth loans in internalList as PAID.
Alternatively or additionally, loan paid p/John p/Mary can also be used
to mark all the loans of the persons John and Mary in internalList.
The LoansManager handles this by executing the appropriate operation repeatedly.
In the case of loan paid 1 3 4, LoansManager#editLoan is called once for each of the three loans.
To account for the fact that the list size might change after each operation, the size of the list before and after each operation is compared. If it has changed, the targeted indices are adjusted accordingly.
If any of the target loan indices cannot be found by the LoansManager in internalList,
they are added to a missingLoanIndices list.
Similarly, target persons that cannot be found are added to a missingPersons list.
Both lists are displayed to the user after other target loans that are in internalList have been acted upon,
notifying the user that the target indices/persons could not be found.
Multi-loan targeting is implemented for the commands loan paid, loan unpaid and loan delete.
Loan Splitting
Loan splitting exists as a command that the user can execute. Its purpose is to split a large, initially unbalanced group payment equally among the group’s members. The following example scenario should clarify the purpose of the command:
John, Mary and Peter go out for dinner. The meal costs $100, so Peter pays $90 and Mary covers the remaining $10. However, the three want to split the bill equally among themselves.
John executes the command loan split p/John p/Mary p/Peter x/0 x/10 x/90.
Budget Buddy then outputs a list of the necessary payments between the three.
From this list, John can now see that he owes Peter $33.33 and that Mary owes Peter $23.33.
To display the results of the calculations, LoansManager holds a list of debtors containing Debtor objects.
For your convenience, the class diagram of the Loans model is reproduced here:
Each Debtor object has the following attributes:
-
debtor:Person— The person who owes money to one or more creditors. -
creditors:HashMap<Person, Amount>— A list of persons that thedebtorowes money to, mapped to the amount of money owed. Each entry in theHashMaprepresents a creditor, with their name as thePersonkey and the amount owed as the correspondingAmountvalue.
LoansManager also implements the getDebtors and setDebtors operations to manipulate the debtors list.
This list is used to hold and display the Debtor objects created for the latest execution of loan split
and is stored between sessions in loans.json.
Given below is an example scenario to demonstrate how the final list is calculated. The algorithm as a whole can be summarized in the activity diagram below, which might prove helpful for following the steps in the example scenario:
Step 1.
The user executes the command loan split p/Ben p/Duke p/Adam p/Zed x/0 x/20 x/80 x/50 max/10 me/Ben d/Dinner.
In this scenario, out of the total bill of $150,
Ben has paid $0,
Duke has paid $20,
Adam has paid $80
and Zed has paid $50.
Furthermore, max/10 specifies that Ben should only pay/owe up to $10 overall.
Finally, me/Ben marks Ben as the user;
all debts involving Ben should be added to the normal loan list with the description Dinner.
Step 2.
LoanSplitCommandParser parses the persons, amounts, and max shares into List<Person>, List<Amount> and List<Long> respectively.
me/Ben and d/Dinner are parsed into Optional<Person> and Optional<Description>.
A new LoanSplitCommand is instantiated with the lists and optional objects.
Step 3.
LoanSplitCommand replaces Ben in List<Person> with a Person with the Name You.
Using the static methods of a LoanSplitCalculator class, it then begins executing the following algorithm:
-
The
defaultSharePerPersonis calculated. In this scenario, $150 should be split among the 4 persons. However, asBenhas a max share of $10, the other 3 persons must divide $140 among themselves, resulting in adefaultSharePerPersonof $46.66. -
Each person in
List<Person>is given abalance, calculated using the amount they paid initially (fromList<Amount>) minus either thedefaultSharePerPersonor their max share if present. -
A list of all possible sub-groups (combinations) of persons is generated. In this scenario, the number of sub-groups for the 4 persons would be 16.
-
For each sub-group, if the sum of their balances is zero, then the following steps are performed:
-
Take the persons with the smallest and biggest balances: the
debtorandcreditorrespectively. -
Transfer money between the two such that one or both of their balances reaches zero. The person(s) with a balance of zero are then removed from the group, and a record of the
debtor,creditorandamountTransferredis stored in aList<DebtorCreditorAmount>. -
Repeat until the sub-group contains less than two persons.
-
-
After every sub-group has been processed,
List<DebtorCreditorAmount>is used to create the finalList<Debtor>stored inLoansManager.
Step 4.
All debts involving the person You in List<Person>
are used to create loans with the description Dinner.
These loans are added to internalList in LoansManager using LoansManager#addLoan.
Step 5. The list of debtors in LoansManager is displayed to the user.
In this scenario, the display will show that
Duke owes Adam $26.66
and You (Ben, the user) owe Zed and Adam $3.32 and $6.68 respectively.
3.6.2. Design Considerations
Aspect: Structure of the loan - person interaction
-
Alternative 1 (current choice):
LoansManagerstoresinternalList; eachLoanreferences aPerson-
Pros: Easy to implement and understand.
-
Cons: Takes a longer time to get all the loans belonging to a person.
-
-
Alternative 2:
LoansManagerstorespersonslist; eachPersonstoresLoanList; eachLoanreferencesPerson-
Pros: Easy to retrieve the person of each loan and retrieve all the loans belonging to a person.
-
Cons: Circular dependency and high coupling, potentially leading to lower testability and a higher bug count.
-
3.7. Rule Management Feature
The Rules feature exists as an integration onto the Transaction system. It makes use of syntax processing, together with scripts to provide an automation solution to repetitive tasks when adding transactions.
Rules are defined with a pair of predicate and action, where an action is performed given that the predicate returns true. This predicate-action split allows us to decouple testing from performing, which helps to increase reusability of individual predicates and actions.
3.7.1. Implementation
Basic attributes and operators are exposed to provide users a way of writing simple
tests on transactions without having to manually check and make changes. Storing rules
works similarly to LoansManager, where individual rules are stored in a
RuleManager which manages all CRUD operations.
All rules are stored in a JSON file when added, formatted to be retrieved and parsed by the application when relaunched.
The following class diagram illustrates the structure of the Rule Model component.
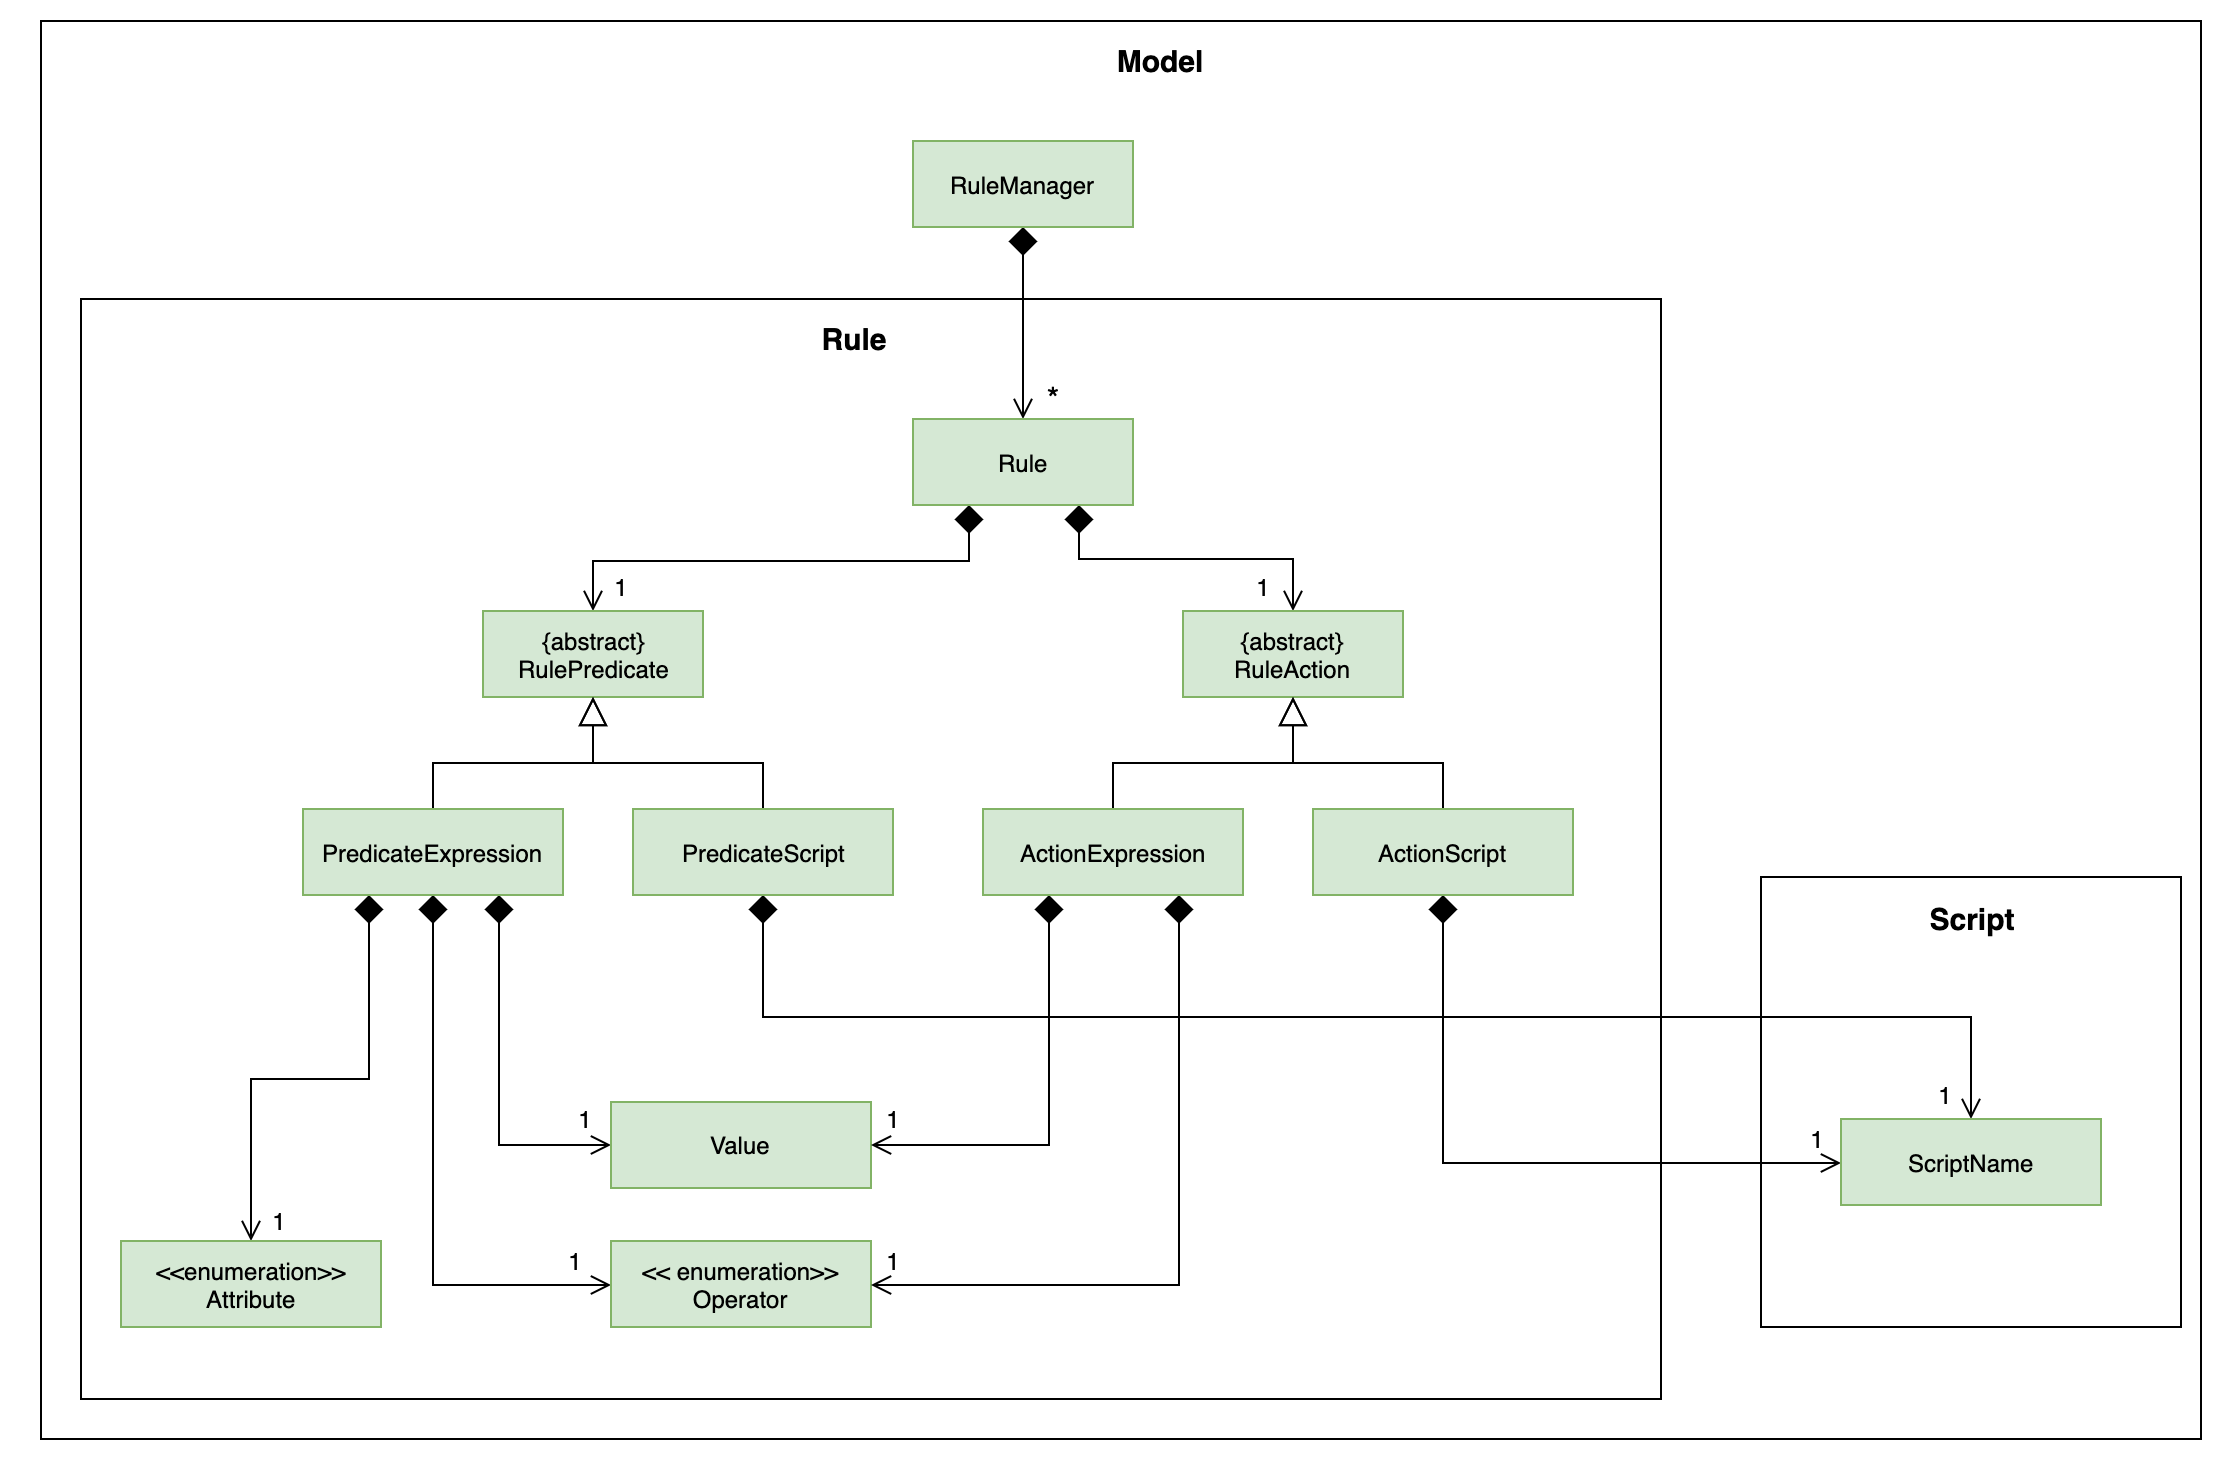
The rest of the Script and Model components have been omitted to give focus on the Rule model component.
|
As mentioned above, rules are defined as a pair of predicate and action, which as seen in the above diagram, is divided into
the two abstract classes RulePredicate and RuleAction. These two classes are abstract due to two implementation
types, either script or expression. Their concrete classes are PredicateExpression and ActionExpression
for expressions and PredicateScript and ActionScript for scripts respectively.
For predicate expressions, they are formed using binary comparison operations, which means that each expression contains
a predefined Operator which takes in two arguments, a predefined Attribute to represent an attribute of a Transaction,
as well as a Value to represent a given value to test against the attribute.
Action expressions are unary operations, which means that each expression is formed with an Operator as well, but takes
only a single argument, a Value to represent a given value to carry out the operation with.
Predicates and actions implemented as scripts on the other hand are each defined with a single ScriptName, which refers to the
name of the script itself.
Each and every Rule is stored within the RuleManager, which serves as an interface to manipulating the list of rules.
For example, RuleManager#addRule is used to add new rules to the list, whereas RuleManager#swapRules is used to
swap the order of two rules in the list. The RuleManager supports basic CRUD operations, as well as other convenience
methods such as the RuleManager#swapRules as mentioned.
3.7.2. Design Considerations
Aspect: Structure of expressions for rule data management
-
Alternative 1 (current choice): The two expression classes
PredicateExpressionandActionExpressionare split into their individual components, the operators and the arguments.-
Pros: More control over the expression format, and increase reusability of individual components.
-
Cons: More classes required to implement, greater overhead.
-
-
Alternative 2: Expressions are just entirely stored as strings within the two classes.
-
Pros: Easy to implement, ease of storage.
-
Cons: Parsing has to be done even after the rule is added. This means we need to parse the expression more than once, not only to check the validity, but again to process the rule before execution.
-
Aspect: Structure of scripts for rule data management
-
Alternative 1 (current choice): The two script classes
PredicateScriptandActionScriptcontain only aScriptName, which is the name of the script they are referencing.-
Pros: No need to reference an entire script, and therefore much easier to validate. Storing names will also be much simpler.
-
Cons: Requires checking against the
ScriptLibraryto retrieve aScriptwhen processing rules.
-
-
Alternative 2: The classes will each store an entire
Scriptwithin them.-
Pros: Referencing the script code when processing rules will not require access to the
ScriptLibrary, and can be taken directly from thePredicateScriptorActionScriptdirectly. -
Cons: Creating unnecessary entire references to a script that already exists in the
ScriptLibrary, and makes storage much more complicated, as the entire script will be contained within the class.
-
3.8. Rule Execution Feature
The structure of rules were separated from the logic of rule execution to maintain the separation of concerns between the
Model and Logic components.
Rule execution is hooked into the evaluation of adding or editing a Transaction. This means that for every new transaction,
all rules within the Rule Engine will be executed on that transaction. The same can be said for modifying a transaction.
The implementation of the Rule execution is elaborated on below.
3.8.1. Implementation
The RuleEngine is a static class used for interfacing with all the rule processings functionality.
Two executable classes are used in the execution of a rule, Testable and Performable.
A Testable represents the executable form of a RulePredicate, which may be either an expression or a script.
Correspondingly, a Performable represents the executable form of a RuleAction, which may also be either an
expression or a script.
Before executing the existing rules, the index of the transaction and the account that the transaction belongs to are
supplied to the RuleEngine through the RuleEngine#executeRules method. This allows for the retrieval of the transaction
when a rule is executed against it.
When a rule is executed, this is firstly represented as the execution of the Testable#test method on the given transaction.
If the test passes, the predicate is true, and therefore the action is performed. This is represented as the execution of
the Performable#perform method on the given transaction.
The following sequence diagram shows the interaction between the RuleEngine and the different objects involved in the
execution of the rules on a transaction:
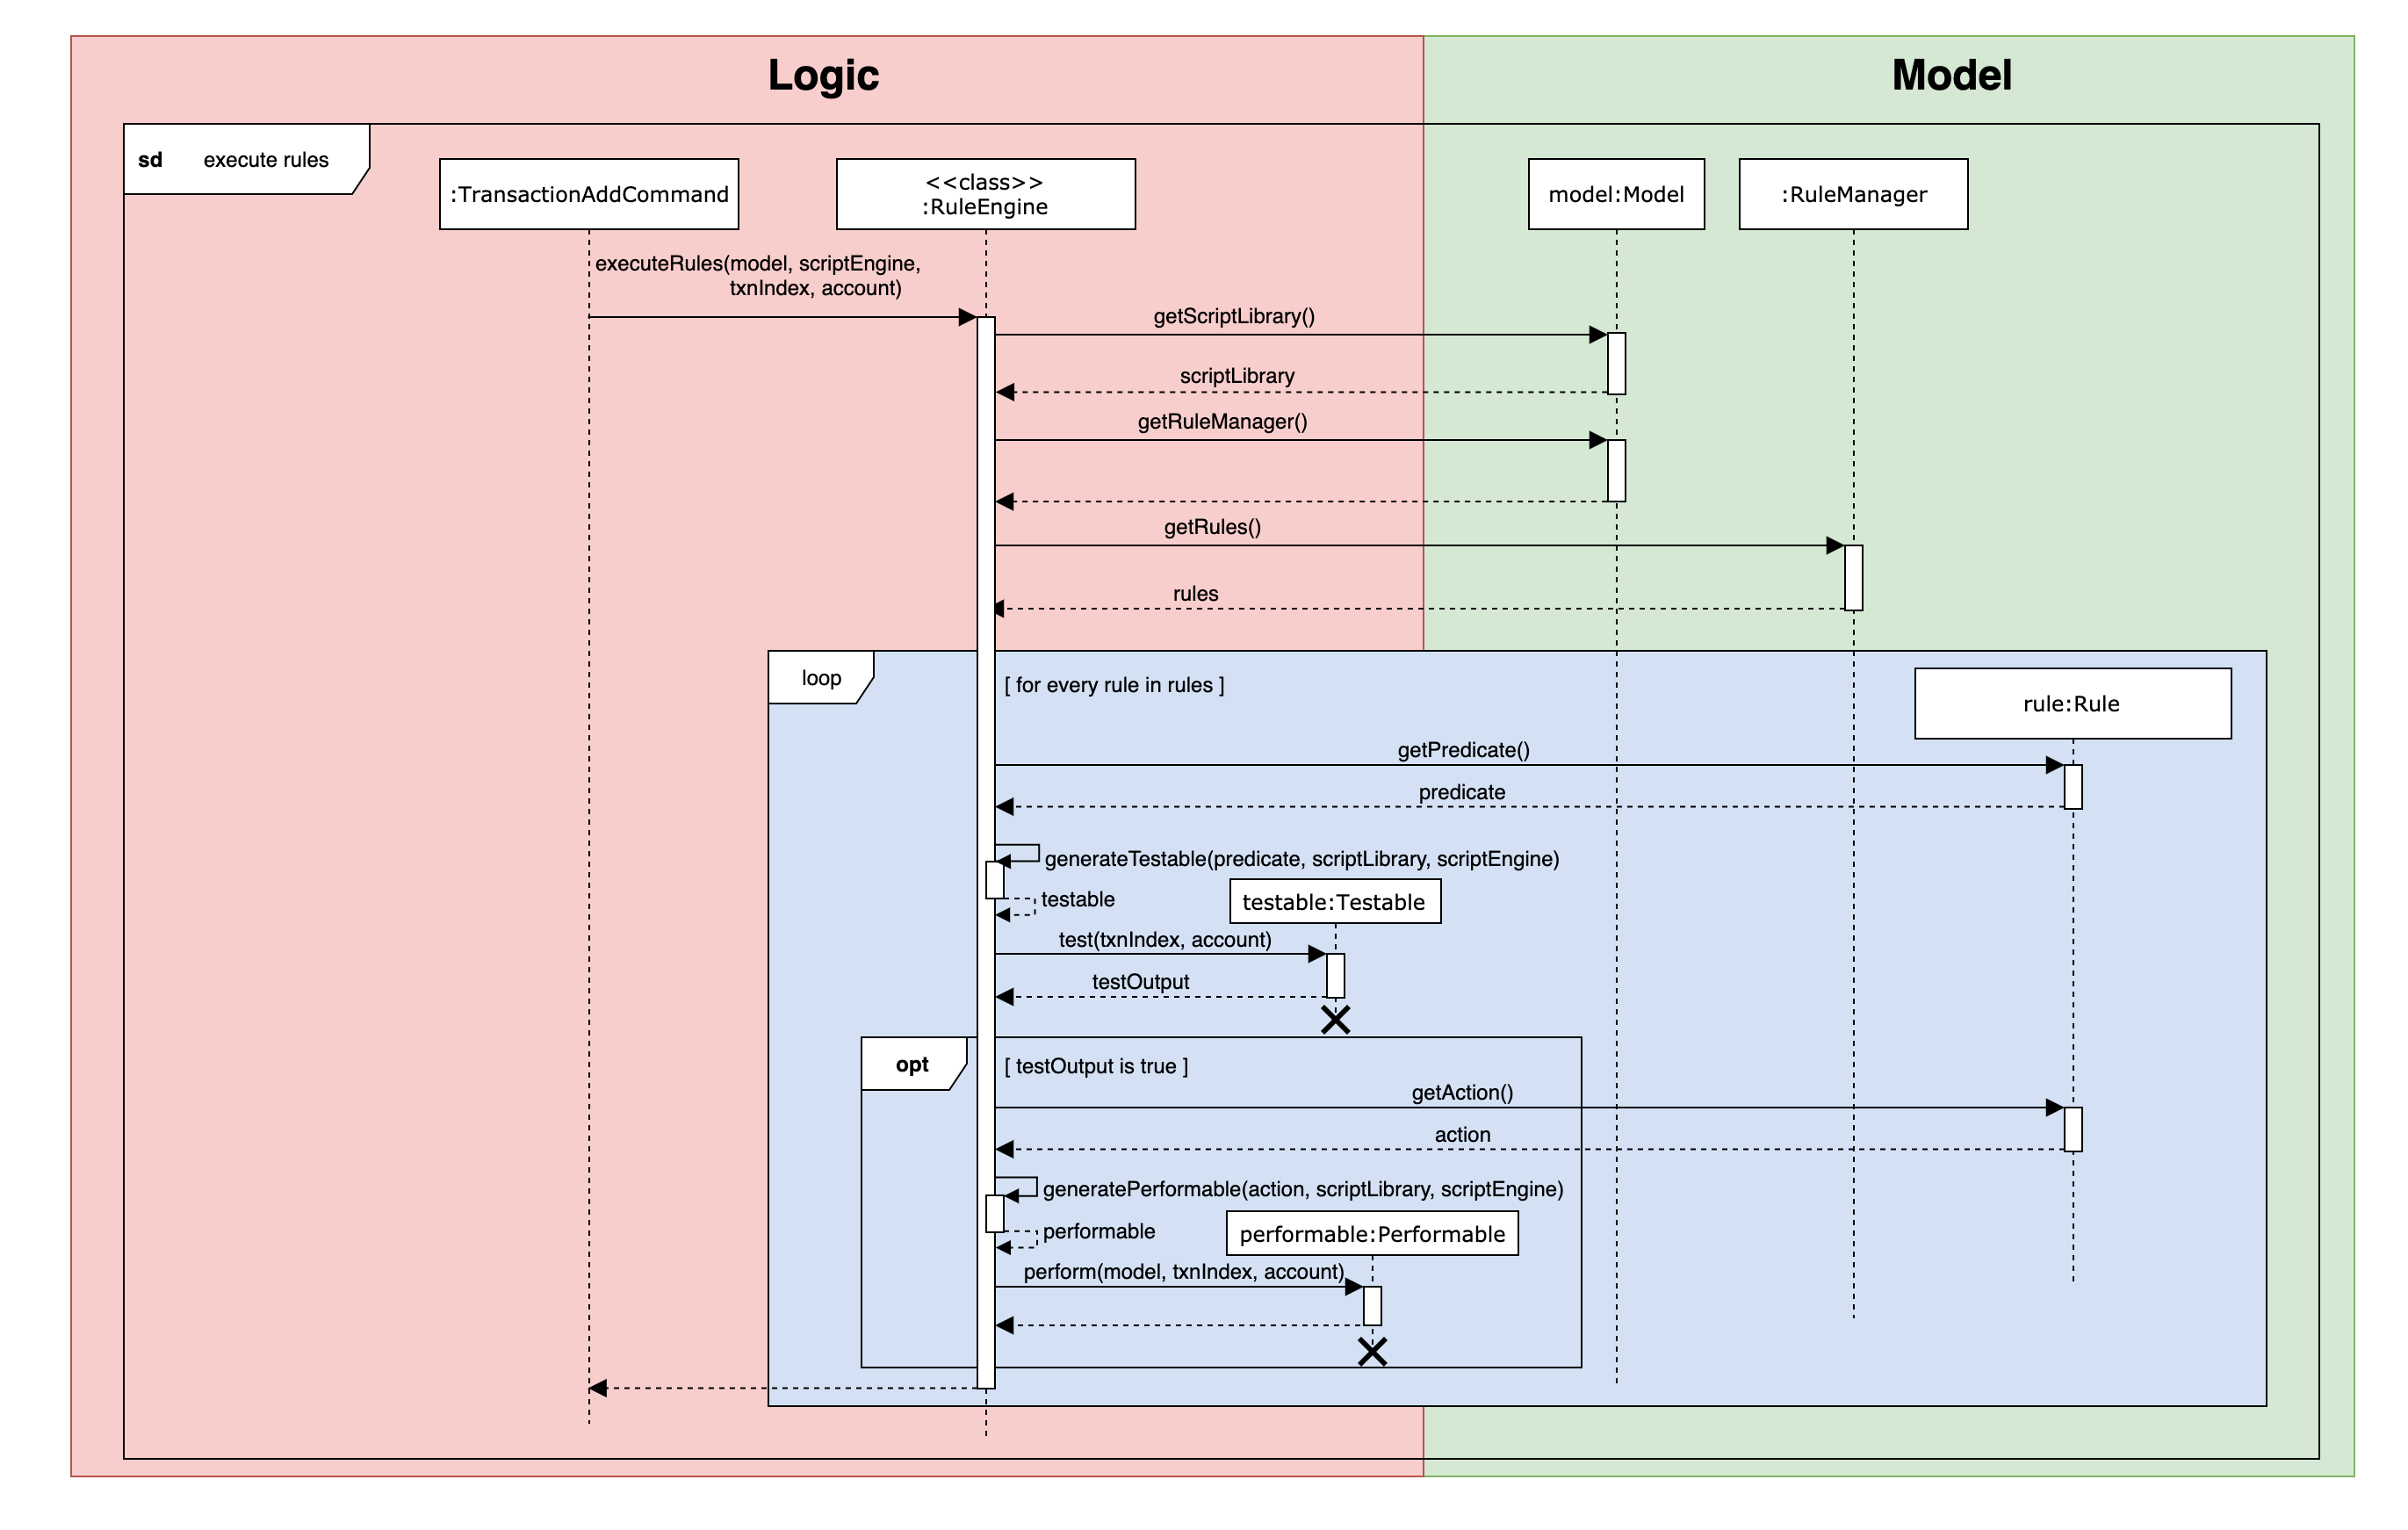
Shown above is a sequence diagram which takes place during the execution of the TransactionAddCommand,
after the new transaction has already been added. The RuleEngine takes over, and retrieves the relevant handlers from
Model.
Thereafter, the list of rules is retrieved from the RuleManager. The RuleEngine iterates through the list,
using the RulePredicate and RuleAction of each rule to create the required Testables for testing on the
transaction, as well as the Performables for performing the action.
The following activity diagram shows in greater detail the workflow of executing rules.
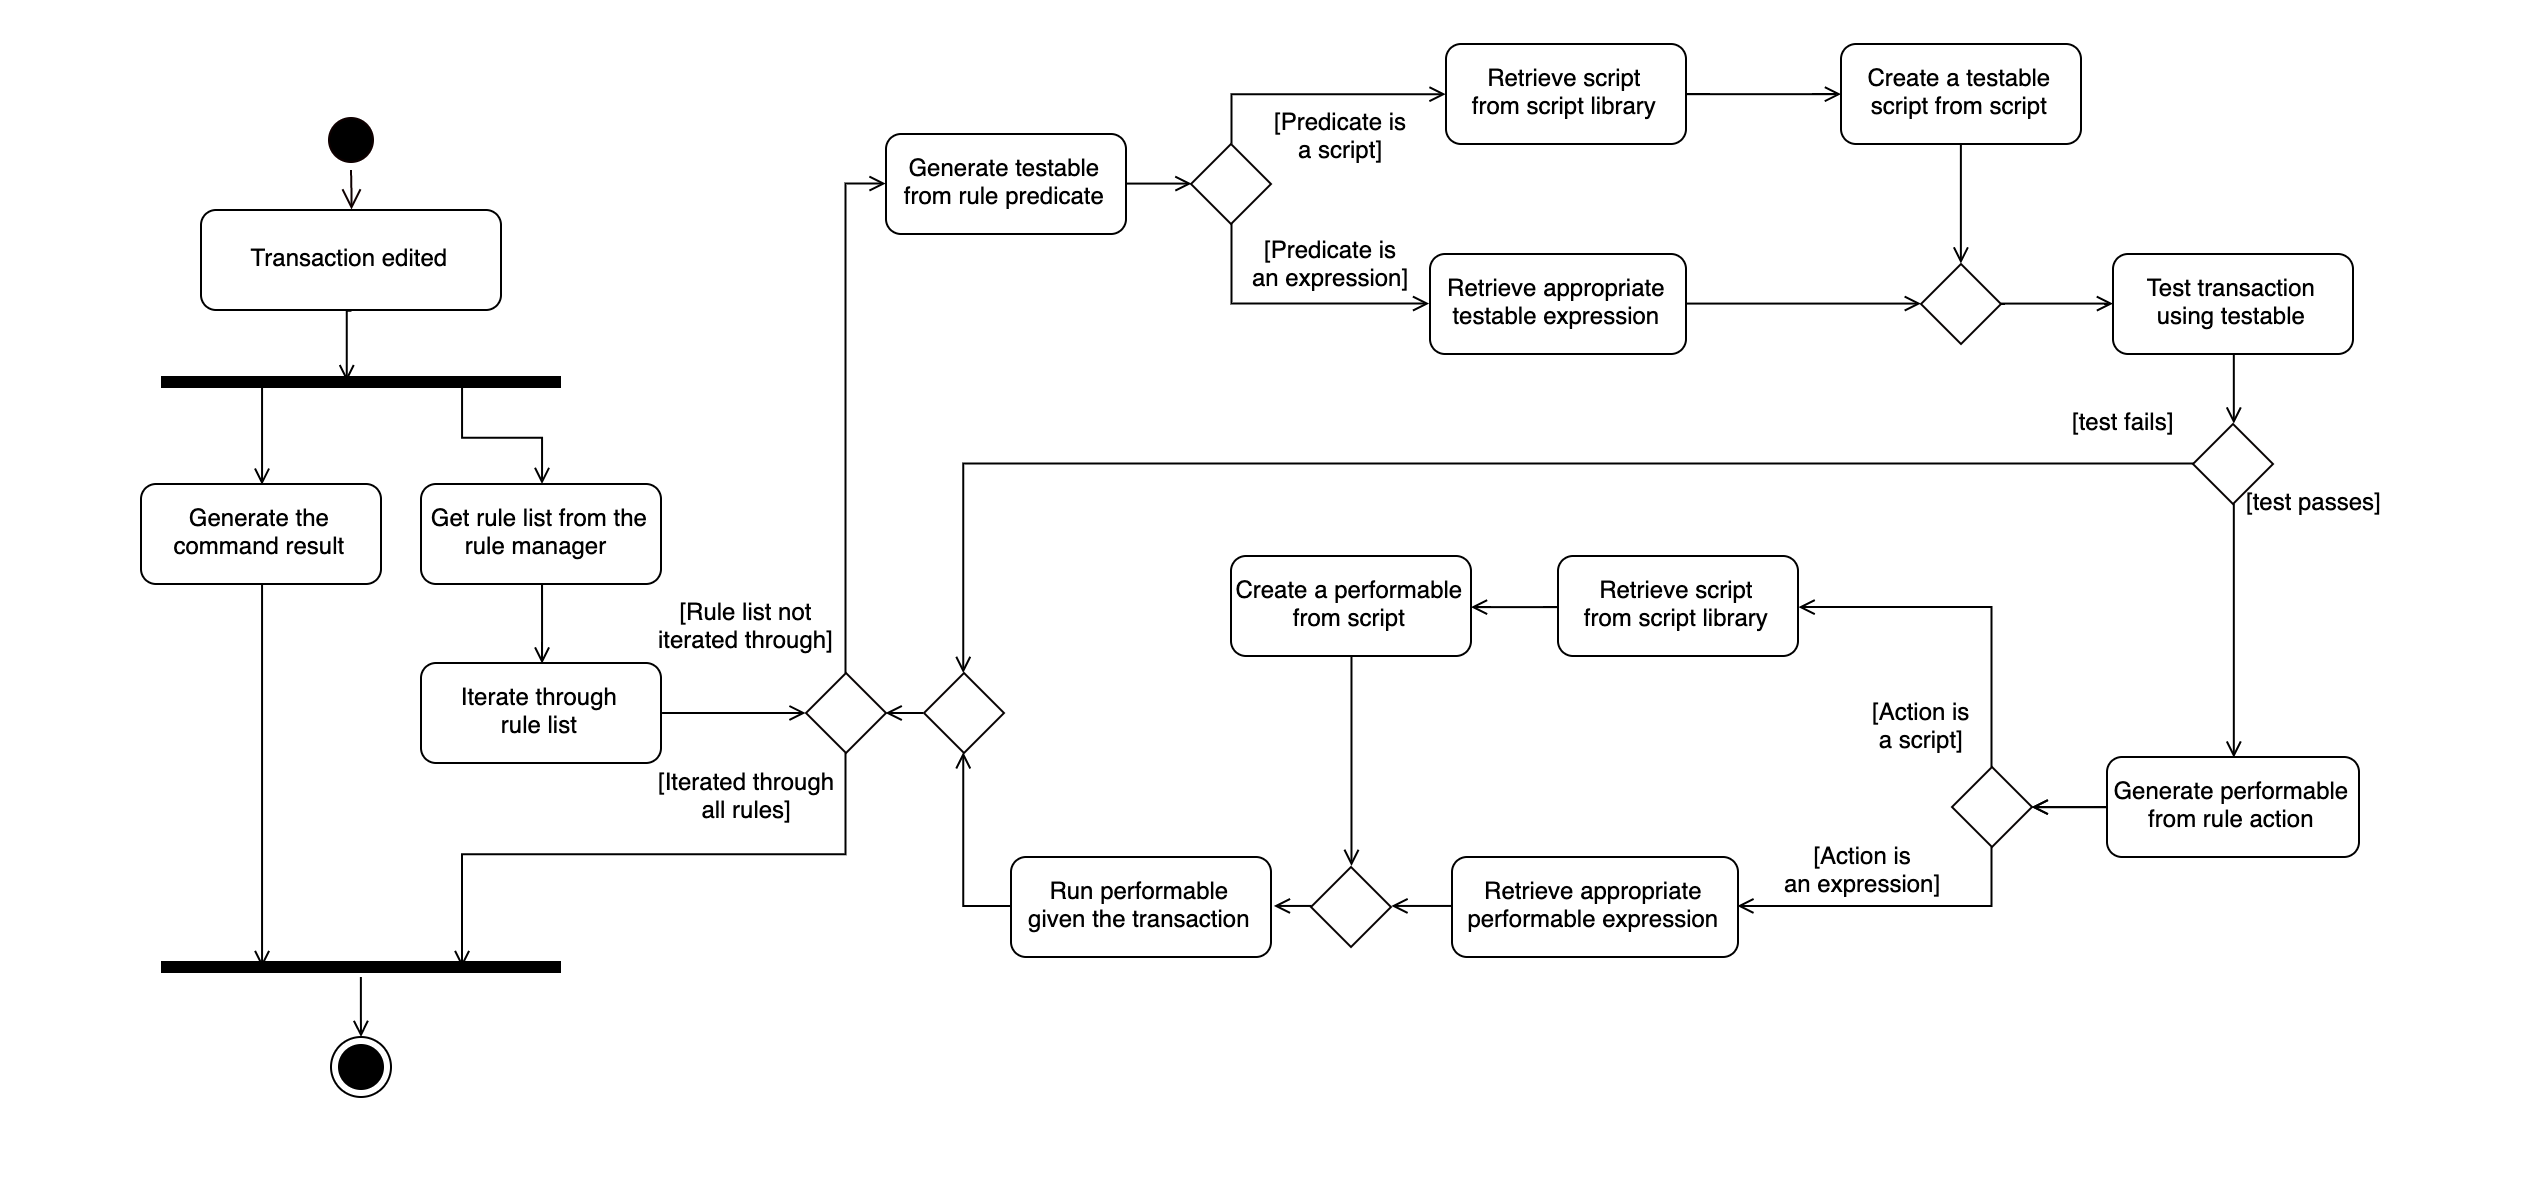
The activity diagram above has a slightly different context as the sequence diagram, to show a separate use case. In this diagram, instead of a new transaction that is added, we have a transaction that is edited. Both types of commands do not affect the workflow of rule execution.
In this diagram, the generation of a Testable and Performable is shown in greater detail.
Testable is an interface which, like RulePredicate, have its implementations split into expressions and scripts,
namely TestableExpression and TestableScript.
Similarly, Performable is an interface which, like RuleAction, have its implementations split into expressions
and scripts, namely PerformableExpression and PerformableScript.
Expressions are generated by the RuleEngine when either the RulePredicate or RuleAction are of the expression type.
The RuleEngine will retrieve the correct expression constructor from an internal hash map based on the Operator,
and create the expression using the given attribute and/or value.
Scripts, on the other hand, are generated by the RuleEngine when either the RulePredicate or RuleAction are of
the script type. The RuleEngine will generate the corresponding Testable or Performable by first retrieving
the script from the ScriptLibrary based on its ScriptName. Following that, a TestableScript or PerformableScript
is instantiated with a function ScriptEvaluator, which evaluates the script given the transaction and account. This
function is then called when Testable#test or Performable#perform is executed.
3.8.2. Design Considerations
Aspect: Duplication of predicates and actions in model and logic
-
Alternative 1 (current choice): Both predicates and actions have their corresponding versions in both model and logic.
-
Pros: Able to split the logic flow and execution code from the data in model.
-
Cons: Seemingly duplicate classes, such as
PredicateExpressionandTestableExpression, which increases the number of classes.
-
-
Alternative 2: All execution data and logic is stored in the rule model rather than logic.
-
Pros: Reduce class duplication, less confusion.
-
Cons:
ModelandLogicwill have unnecessary coupling which reduces testability and makes maintenance and integration harder.
-
3.9. Scripting
The scripting feature allows users to write scripts to automate tasks and extend the functionality of Budget Buddy.
3.9.1. Implementation
The script engine works independently of the rest of the application. At its core, it uses the Nashorn ECMAScript 5.1 engine bundled with Java 11 to evaluate scripts.
A set of convenience functions are provided to make basic tasks, such as manipulating transactions and accounts, easier. The full model is nevertheless exposed to scripts, and scripts are able to access any classes provided in the Java 11 standard library, as well as any dependencies included in the application.
There is a simple mechanism to store scripts to be run in future. This works together with rules to give the ability to have complex predicates and actions outside of those supported inherently by the program.
When the proposed alias feature is implemented, scripts and aliases can be used together to, in effect, allow users to create custom commands.
The following class diagram illustrates the design of the script engine and model. For clarity, parts of the model and logic components that do not interact directly with the script engine are omitted.
Script engine
The logic component of the scripts feature contains the
ScriptEngine
class which underpins the entire scripting component. At its heart, the ScriptEngine class is
simply a thin layer to abstract away the underlying script engine (in our case, Nashorn). It contains a method
evaluateScript that accepts a string of script code, and arguments for the script, and
then evaluates the script. There is an overload of evaluateScript that accepts a Script
from the script model, which is simply a convenience method. There is no other relationship
between the logic and model components.
The logic component also contains methods setVariable, addToEnvironment and resetEnvironment
that allow functions and variables to be set in the script environment, to provide helper functions
to the scripts, like those in the Scripting API.
To allow other components to add helper functions to the script environment,
without the script engine having to be aware of those components,
the ScriptEngine accepts ScriptEnvironmentInitialisers. A ScriptEnvironmentInitialiser
is a FunctionalInterface that simply accepts a ScriptEngine and does some setup
on it e.g. setting variables and functions using ScriptEngine#setVariable. ScriptEngine
maintains a list of ScriptEnvironmentInitialisers and re-applies them each time
ScriptEngine#resetEnvironment is called.
Library and storage
The model component of the scripts feature is a simple script library that allows
users to store scripts with a name and a description for repeated use. See the interface
ScriptLibrary
and its implementation
ScriptLibraryManager.
Scripts are persisted as individual files under the scripts/ directory in
Budget Buddy’s data directory. Script names are not stored separately, but simply
used as the file name of the scripts with a .js extension. See
FlatfileScriptsStorage.
The script descriptions are stored in a separate descriptions.json file.
User interface
The last component of the scripts feature is the user interface.
The script engine is presented to the user as a set of simple commands.
script eval and script run
run scripts, while script reset resets the script environment.
script add, script list
and script delete manage the script library.
The following sequence diagram shows the interaction between the different components
when the user runs a script from the script library using script run my-script.
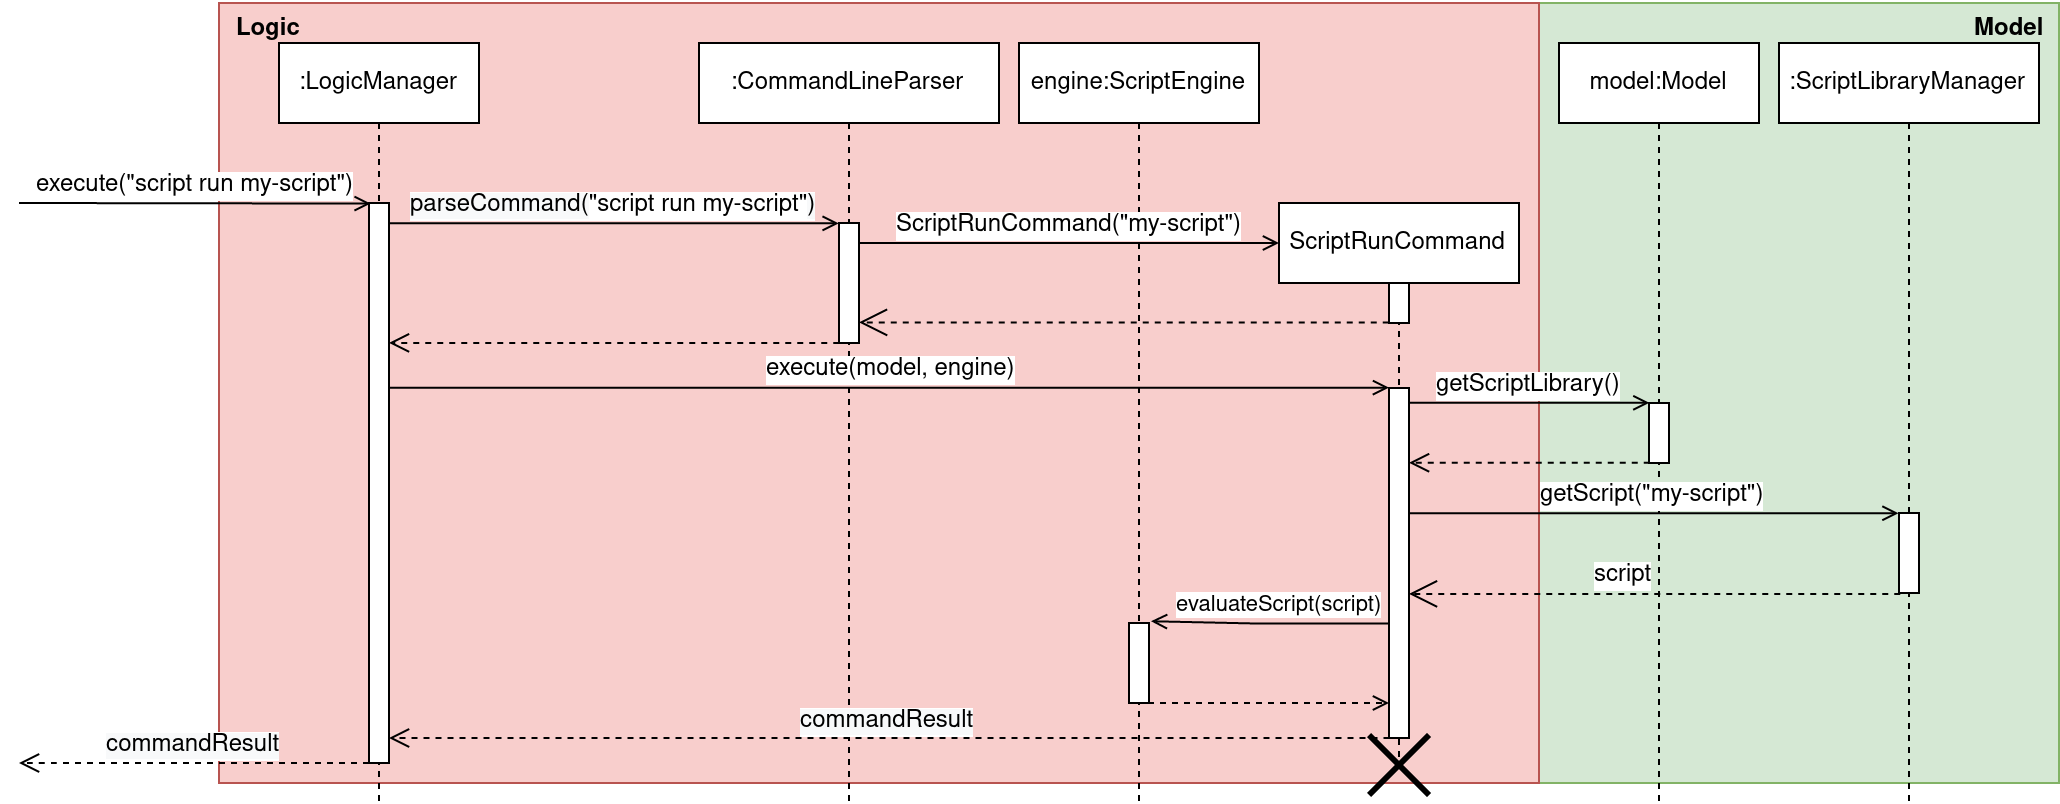
script run my-scriptThe command is parsed into ScriptRunCommand by the command line parser.
ScriptRunCommand then retrieves the Script from the ScriptLibraryManager
and then hands the Script to ScriptEngine for evaluation.
Script bindings
Script bindings are added via
ScriptEnvironmentInitialisers, which are registed with the ScriptEngine through Logic#addToScriptEnvironment.
Most of the functions exposed in the Scripting API
come from the script-model bindings, in
ScriptModelBinding.
JavaFX-specific bindings are added in
ScriptUiBinding,
and bindings that require access to MainWindow internals are added in a private inner class of MainWindow.
Methods in the binding classes are added into the script environment by casting
their method references to appropriate FunctionalInterfaces. Nashorn allows
objects which implement a FunctionalInterface to be called as if they were
functions, providing an ergonomic scripting experience for the user. Nashorn also
helps to do some type conversion from JavaScript types to Java types, saving on
the amount of boilerplate required in our implementation.
We declare an
entire suite of functional interfaces in
ScriptBindingInterfaces.
We do not use the functional interfaces provided in the Java package java.util.function
because of these reasons:
-
These interfaces cannot be used if the methods throw any checked exceptions. Many script methods involve parsing strings into appropriate model types, which means that parsing exceptions need to be thrown, but they are checked exceptions.
-
These interfaces have generic type parameters. However, because Java implements generics using type erasure, it is not possible for Nashorn to determine the actual types of parameters, in order to do automatic conversion between JavaScript and Java types, if functional interfaces with generic type parameters were used. (They would all appear as
Objectat runtime.) This is also the reason that we do not use generics in the functional interfaces inScriptBindingInterfaces.
3.9.2. Design considerations
Aspect: JavaScript engine
Two JavaScript engines were considered.
-
Alternative 1 (current choice): Use the Nashorn JavaScript engine.
-
Pros: It is bundled with Java 11.
-
Cons: It is deprecated and marked for removal in a future Java version, and it also interprets scripts, so it is slower than GraalVM.
-
-
Alternative 2: Use the GraalVM engine.
-
Pros: It is well-maintained, and it also just-in-time (JIT) compiles scripts, so it will be faster than Nashorn.
-
Cons: It is not bundled with Java 11, so it is an additional dependency.
-
We chose Nashorn because:
-
While it is slower, it is not too slow for the kinds of lightweight scripting tasks in Budget Buddy.
-
While it is deprecated, we are targetting specifically Java 11, so its future removal is not a concern at this moment.
-
It is bundled with Java 11, so we do not need to manage and ship an additional dependency.
Aspect: Script bindings
-
Alternative 1 (current choice): Use functional interfaces.
-
Pros: It requires less marshalling code in Budget Buddy, because Nashorn helps to perform most of the type conversion.
-
Cons: Many functional interfaces need to be declared for every unique method signature exposed to the script environment.
-
-
Alternative 2: Extend Nashorn’s
AbstractJSObject, overriding thecallmethod.-
Pros: No extra declarations (e.g. functional interfaces) need to be made if a new method signature is to be exposed to the script environment.
-
Cons: Nashorn’s built-in type conversion and marshalling are not applicable; it has to be done manually in our
AbstractJSObjectsubclass.
-
3.10. [Proposed] Aliases
The alias is a simple hook into the command parsing engine. If there is no built-in command corresponding to a command line, then the alias map is checked. If there is a matching alias, then the alias name in the command line is replaced, and the command execution is re-tried.
To prevent alias loops where the user creates an alias x mapping to y, and an
alias y mapping to x, we track the aliases that have been applied, and
stop evaluation if we see that the same alias has been applied more than once.
The following activity diagram illustrates the above algorithm.

3.11. Logging
We are using java.util.logging package for logging. The LogsCenter class is used to manage the logging levels and logging destinations.
-
The logging level can be controlled using the
logLevelsetting in the configuration file (See Section 3.12, “Configuration”) -
The
Loggerfor a class can be obtained usingLogsCenter.getLogger(Class)which will log messages according to the specified logging level -
Currently log messages are output through:
Consoleand to a.logfile.
Logging Levels
-
SEVERE: Critical problem detected which may possibly cause the termination of the application -
WARNING: Can continue, but with caution -
INFO: Information showing the noteworthy actions by the App -
FINE: Details that is not usually noteworthy but may be useful in debugging e.g. print the actual list instead of just its size
3.12. Configuration
Certain properties of the application can be controlled (e.g user prefs file location, logging level) through the configuration file (default: config.json).
4. Documentation
Refer to the guide here.
5. Testing
Refer to the guide here.
6. Dev Ops
Refer to the guide here.
Appendix A: Product Scope
Target user profile:
-
has a need to manage expenses and income over a significant period of time
-
prefer desktop apps over other types
-
can type fast
-
prefers typing over mouse input
-
is reasonably comfortable using CLI apps
-
capable of basic programming to customize the app to their liking
Value proposition: manage expenses/income faster than a typical mouse/GUI driven app
Appendix B: User Stories
Priorities: High (must have) - * * *, Medium (nice to have) - * *, Low (unlikely to have) - *
| Priority | As a … | I want to … | So that I can… |
|---|---|---|---|
|
user |
see an overview of all my spending from month to month |
better judge my expense/income ratio |
|
user who borrows and loans money frequently |
track who owes me money/who I owe money to |
settle my debts |
|
careful spender |
dedicate different accounts to different holidays |
control how much I spend while on the holidays |
|
busy user |
keep track of my spending in different account books |
segregate completely unrelated spending |
|
lazy user |
simplify repetitive actions by setting rules for every transaction added |
automate repetitive and tedious processes |
|
SoC student experienced in writing programs |
write my own scripts to manipulate entries in the app |
automate and customize the app to my liking |
|
spendthrift |
set a budget for my monthly spending |
avoid breaking the bank again |
|
lazy user |
key in recurring expenses just once |
do not have to enter them over and over again |
|
careful spender |
make month-to-month comparisons of spending in a particular category |
see where additional expenses for certain months come from |
|
cautious spender |
carry over any budget deficits incurred each month to the following month |
remember to repay it |
|
SoC student who has to pay school fees regularly |
track how much I’ll have to pay and when I have to pay it by |
avoid making late payments |
|
ambitious user |
set goals for my cumulative income |
work towards my dream home/car/goal |
|
careless user |
undo a mistake |
not worry even if I accidentally make an error |
|
careful spender |
set different currencies for different accounts |
see my expenditure during a holiday in the local currency |
|
lazy person |
import expenses from csv exports from internet banking |
transfer my records across software |
|
supremely lazy user |
have the program detect recurring transactions and suggest them to me |
not waste time adding them manually |
|
paranoid user |
have the program show me all possible commands and how to use them |
know exactly what I am doing |
|
user who prefers visuals |
see a chart of my budget spending across past months |
see how much I have been overspending/underspending |
|
busy user |
move and delete multiple transactions at the same time |
be more efficient |
|
lazy user |
have the program autofill my command as I am typing it |
enter my transactions more quickly |
|
user who cannot control spending |
set a budget for different purposes |
control my spending |
|
lazy user |
have the app to have predictive commands based on what transactions I commonly include |
spend less time typing in my expenses |
|
fast typer |
type out multiple commands all at once |
type the next command without having to pause |
|
person who occasionally goes overseas |
assign an exchange rate to each foreign currency transaction |
get reports on my total expenditure in my home currency |
|
busy user |
see my overall budget surplus/deficit at a glance |
know straight away when I’m below or above my budget for that month |
|
meticulous user |
see how much I need to budget every month to reach a savings goal based on what the goal is and its deadline |
plan my budget well |
|
unmotivated person |
be rewarded for entering my expenses/income daily |
be motivated to do so and eventually turn it into a habit |
|
expense planner |
record down possible future expenses |
keep track of what I planned to spend on |
|
forgetful user |
have the app set reminders |
keep track of my spending everyday |
Appendix C: Use Cases
(For all use cases below, the System is Budget Buddy and the Actor is the user, unless specified otherwise)
Use case: Delete transaction
MSS
-
User requests to list transactions.
-
Budget Buddy shows a list of transactions for the current account.
-
User requests to delete a specific transaction in the list.
-
Budget Buddy deletes the transaction.
Use case ends.
Extensions
-
2a. The list is empty.
Use case ends.
-
3a. The given index is invalid.
-
3a1. Budget Buddy shows an error message.
Use case resumes at step 2.
-
C.1. Use case: Add loan
MSS
-
User requests to add a loan out.
-
Budget Buddy adds the loan for the given person.
Use case ends.
Extensions
-
1a. The given loan out value is not positive.
-
1a1. Budget Buddy shows an error message.
Use case resumes at step 1.
-
C.2. Use case: Edit loan
MSS
-
User requests to list loans.
-
Budget Buddy shows a list of loans.
-
User requests to edit the description of a loan in the list.
-
Budget Buddy edits the description of the specified loan.
Use case ends.
Extensions
-
2a. The list is empty.
Use case ends.
-
2a. The given loan index is invalid.
-
2a1. Budget Buddy shows an error message.
Use case resumes at step 2.
-
C.3. Use case: Add account
MSS
-
User requests to add a new account.
-
Budget Buddy creates the new account.
Use case ends.
Extensions
-
1a. No account name was provided.
-
1a1. Budget Buddy shows an error message.
Use case resumes at step 1.
-
C.4. Use case: Add rule
MSS
-
User requests to add a new rule.
-
Budget Buddy creates the new rule.
Use case ends.
Extensions
-
1a. No predicate was provided.
-
1a1. Budget Buddy shows an error message.
Use case resumes at step 1.
-
-
1b. No action was provided.
-
1b1. Budget Buddy shows an error message.
Use case resumes at step 1.
-
-
1c. Predicate is an expression but not in the form of <attribute> <operator> <value>.
-
1c1. Budget Buddy shows an error message.
Use case resumes at step 1.
-
Appendix D: Non Functional Requirements
-
Should work on any mainstream OS as long as it has Java
11or above installed. -
Should be able to hold up to 1000000 transactions without a noticeable sluggishness in performance for typical usage.
-
A user with above average typing speed for regular English text (i.e. not code, not system admin commands) should be able to accomplish most of the tasks faster using commands than using the mouse.
Appendix F: Instructions for Manual Testing
Given below are instructions to test the app manually.
| These instructions only provide a starting point for testers to work on. |
F.1. Launch and Shutdown
-
Initial launch
-
Download the jar file and copy into an empty folder
-
Double-click the jar file
Expected: Shows the GUI starting in the transaction panel. The window size may not be optimum.
-
-
Saving window preferences
-
Resize the window to an optimum size. Move the window to a different location. Close the window.
-
Re-launch the app by double-clicking the jar file.
Expected: The most recent window size and location is retained.
-
F.2. Accounts
F.2.1. Adding an Account
-
Adding an account when no duplicate account exists in the list
-
Prerequisites: None
-
Test case:
account add n/food
Expected: An account with name "food" is added to the current list of accounts.
-
F.2.2. Deleting an Account
-
Deleting an account while all accounts are listed
-
Prerequisites: List all persons using the
account listcommand. More than one account in the list. -
Test case:
account delete 1
Expected: First account is deleted from the list. Details of the deleted account shown in the status message. -
Test case:
account delete 0
Expected: No account is deleted. Error details shown in the status message. -
Other incorrect delete commands to try:
account delete,account delete x(where x is larger than the list size)
Expected: Similar to previous.
-
F.2.3. Editing an Account
-
Editing one or all specified fields of an existing account from the account list
-
Prerequisites: List all accounts using the
account listcommand. At least one account in the list. -
Test case:
account edit 1 n/food
Expected: The name field of the first account is changed to "food".
-
F.2.4. Finding Account(s)
-
Finding account(s) that contain specified keyword in their names
-
Prerequisites: None.
-
Test case:
account find trip
Expected: Account(s) that contain the keyword "trip" in their names will be listed.
-
F.2.5. Viewing the Report of an Account
-
Viewing the details of an existing account in the account list
-
Prerequisites: None.
-
Test case:
account report 2
Expected: The details of the account will be displayed in the commandBox textfield.
-
F.2.6. Viewing the Report of all Accounts
-
Viewing the reports of all accounts to have an overview of the user’s financial status.
-
Prerequisite: None.
-
Test case:
account overview
Expected: Successful message will be displayed, with an html file generated containing the overview in the exports folder.
-
F.3. Loans
F.3.1. Adding a Loan
-
Adding a loan when no duplicate loan exists in the list
-
Prerequisites: None
-
Test case:
loan out x/4.20 p/John d/For dinner
Expected: A loan is added to the list at the appropriate position based on the current sorting order. The date of the loan should be the current system date.
-
F.3.2. Listing Loans
-
Listing loans in the main display panel with optional filtering/sorting
-
Prerequisites: None
-
Test case:
loan listExpected: All loans are listed. -
Test case:
loan list out p/John s/pExpected: Only loans out involving the person "John" are listed. The list is also sorted by person in alphabetical order.
-
F.3.3. Editing a Loan
-
Editing an existing loan while all loans are listed
-
Prerequisites: List all loans using the
loan listcommand. At least one loan in the list. -
Test case:
loan edit 1 x/500Expected: First loan’s amount is changed to $500 and it is sorted into the appropriate position based on the current sorting order.
-
F.3.4. Marking a Loan as Paid
-
Marking an existing loan as paid while all loans are listed
-
Prerequisites: List all loans using the
loan listcommand. At least one loan in the list that is unpaid. -
Test case:
loan paid 1Expected: First loan is marked as paid. A "tick" icon should appear to the left of the loan’s index. -
Test case:
loan paid p/JohnExpected: All loans pertaining to the person "John" are marked as paid.
-
F.3.5. Marking a Loan as Unpaid
-
Marking an existing loan as unpaid while all loans are listed
-
Prerequisites: List all loans using the
loan listcommand. At least one loan in the list that is paid. -
Test case:
loan unpaid 1Expected: First loan is marked as unpaid. The "tick" icon should disappear from the left of the loan’s index. -
Test case:
loan unpaid p/JohnExpected: All loans pertaining to the person "John" are marked as unpaid.
-
F.3.6. Deleting a Loan
-
Deleting an existing loan while all loans are listed
-
Prerequisites: List all loans using the
loan listcommand. At least one loan in the list. -
Test case:
loan delete 1Expected: Deletes the first loan from the list. -
Test case:
loan delete p/JohnExpected: All loans pertaining to the person "John" are deleted.
-
F.3.7. Splitting a Payment into Loans
-
Splitting a group payment into loans/debts
-
Prerequisites: None
-
Test case:
loan split p/John x/0 p/Mary x/10 p/Peter x/90Expected: Displays a list saying John owes Peter $3.33 and Mary owes Peter $23.33. -
Test case:
loan split p/John x/0 max/10 p/Mary x/10 p/Peter x/30 p/Bruce x/90 p/Thomas x/50 me/John d/Big lunchExpected: Displays a list saying Mary owes Bruce $32.50, Peter owes Bruce $12.50, and You owe Bruce and Thomas $2.50 and $7.50 respectively. Two new loans out to Bruce and Thomas should be added to the normal loan list as well (pressCtrl + Dto switch between the two lists).
-
F.4. Rules
F.4.1. Listing rules
-
Listing rules while another panel is shown
-
Prerequisites: Display another panel using
account list,loan list,txn list, orscript list. -
Test case:
rule list
Expected: Current panel switches over to the rule panel and displays rule list.
-
-
Listing rules while on rule panel.
-
Prerequisites: Display the rule panel with with
rule list. -
Test case:
rule list
Expected: Current panel remains on the rule panel, displays rule list.
-
F.4.2. Adding a rule
-
Adding a rule while on a different panel
-
Prerequisites: Display another panel using
account list,loan list,txn list, orscript list. -
Test case:
rule add p/desc = m a/set_desc Monthly Allowance+ Expected: Rule is created, panel switches to rule panel. -
Test case:
rule add p/it is monday a/prep_desc [Monday]Expected: No rule created. Error details shown in the status message. -
Other incorrect rule add commands to try:
rule add a/set_in,rule add p/outamt > 100
Expected: Similar to previous.
-
-
Adding a rule while on the same panel
-
Same test cases as above: e.g.
rule add p/desc = m a/set_desc Monthly AllowanceExpected: Similar output as above, app remains on the rule panel.
-
F.4.3. Editing a rule
-
Editing a rule on the same panel
-
Prerequisite: At least 1 rule in the list.
-
Test case:
rule edit 1 p/date < 11/11/2019Expected: Rule is edited and edited rule is shown on the rule list. -
Test case:
rule edit 0 p/date < 11/11/2019Expected: No rule edited. Error details shown in the status message. -
Other incorrect rule edit commands to try:
rule edit 1,rule edit 1 p/outamt contains letters,rule edit 1 a/Expected: Similar to previous.
-
-
Editing a rule on a different panel
-
Prerequisites: Display another panel using
account list,loan list,txn list, orscript list. At least 1 rule in the list. -
Same test cases as above: e.g.
rule edit 1 p/date < 11/11/2019Expected: Similar output as above, app switches over to the rule panel if rule is successfully edited.
-
F.4.4. Deleting a rule
-
Deleting a rule
-
Prerequisites: More than 1 rule in the list
-
Test case:
rule delete 1Expected: Rule is deleted. If not on the rule panel, app switches to rule panel. -
Test case:
rule delete 0Expected: No rule deleted. Error details shown in the status message. -
Other incorrect delete commands to try:
rule delete,rule delete x(where x is larger than the list size)
Expected: Similar to previous.
-
F.4.5. Executing rules
-
Rules are executed on newly added transaction
-
Prerequisites:
-
Add rule:
rule add p/desc = m a/set_desc Monthly Allowance -
Add rule:
rule add p/inamt > 100 a/set_cat Large Savings
-
-
Test case:
txn dn/in x/10 d/mExpected: Transaction is added. Transaction description seen in the transaction panel is "Monthly Allowance". -
Test case:
txn dn/in x/100 d/mExpected: Similar to previous. Transaction also has a category "Large Savings" -
Test case:
txn dn/out x/100 d/BuffetExpected: Transaction is added. Rules do not apply to transaction. No change to description or categories.
-
F.5. Scripts
F.5.1. Evaluating an expression
-
Evaluating an expression
-
Prerequisites: None
-
Test case:
script eval 123 + 456Expected: "579" is shown in the command result box. -
Test case:
script eval showAlert("Hello", "World")Expected: An alert box with "Hello" as the title and "World" as the message is shown. "Script succeeded with no result." is shown in the command result box.
-
F.5.2. Listing scripts
-
Listing scripts
-
Prerequisites: A tab other than the script tab is active.
-
Test case:
script listExpected: The script tab is activated.
-
F.5.3. Adding a script
-
Adding a script from the command line
-
Prerequisites: No script named
hello-worldexists. -
Test case:
script add hello-world s/"Hello world"Expected: The script tab is shown. "New script hello-world added." is shown in the command result box. A scripthello-worldwith description "No description provided" is shown in the list of scripts.
-
-
Adding a script from file
-
Prerequisites: No script named
hello-worldexists. -
Test case:
script add hello-worldExpected: The script tab is shown. A file picker dialog appears. Once any file is selected, "New script hello-world added." is shown in the command result box. A scripthello-worldwith description "No description provided" is shown in the list of scripts.
-
F.5.4. Running a script
-
Running a script
-
Prerequisites:
script add hello-world s/"Hello world" -
Test case:
script run hello-worldExpected: "Hello world" is shown in the command result box.
-
F.5.5. Deleting a script
-
Deleting a script
-
Prerequisites:
script add hello-world s/"Hello world" -
Test case:
script delete hello-worldExpected: The script tab is shown. "Script hello-world deleted." is shown in the command result box. No script with the namehello-worldis listed in the list of scripts.
-
F.5.6. Resetting the scripting environment
-
Resetting the scripting environment
-
Prerequisites:
script eval var a = 1 -
Test case:
script reset, thenscript eval aExpected: "Exception while evaluating script: javax.script.ScriptException: ReferenceError: "a" is not defined in <eval> at line number 1" is shown in the command result box.
-