PROJECT: Budget Buddy
This portfolio provides a detailed report of my contributions to Budget Buddy.
Overview
Students taking part in this project were tasked to either enhance or morph a simple CLI-based address book application. We decided to create a finances tracker, Budget Buddy, for NUS Computing Students, to both address the need by students to manage their finances, as well as customise the application’s features to suit our users as much as possible, leveraging on their familiarity with typing and using a CLI.
Budget Buddy is a finances tracker designed around the needs and habits of NUS School of Computing students. Interaction is mainly through a Command Line Interface (CLI), and results are displayed via a Graphical User Interface (GUI) powered by JavaFX.
Budget Buddy can keep track of transactions across separate accounts, so that users can clearly and conveniently organise their spending. The application can also keep track of loans that users have made, addressing the habit of our users often borrowing money from one another, but having trouble remembering exactly who owes money to them, and how much they owe.
Going above and beyond the basic functions that many other trackers have, Budget Buddy also has the ability to run Scripts and Rules that users have created. These scripts and rules can then carry out custom actions as defined by the users, who should have some experience with writing code. By capitalising on their programming know-how to create a truly personalised experience, Budget Buddy distinguishes itself from other finance trackers out there.
Project Role
My role was mainly to implement Transactions within Budget Buddy. Transactions formed the core of Budget Buddy’s finances tracking, and I implemented the functionality to add, edit and delete Transactions from the finances tracker.
The following sections will elaborate further on my contributions regarding this feature, as well as any other contributions that I have made.
Summary of contributions
The following section summarizes my contributions to Budget Buddy. |
Major enhancement
Added functionality to add, edit and remove transactions, as well as to list, sort and filter them.
-
Function: Transactions provide the ability for users to record their day-to-day spending. The ability to delete and edit Transactions allows users to correct mistakes in finances recording, or retroactively update past finances.
-
Purpose: Transactions form the core of the functionality of Budget Buddy. Users will be using it to record their transactions daily, as well as use the sorting and filtering functions to get a clear view of their spending habits and trends.
-
Challenges: Implementing Transactions on their own was a straightforward task, but the difficulties arose with making sure it integrated well with the rest of the functions of Budget Buddy. One example was another enhancement I made to the GUI for showing the active account, and implementing the corresponding logic. The full details are explained below, as a minor enhancement.
Minor enhancement
Make manipulating transactions more intuitive when integrated with accounts, by implementing logic to determine the active account.
-
Function: Because transactions are never manipulated in isolation in Budget Buddy, the Accounts containing them need to be taken care of as well. This feature provided the logic to keep track of the active account, so that transaction commands would not always need to have a specified account, helping Budget Buddy feel more user-friendly and intuitive.
-
Purpose: Transactions are the core feature of Budget Buddy, and hence they should be as user-friendly and intuitive to manipulate as possible.
-
Challenges: Implementing a responsive GUI for Transactions proved to be a challenge, as this was our first time working with JavaFX. It was challenging to think about how to provide a intuitive user experience as well, while maintaining a logical flow to manipulating transactions.
Other contributions
-
GUI Enhancements:
-
Implemented responsive GUI for Active account: Pull request #194
-
-
Bug fixes:
-
Fixed bugs reported regarding Transactions during PE Dry run: Pull request #166
-
-
Documentation:
-
Made contributions to the User Guide/Developer Guide as shown below
-
-
Community:
-
PRs reviewed with non-trivial comments: #34
-
Contributions to the User Guide
Given below are sections I contributed to the User Guide. They showcase my ability to write documentation targeting end-users. |
Managing transactions: txn
Transactions form the core of Budget Buddy. They can be used to track any purchases you make, or any money that you receive. Transactions can further be filtered by various criteria, if you want to find out how much money you’ve spent in a certain time period, or in a certain category of spending.
Add a transaction: txn out|in
This command will add a new transaction of the specified amount and with the given description.
Format: txn dn/out|in x/<amount> d/<description> [a/<account>] [c/<category>] [w/<date>]
Examples:
-
txn dn/out x/3 d/apples a/food c/fruits w/5/4/2019 -
txn dn/in x/50 d/pocket money a/school
Edit a transaction: txn edit
This command will edit the specified transaction, setting the specified fields. At least one field should be provided for editing.
Format: txn edit <id> dn/out|in [x/<amount>] [d/<description>] [a/<account>] [c/<category>] [w/<date>]
Examples:
-
txn edit 1 x/50 d/apple juice c/groceries -
txn edit 4 a/personal
Delete a transaction: txn delete
This command will delete the transaction with the specified ID in the displayed list of transactions.
Format: txn delete <id>
Examples:
-
txn delete 3
List transaction(s): 'txn list'
This will list the transactions from the currently active account, and you can optionally filter/sort them as well.
Format: txn list [c/category] [f/from date] [u/until date] [af/from amount] [au/until amount] [d/description]
[s/aw|dw|ax|dx|ad|dd]
Examples:
-
txn list c/food u/10/4/2019 af/5 au/10 d/fruits s/ad
Contributions to the Developer Guide
Given below are sections I contributed to the Developer Guide. They showcase my ability to write technical documentation and the technical depth of my contributions to the project. |
Transaction Model
Implementation
Transactions are the main elements of the BudgetBuddy’s expenses tracker. Within each Account, a TransactionList is
stored, and inside each TransactionList, Transaction objects are stored internally in the internalList of the
TransactionList.
The class diagram below shows how Transaction objects are stored within an Account.
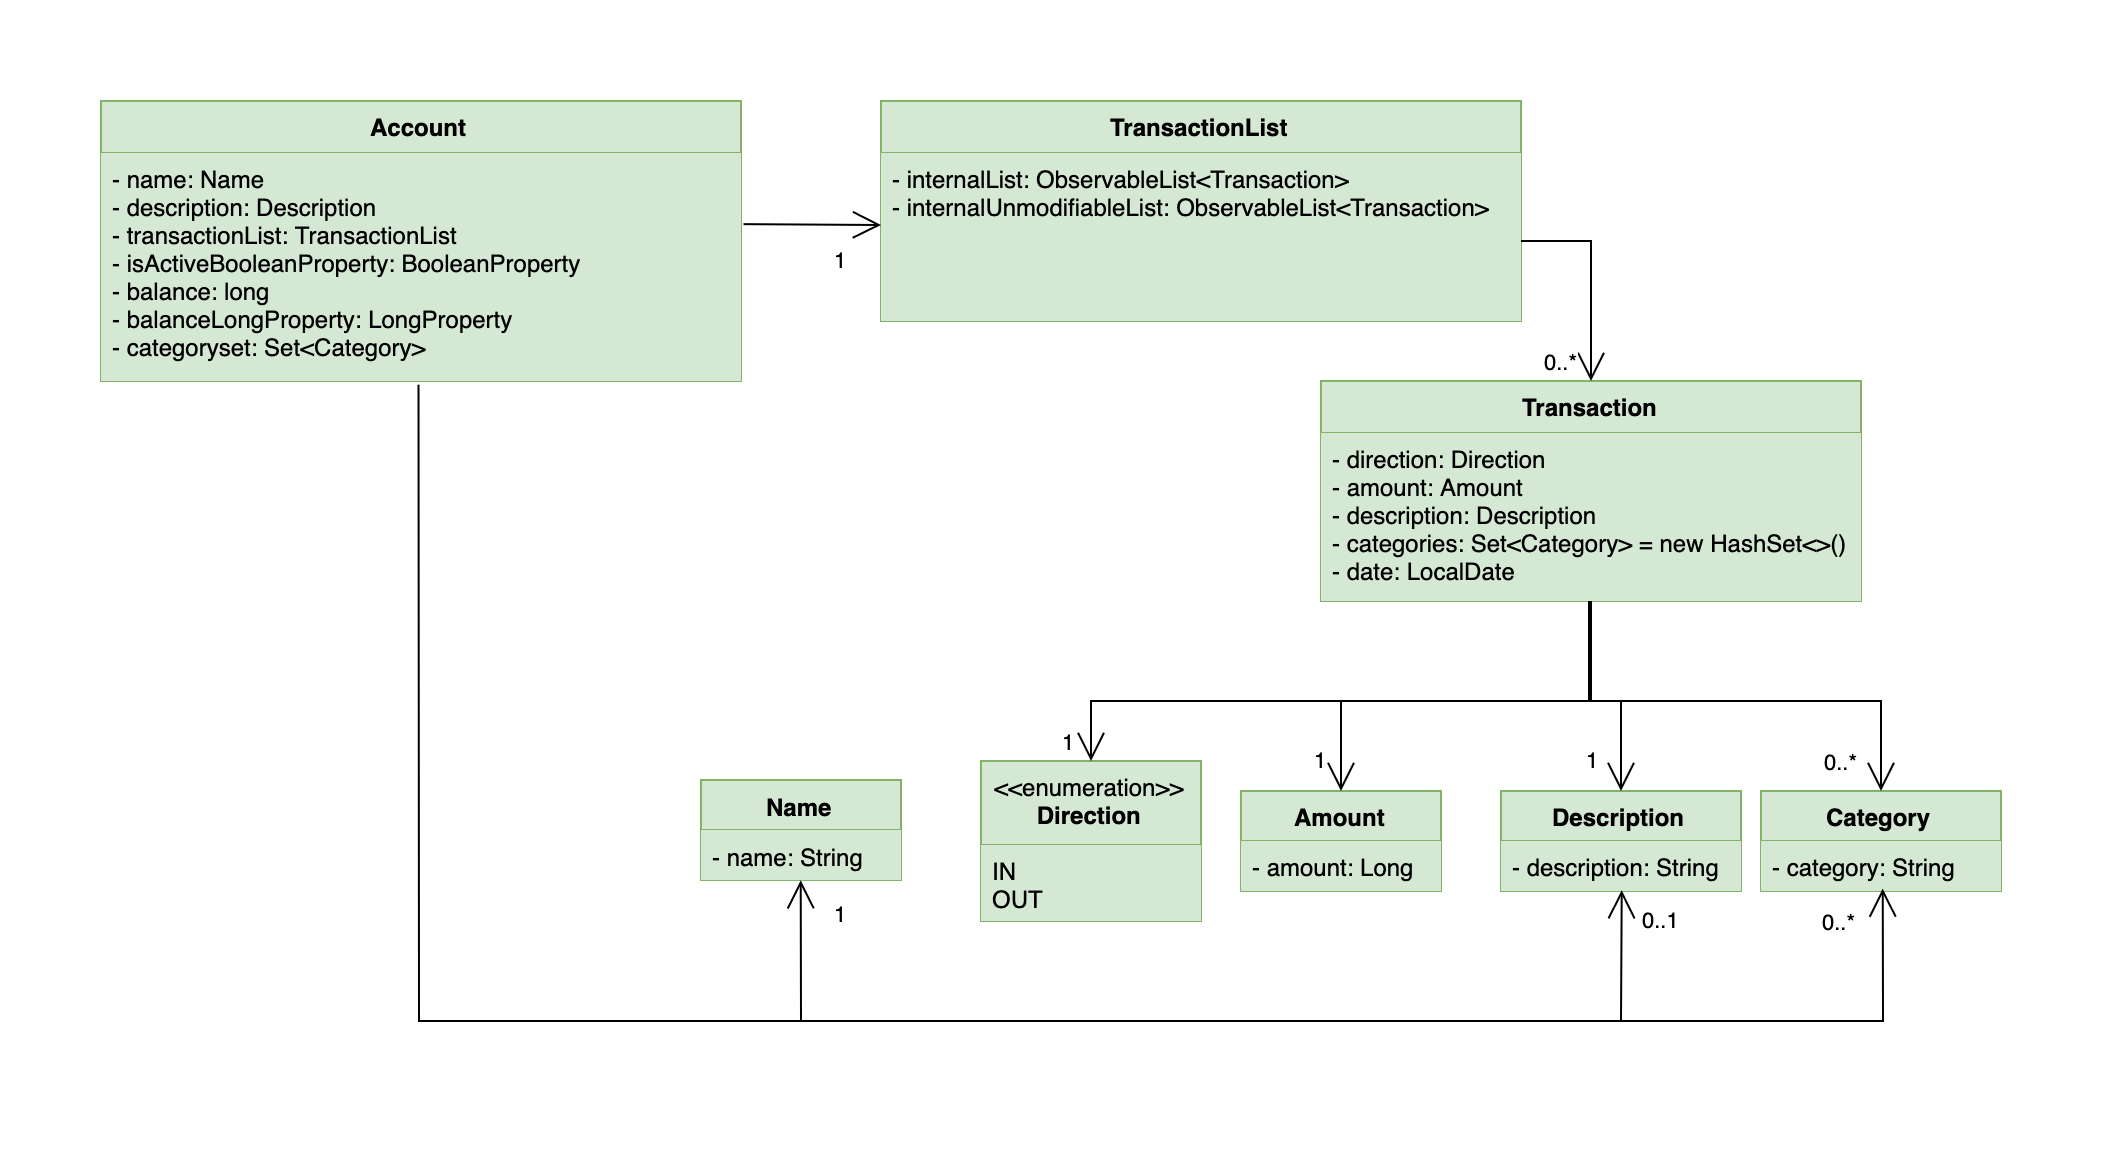
Each Transaction object must have:
-
direction: Direction— The direction of the transaction (eitherINfor money inflow orOUTfor money outflow). -
amount: Amount— The amount of money transacted. -
date: LocalDate— The date of the transaction.
Optional attributes for Transaction objects:
-
description: Description— A short description about the transaction. -
categories: Set<Category>— ASetofCategoryobjects that categorize the transaction.
Because Transaction and TransactionList objects are contained within Account objects, which are in turn stored within the
AccountsManager, it is called when any operations is made on a Transaction. Additionally, AccountsManager has an
activeTransactionList which holds the TransactionList of the current active Account. activeTransactionList is then
wrapped by a SortedList and FilteredList to enable the sorting and filtering of the Transaction objects.
These methods in AccountsManager below that manipulate the activeTransactionList are called when the list of
transactions needs to be filtered/sorted:
-
AccountsManager#getFilteredTransactionList()— Returns anObservableListof the filtered transactions. -
AccountsManager#updateFilteredTransactionList(Predicate<Transaction> predicate)— Updates thePredicate<Transaction>of theFilteredListto filter by the givenPredicate<Transaction> -
AccountsManager#resetFilteredTransactionList()— Resets and removes any filter on theFilteredList. -
AccountsManager#updateSortedTransactionList(Comparator<Transaction> comparator)— Updates theComparator<Transaction>of theSortedListto sort by the givenComparator<Transaction> -
AccountsManager#resetSortedTransactionList()— Resets theComparatoron theFilteredListto the default comparator.
When Transaction objects are added/edited/deleted, the following implemented methods are called from Account:
-
Account#addTransaction(Transaction toAdd)— Adds aTransactionto thetransactionList. -
Account#updateTransaction(Index txnIndex, Transaction editedTxn)— Sets aTransactionto thetransactionListat the specifiedIndex. -
Account#deleteTransaction(Transaction toDelete)— Deletes aTransactionfrom thetransactionList.
Transaction objects are saved within their respective Account objects after every command, and they are saved
into the file accounts.json, stored in the same directory as the JAR executable.
Design Considerations
Aspect: Reference to respective Account in Transaction
-
Alternative 1 (current choice):
Transactionhas no reference toAccount; any commands that create/edit/deleteTransactionobjects are called via the activeAccount.-
Pros: Reduced coupling, which makes testing/maintenance easier.
-
Cons: More methods are required to ensure the logic of
Transactioncommands and the current activeAccount, instead of calling getAccount() on aTransaction.
-
-
Alternative 2:
Transactionholds a reference toAccount; commands that create/edit/deleteTransactionobjects directly reach theAccountthrough theTransaction.-
Pros: It would result in shorter code by avoiding having to go through
AccountsManagerto find the respectiveAccount. -
Cons: This would result in a circular dependency between
TransactionandAccount, as well as high coupling. This lowers testability and increases the risk of bugs.
-
Adding Transactions: txn
Given below is an example usage scenario and how the txn command is processed and executed at each step.
Step 1: The user (ideally an NUS Computing Student) executes txn dn/out x/50 d/books a/school to add a purchase of $50 worth of
books, to be added to the school Account.
Step 2: LogicManager calls parseCommand on the command string txn dn/out x/50 d/books a/school
Step 3: CommandLineParser creates a new TransactionAddCommandParser by identifying the txn String that represents a
TransactionAddCommand
Step 4: TransactionAddCommandParser parses the rest of the command string dn/out x/50 d/books a/school and return a
new TransactionAddCommand with the parsed details.
Step 5: LogicManager then calls execute() on the TransactionAddCommand, which gets the Account school from the
AccountsManager
Step 6: addTransaction is called on the returned Account to add the Transaction to the TransactionList of
the Account`.
Step 7: After adding the Transaction, RuleEngine is called to execute its rules over the newly added Transaction.
The full diagram sequence diagram for this step can be found below, in the Implementation of the Rules Execution feature.
Step 8: The Account which was added to is set as the active Account with setActiveAccount().
Step 9: Finally, TransactionAddCommand returns a CommandResult to the LogicManager.
Step 10: Before LogicManager returns the CommandResult, it calls save(Model model) on the StorageManager, which
saves all the Account objects.
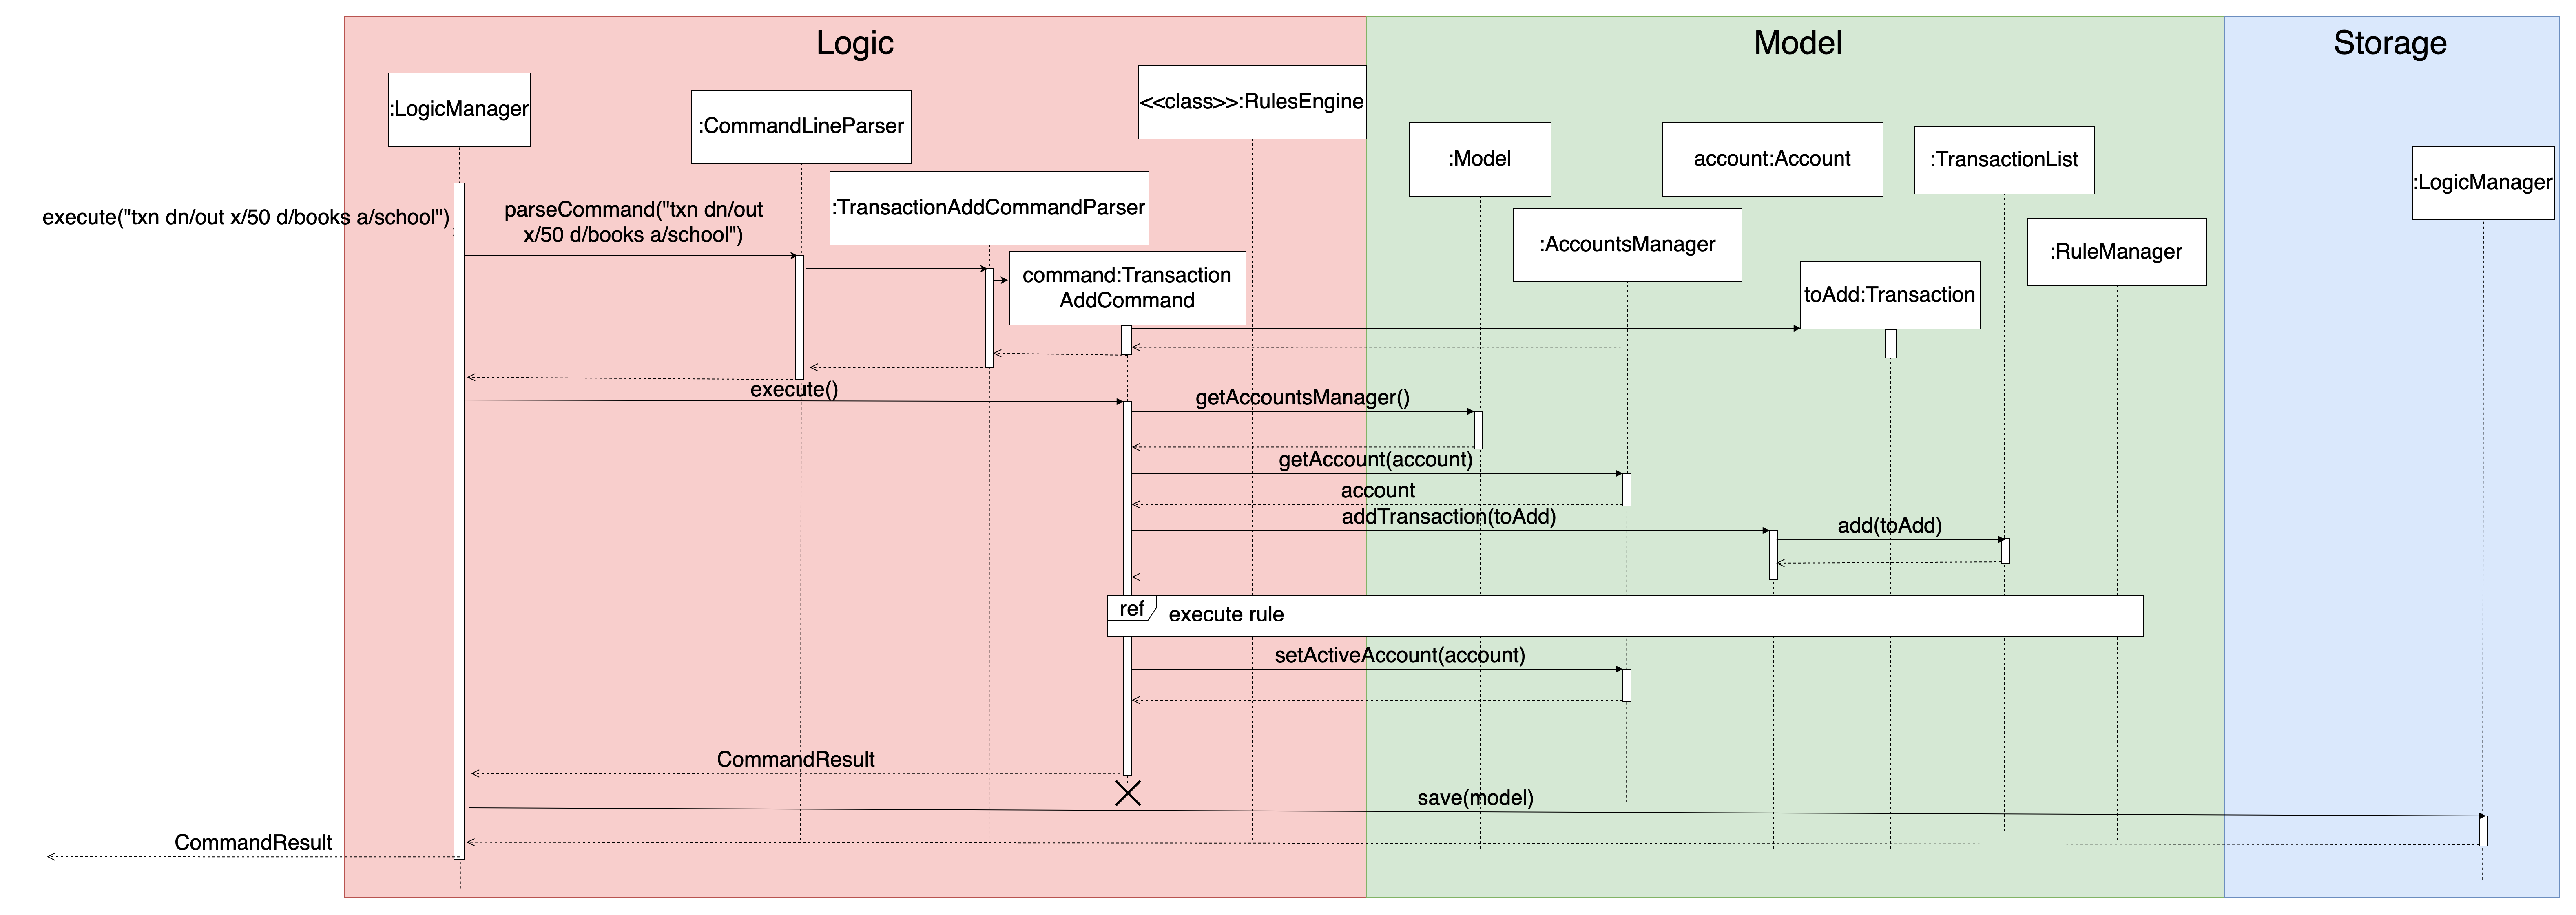
The following sequence diagram illustrates the scenario as described above (the execution of txn dn/out x/50 d/books a/school):
Editing transactions: txn edit
txn edit allows users to edit any attribute of the Transaction. It uses a TransactionEditDescriptor to store the details
of the new Transaction, then uses getUpdatedTransaction to generate the edited Transaction as well as validate that
changes have been made to the transaction.
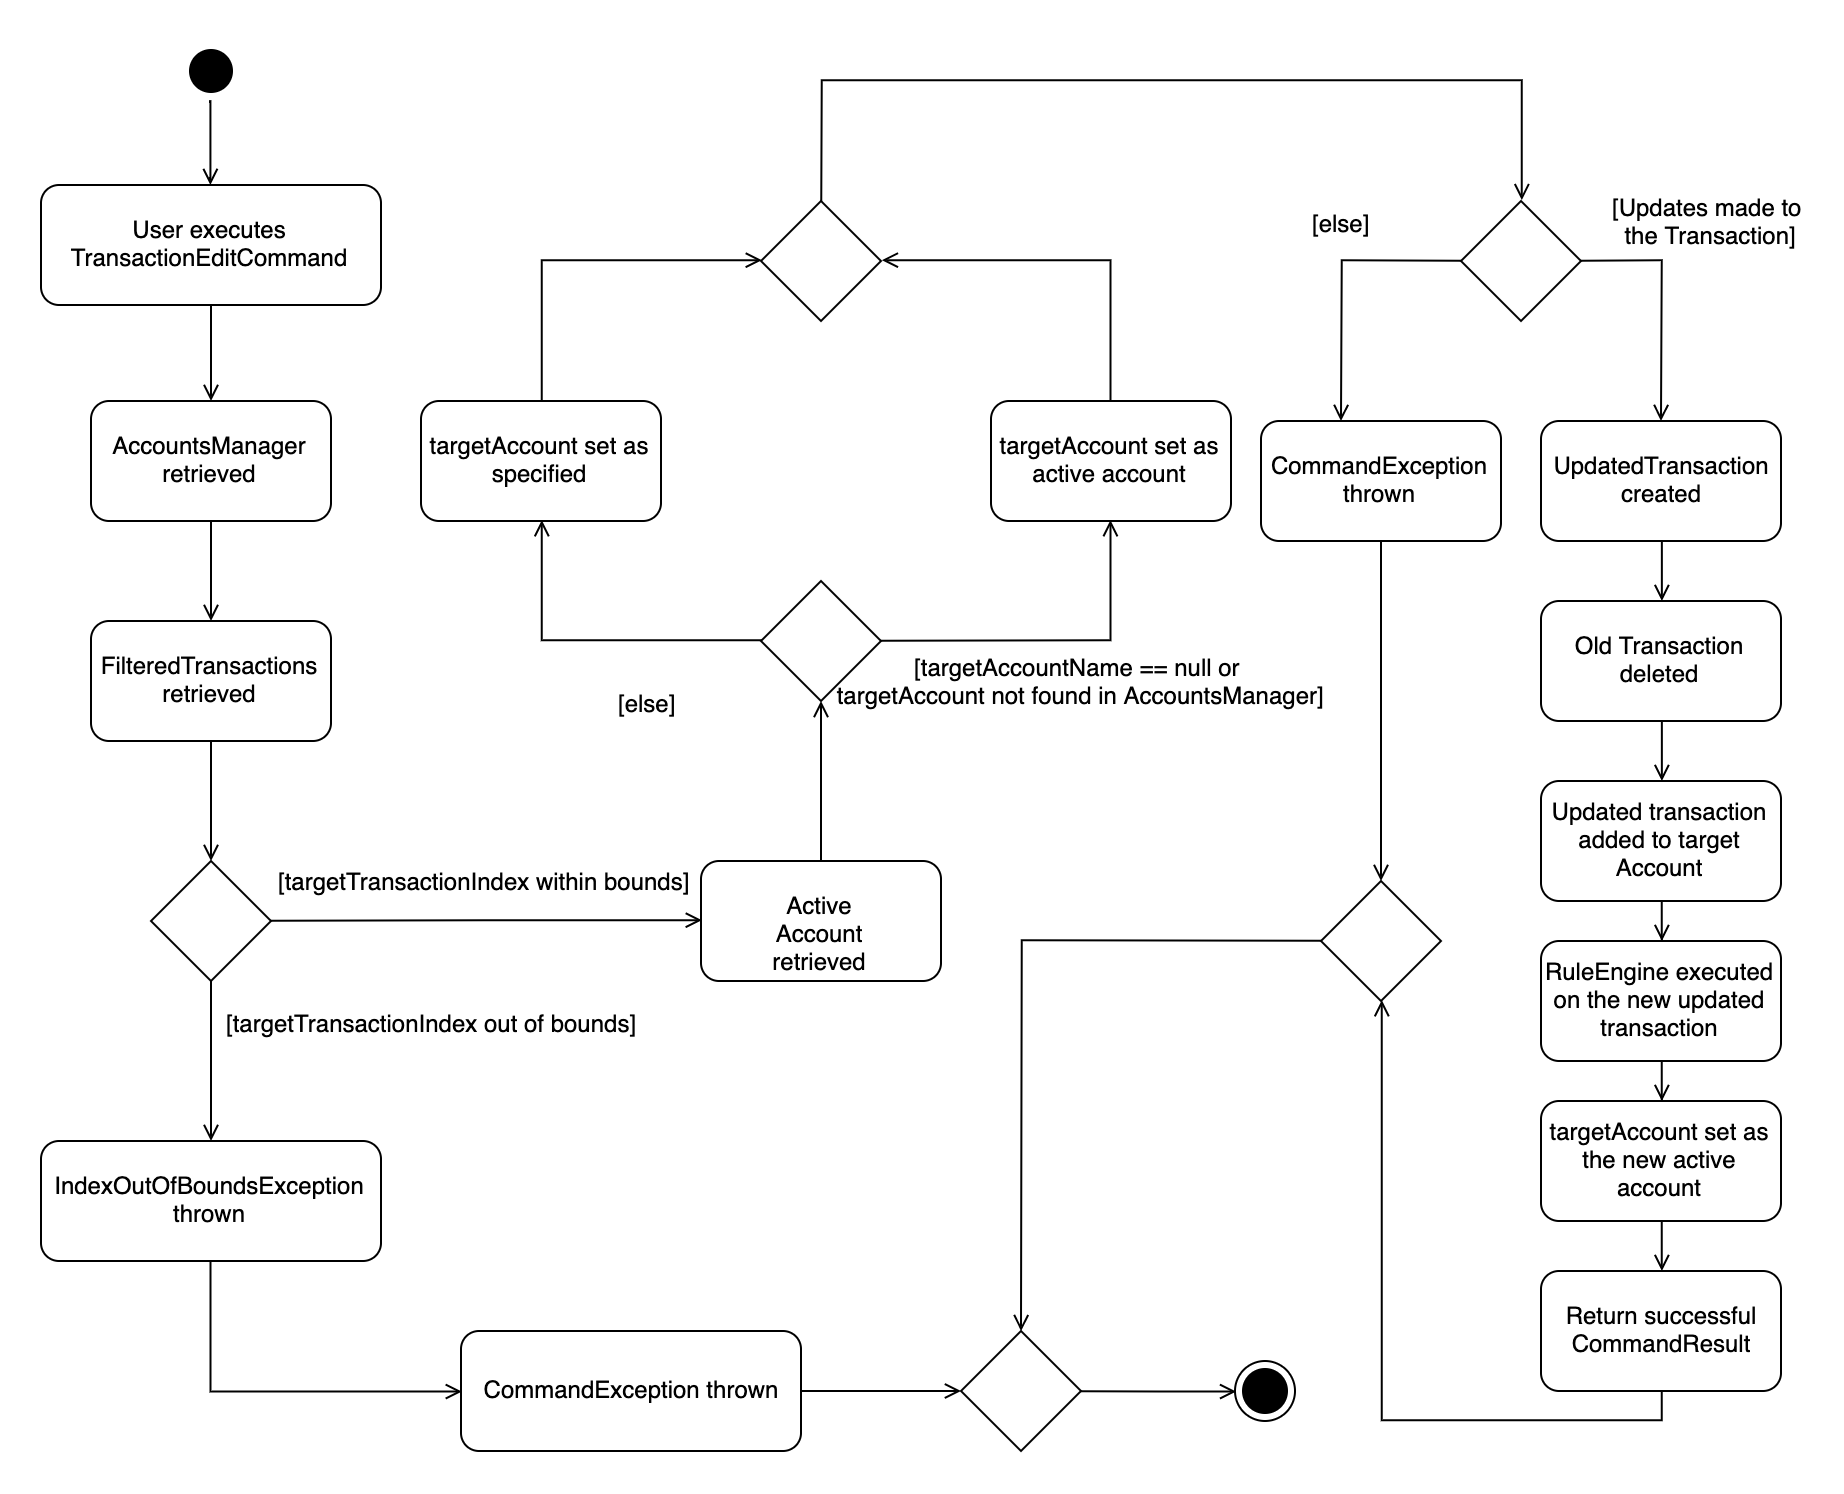
Below is an example scenario to demonstrate how a Transaction is edited, as well as certain additional steps that are taken when certain
attributes of the Transaction are edited, for example to edit the Account or to edit the categories. The activity diagram
accompanies this explanation, to help visualise the steps that might take place.
Assume that txn add dn/out x/20 d/bill a/home was just executed, and that the Transaction shows up in the first index:
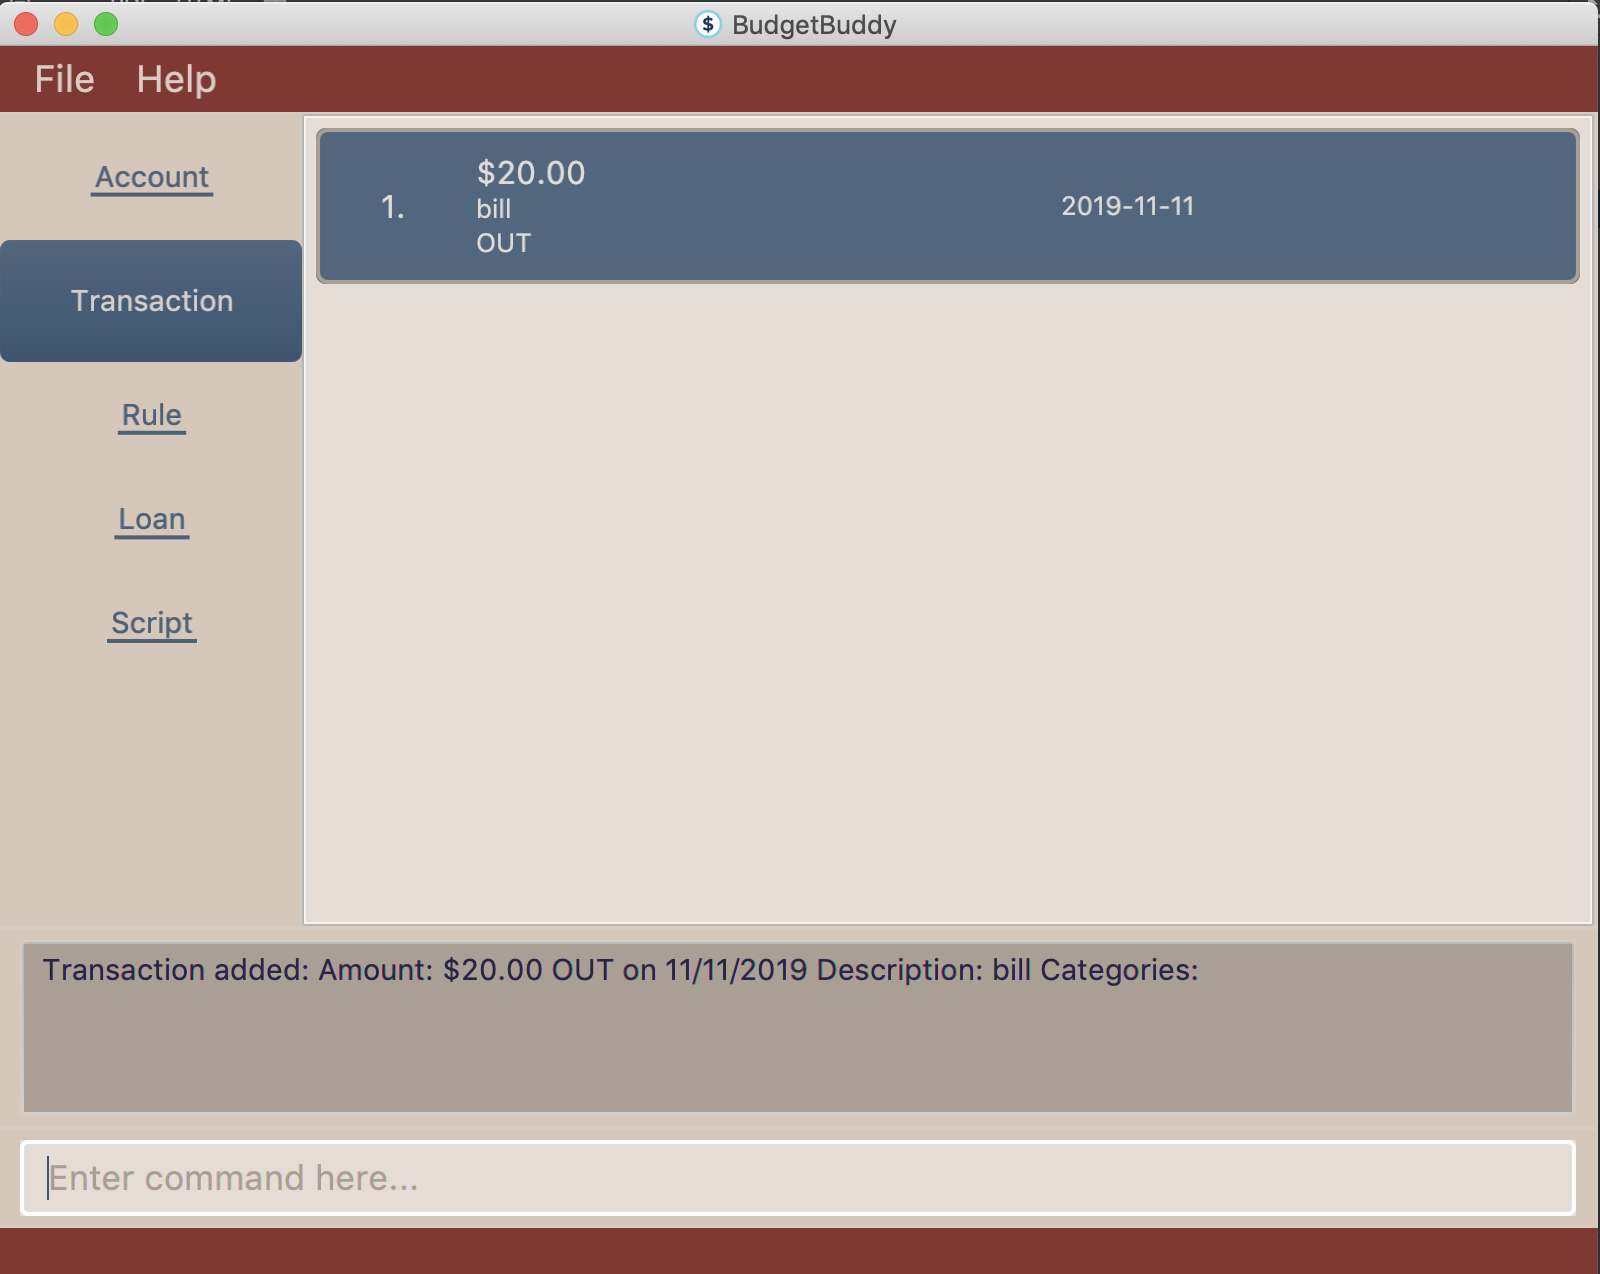
Step 1: The user (ideally an NUS Computing Student) executes txn edit 1 x/28 d/phone bill a/personal c/phone c/bill
to edit the previously added Transaction to a $28 phone bill, to be added to the personal Account.
Step 2: LogicManager calls parseCommand on the command string txn edit 1 x/28 d/phone bill a/personal c/phone c/bill
Step 3: CommandLineParser creates a new TransactionEditCommandParser by identifying the txn edit String that represents a
TransactionAddCommand
Step 4: TransactionAddCommandParser parses the rest of the command string 1 x/28 d/phone bill a/personal c/phone c/bill and return a
new TransactionEditCommand along with the TransactionEditDescriptor and the updatedAccountName, which represents the
Name of the new target Account. A new Set<Categories> is also created from the c/phone and c/bill arguments provided.
Step 5: LogicManager then calls execute() on the TransactionEditCommand. Then, the original Transaction is obtained,
followed by the target Account and the edited Transaction via getUpdatedTransaction. Meanwhile, validation occurs
at every step, to ensure that the parsed attributes conform to the requirements to edit the `Transaction.
Step 6: deleteTransaction is called on the Account containing the Transaction to be edited.
Step 7: addTransaction is called on the target Account, followed by the execution of the RulesEngine, similar to the
situation as shown further below.
Step 8: The Account which was added to is set as the active Account with setActiveAccount().
Step 9: Finally, TransactionAddCommand returns a CommandResult to the LogicManager.
Step 10: Before LogicManager returns the CommandResult, it calls save(Model model) on the StorageManager, which
saves all the Account objects.
Active Account
Implementation
The active Account allows operations on Transaction objects to not have to specify the concerning Account when
the command is entered. This allows for a more user-friendly and intuitive experience with managing finances. By updating
ActiveAccountIndex where appropriate, the activeAccount is implemented on the idea that users want to continue to
manipulate transactions within the same Account that they last interacted with.
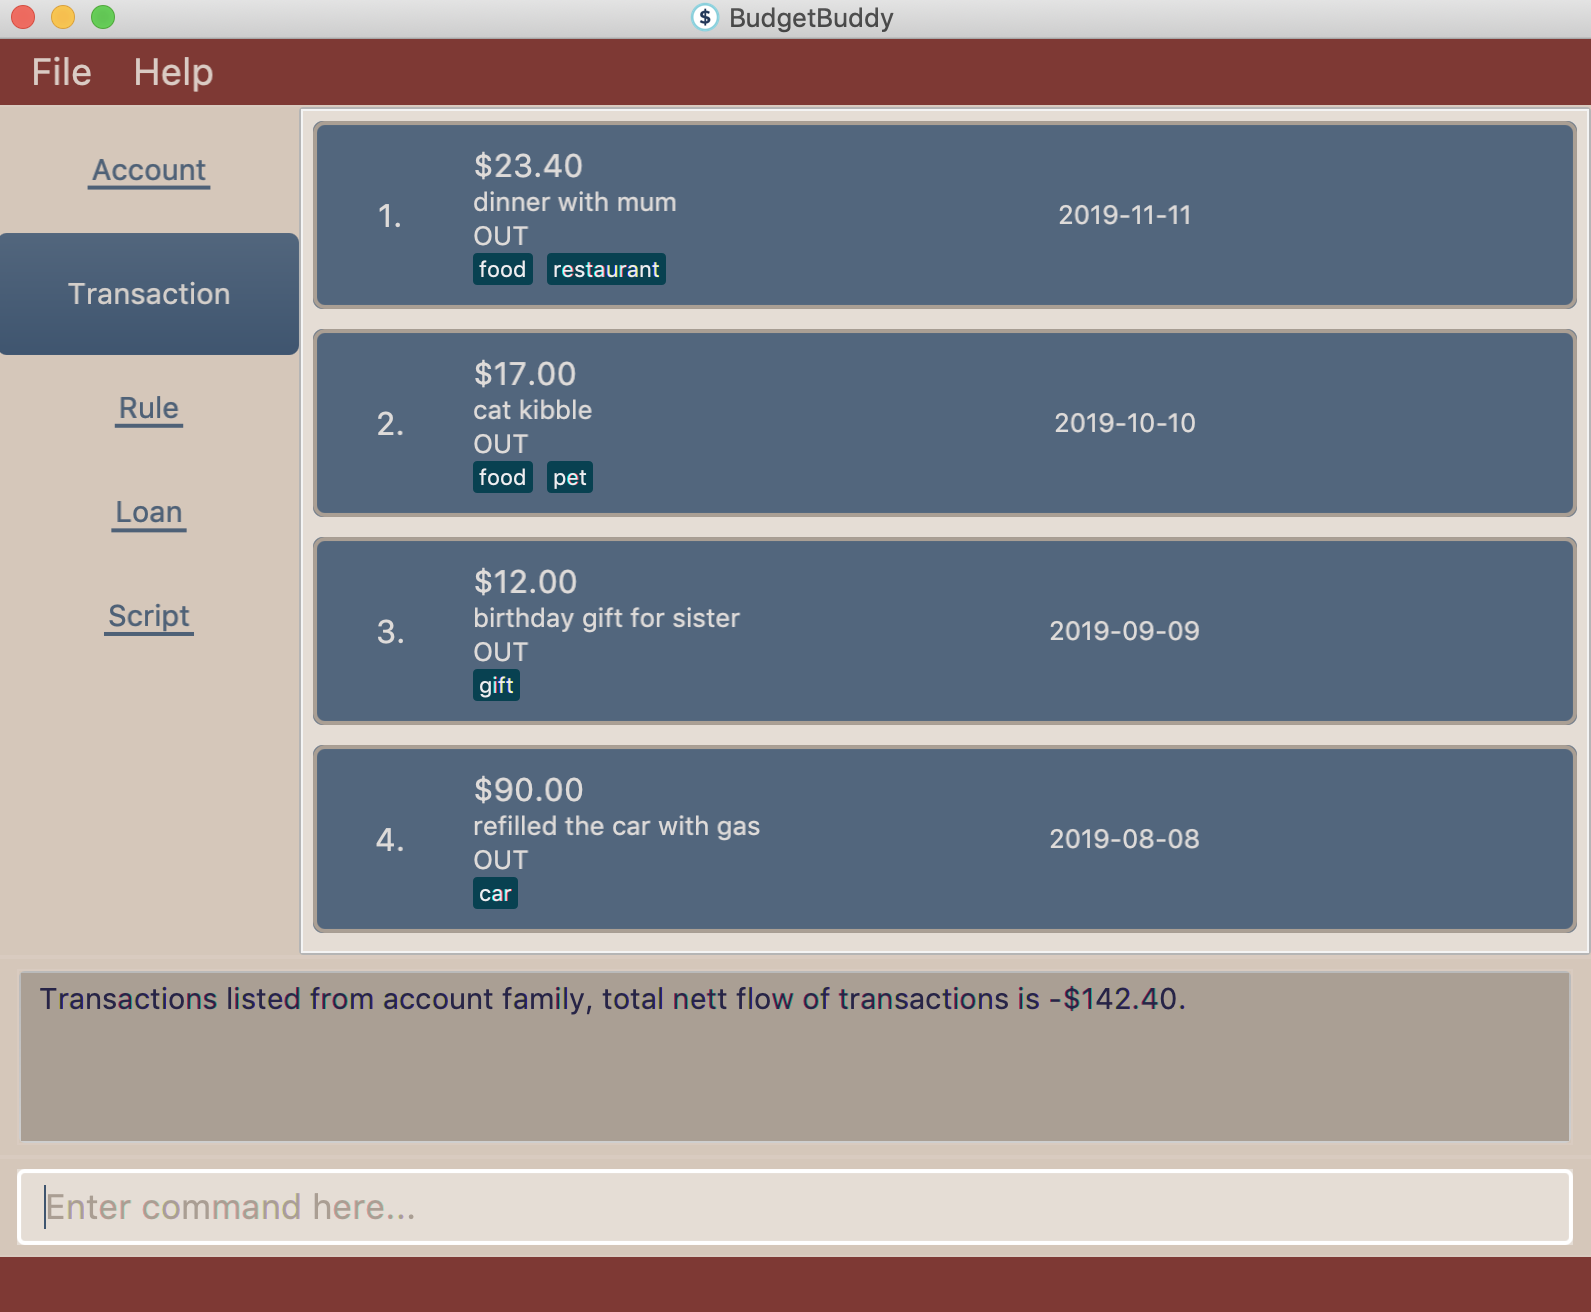
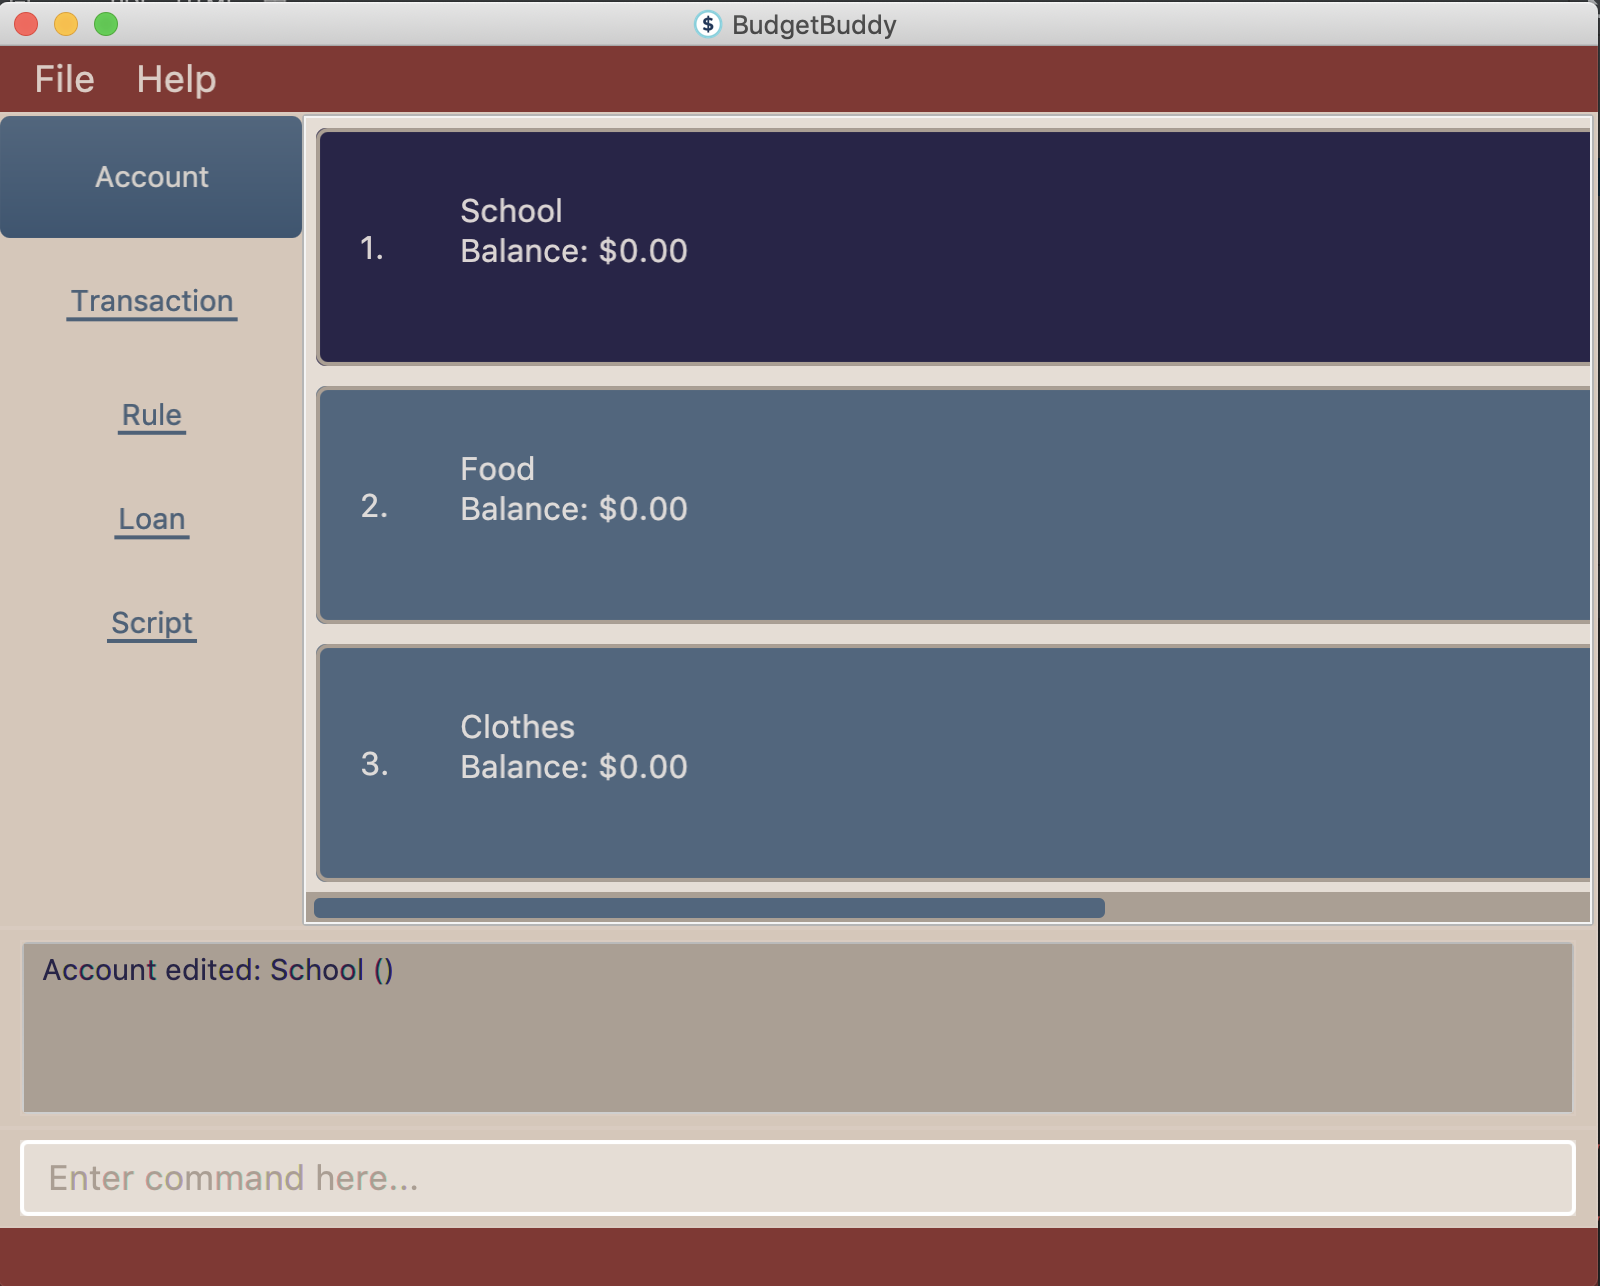
The current active Account is indicated in the UI by a highlight as shown below.
The following user commands, if executed successfully, can change the active account:
-
AccountAddCommand— The addedAccountbecomes the active account. -
AccountDeleteCommand— If the activeAccountis deleted, a new activeAccountwill be selected. -
AccountEditCommand— The editedAccountbecomes the active account. -
AccountFindCommand— The firstAccountin the list is set as the activeAccount. -
AccountListCommand— The firstAccountin the list is set as the activeAccount. -
AccountReportCommand— The targetAccountis set as the new activeAccount. -
AccountSwitchCommand— The targetAccountis set as the new activeAccount. -
TransactionAddCommand— The targetAccountis set as the new activeAccount. -
TransactionEditCommand— The targetAccountis set as the new activeAccount.
Design Considerations
Aspect: responsive UI for showing the active Account
An Extractor is used to update the UI when an Account is set as active, or when the balance is updated. This is because
the FilteredList<Account> only updates automatically when the Accounts themselves are changed, but not when their internal
elements are altered.
-
Alternative 1 (current choice): Use an
Extractorto listen for changes toisActiveBooleanPropertyandbalanceLongProperty.-
Pros: Less overhead/unnecessary movement of accounts
-
Cons: Not as easy for new developers to understand and implement.
-
-
Alternative 2: Refresh the account list by forcing removal and re-addition of each of the accounts.
-
Pros: Easy to implement, no need to change members to adapt to the
Propertyclass, and easier for newer developers to read and understand. -
Cons: High overhead, as more and more accounts are added to the BudgetBuddy.
-