Introduction
BudgetBuddy is a desktop expense tracker application designed for Computing students in the National University of Singapore who wish to better manage their expenses. The user interacts with it using a Command-Line Interface (CLI), and it has a Graphical User Interface (GUI) created with JavaFX. It is written in Java, and has about 15 kLoC. The purpose of this Project Portfolio Page is to present my contribution to BudgetBuddy.
Overview of the Project
Budget Buddy possesses a fair number of features to equip the user the ability to track and manage their expenses, as well as customize their user experience to according to their preference.
As an expense tracker, Budget Buddy offers the ability for users to record their transactions occurred in life. The user can create different accounts to manage different types of transactions. For example, when a user wants to view his expenses spent overseas, he can create a separate account named 'trip' to record the transactions spent in the trip. Moreover, a category or a few categories can be set to remind the users the use of the transaction made.
To help the users track their loans that they own others or are owed to them, Budget Buddy offers a feature called loan so that the users can remind themselves to pay back or reclaim borrowed money. Unbalanced group payments can also be split equally, and the resulting debts the user owes or is owed can be recorded as loans automatically.
Among other financial trackers, Budget Buddy outstands in terms of its functionality of customizing the user experience through rules. To ease the process of managing the expenses, users can create rules to automate a series of actions. For example, they could create a rule that adds a transaction to a specific category if said transaction exceeds a certain amount.
Taken the fact that our main target users is computing students into consideration, Budget Buddy provides the functionality for users to utilize their computing knowledge to write custom scripts to manipulate the app. For example, users are able to write scripts to add huge number of transactions, or scripts to trigger alarms when their expenses have exceeded a certain limit.
Summary of contributions
-
Major enhancement: added the feature of account and related commands
-
What it does: allows the user to manage their accounts to facilitate the tracking of expenses, including add/delete/edit/list/find/report/overview the accounts.
-
Justification: This feature lays the foundation for the product because a user needs accounts to carry out all other activities, e.g. manage the transactions in a particular account.
-
Highlights: This feature affects many other existing commands and commands to be added in future. It required an in-depth analysis of design alternatives. The implementation was demanding as it required carefully design to fit the entire architecture.
-
-
Minor enhancement: added the help window that allows the user to navigate to the website when they are in need of help.
-
Code contributed: [RepoSense Report]
-
User’s benefit: With the account feature, the user is able to record their expenses and income in different accounts. Moreover, the user can choose to view the report of either individual or all accounts. Details of the particular account is offered for the user to have an general idea about their financial status.
Contributions to the User Guide
Given below are sections I contributed to the User Guide. They showcase my ability to write documentation targeting end-users. |
Managing accounts: account
Add an account: account add
You can create a new account. Each account has a unique ID and name. You can choose to customise a description to describe the use of the account.
Format: account add n/<name> [d/<description>]
Examples:
-
account add n/Japan trip
You have created an account with the name 'Japan trip'. -
account add n/Japan trip d/expense spent in Japan
You have created an account with the name 'Japan trip' and description 'expense spent in Japan'.
List accounts: account list
If you want to see the full list of accounts you currently own, you can enter this command and a list of all accounts will be displayed.
Format: account list
Edit an account: account edit
You can edit the account that you think needs modifiying. You can choose to edit either the name or the description of the account, or both.
Format: account edit <id> [n/<name>] [d/<description>]
Examples:
-
account edit 1 n/food
The name of your first account will be changed to 'food'. -
account edit 1 d/money spent on food
The name of your first account will be changed to 'money spent on food'. -
account edit 1 n/food d/money spent on food
The name of your first account will be changed to 'food', at the same time the description of the same account will be changed to 'money spent on food'.
Delete account: account delete
You can delete the account with the specified ID, as in account list.
Note: you cannot delete an account if there are transactions associated with the account.
Format: account delete <id>
Examples:
-
account delete 2
You have deleted the second account in your account list.
Find account: account find
If you want to see a specific type of account you have, or find a specific account, you can find the account(s) with a specified keyword. A list of account(s) containing the keyword in their names will be displayed.
Format: account find <keyword>
Examples:
-
account find trip
You can see a list of accounts with the word 'trip' contained in their names.
View report of an account: account report
If you want to see the details of a particular account, you can choose to view the report of the specified account. The report contains the balance, the total expenses, the total income, and the categories involved in the specified account.
Format: account report <id>
Example:
-
account report 2
You can view the report of the first account.
Switch the active account: account switch
To switch the active account to another in the account list, specify the ID of the new account to switch to.
Format: account switch <id>
Example:
-
account switch 3
You have switched the active account to the third one in the list. The active account will be highlighted in dark blue color.
Export the overview of all accounts: account overview
If you want to see the overview of all accounts, Budget Buddy allows you to export the overview of all accounts in a HTML file. In the overview, you are able to see the balance, the total expenses, the total income, and the categories involved in each account.
Format: account overview
Step 1. Type account overview in the command textfield input.
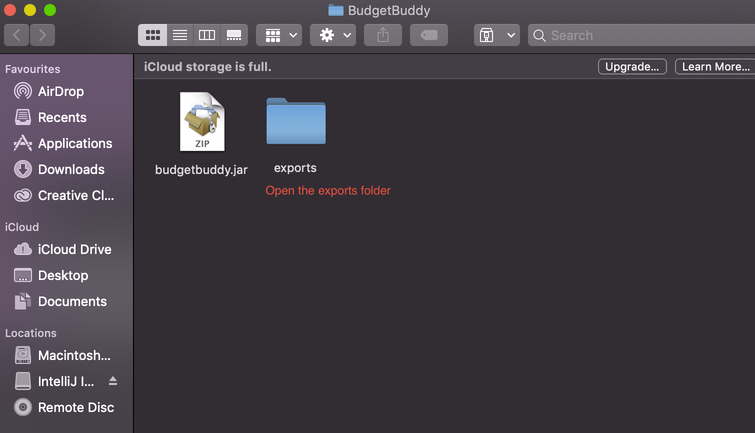
Step 2. Successful message displayed, and you can navigate to the exports folder in the same directory of the source file.

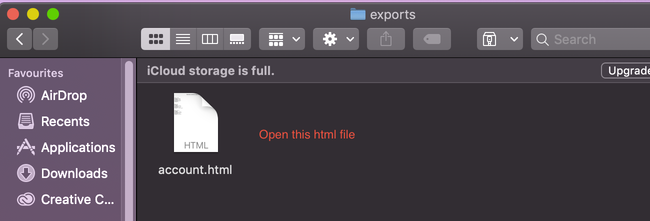
Step 3. Open the HTML file in the exports folder to see the overview of all accounts.

Contributions to the Developer Guide
Given below are sections I contributed to the Developer Guide. They showcase my ability to write technical documentation and the technical depth of my contributions to the project. |
Accounts Feature
Implementation
The Accounts Feature allows the users to manage their accounts.
It is managed by AccountsManager, with Account objects stored internally in an accounts and filteredAccounts.
The class diagram below shows how the AccountsManager manages its list of Account objects:
![][width=85%](../images/accountclassdiagram.png)
When the user inputs a command, several of the above operations are carried out.
For example, account edit will call AccountsManager#resetFilteredAccountList to update the filteredAccounts,
so that all accounts present in accounts will be present in filteredAccounts,
then AccountsManager#editAccount to edit the account,
finally AccountsManager#getFilteredAccountList() to display the list of accounts.
After each command, the list of accounts is saved in accounts.json,
which is stored in a data folder in the same directory as budgetbuddy.jar.
Given below is an example usage scenario and how the AccountsManager behaves at each step.
Step 1. The user launches the application.
If this is the first time it is launched,
accounts.json is created and the AccountsManager initializes with an accounts containing a default account.
Otherwise, the data in accounts.json is loaded into accounts.
Step 2. The user executes account add n/Japan trip d/expense spent in Japan to add a new account.
This creates a new account toAdd with the name as Japan trip and description as expense spent in Japan.
AccountsManager#addAccount(Account toAdd) adds toAdd to accounts.
filteredAccountList will be automatically updated to match accounts.
Step 3. The user executes the command account find trip to find account contains the keyword trip specified.
AccountsManager#updateFilteredAccountList sets the predicate of filteredAccounts according to the input parameters.
Finally, AccountsManager#getFilteredAccounts retrieves an immutable version of filteredAccounts (filtered) to display to the user.
In this case, an account with the name as Japan trip and description as expense spent in Japan will be displayed.
The following sequence diagram shows how finding the accounts containing specified keyword works:
![][width=85%](../images/AccountSequenceDiagram.png)
Most of the commands and operations behave in the same way. The only difference will be the the action taken by the operation (e.g. finding account or adding account).
Step 4. The user executes account delete 2 to delete the second account in the accounts.
Firstly, AccountsManager#resetFilteredAccountList will update the filteredAccounts,
so that all accounts present in accounts will be present in filteredAccounts,
then AccountsManager#deleteAccount deletes toDelete account from accounts.
Step 5. The user executes account edit 3 n/food to edit the name of the first account.
A new editedAccount is created, which is the same as the first third account except for its name which is food.
AccountsManager#editAccount(Index toEdit, Account editedAccount replaces the account at index toEdit with editedAccount.
The activity diagram below shows what happens when the user executes account edit:
![][width=85%](../images/AccountActivityDiagram.png)
Step 6. The user executes account report 2 to view the details of the second account.
Firstly, AccountsManager#resetFilteredAccountList will update the filteredAccounts,
so that all accounts present in accounts will be present in filteredAccounts,
then AccountsManager#getAccount and Account#getAccountInfo are used to display the details of the second account.
Step 7. The user executes account overview to view the report of all accounts in an html export file.
Firstly, AccountsManager#resetFilteredAccountList will update the filteredAccounts,
so that all accounts present in accounts will be present in filteredAccounts,
then AccountsManager#exportReport generates the overview of all accounts html file to the exports folder.
For account edit, account delete and account report,
if the user targets an index beyond the last index,
an error message is displayed.
|
Design Considerations
Aspect: Interaction with ui - the list retrieved by LogicManager
In the mainWindow of ui, AccountTab is associated with a list of accounts. However, two lists of accounts are required.
One stores all the current accounts present in accounts, the other one stores the filteredAccounts with the filtered accounts after account find executes.
-
Alternative 1 (current choice):
AccountTabis only associated withfilteredAccountsasfilteredAccountsstores all accounts. After each command,AccountsManager#resetFilteredAccountListis called to reset the predicate to be true, so thatfilteredAccountsmatchesaccounts.-
Pros: Only one list of accounts is associated with
LogicManager. -
Cons: It is counter-intuitive as
filteredAccountsis supposed to stored the accounts that have been selected.
-
-
Alternative 2:
AccountListPanelis associated with bothfilteredAccountsandaccounts, and the display of the list switches when necessary.-
Pros: Easy to understand and align with the common sense.
-
Cons: Hard to implement.
-