Overview
Budget Buddy is a desktop application that allows users to track their expenses. The user interacts with it using a Command-Line Interface (CLI), and it has a Graphical User Interface (GUI) created with JavaFX. It is written in Java, and has about 20 kLoC.
About the Project
Budget Buddy has a number of features to help users track their expenses and deeply customize their experience while using the app.
As an expense tracker, Budget Buddy provides the ability for users to record and categorize transactions they have made. Transactions can also be divided into user-created accounts, helping users to isolate transactions for specific events or holidays. Budget Buddy further allows the user to track loans that they owe others or are owed to them, helping them remember to pay back or reclaim borrowed money. Unbalanced group payments can also be split equally by Budget Buddy, and the resulting debts the user owes or is owed can be recorded as loans automatically.
Budget Buddy also provides features to deeply customize the user experience. Users can create rules to automate many actions; for example, they could create a rule that adds a transaction to a specific category if said transaction exceeds a certain amount. As the target audience comprises of computing students, Budget Buddy also allows users to utilize their computing know-how to write custom scripts to manipulate the app. For example, users can write scripts to add huge numbers of transactions, or scripts to trigger alarms when their expenses have exceeded a certain limit.
My role in the project was to implement all facets regarding the loans feature. Chiefly, I added the ability for the user to add, edit, view and delete loans. Users can also mark loans as paid or unpaid, and when viewing their list of loans they can sort or filter the list by amount, date and more. I was also responsible for implementing the complex algorithm necessary to split and divide an initially unbalanced group payment; the main challenge in this scenario was to devise an algorithm that worked for any group size and every variation of initial unbalance.
Aside from the implementation of features, I also aided in the delegation of roles among the team, upholding the quality of project documentation, and ensuring the team remained on task.
Summary of contributions
-
Major enhancement: Added the ability to track loans and split unbalanced group payments equally
-
What they do: Tracking loans allows the user to track all the money that they owe/are owed to other people. Splitting group payments through the app allows the user in avoiding messy miscalculations and over/under-paying their friends.
-
Justification: This feature improves the product significantly, as both lending/borrowing money and paying for large items as a group are common occurrences that affect one’s expenses, especially for students.
-
Highlights: Implementing loan-tracking required an in-depth analysis of design alternatives, especially regarding the structure of the loan-person relationship. Building it on top of and mutating the original brownfield project also proved challenging. Splitting group payments proved difficult due to the need for an accurate yet efficient algorithm. Great care had to be taken to correctly implement each of the many steps in the complex final result.
-
-
Code contributed: [RepoSense Report]
-
Other contributions:
-
Documentation:
-
Community:
-
Contributions to the User Guide
Given below are a few sections I contributed to the User Guide. They showcase my ability to write documentation targeting end-users. Due to limited space, not all my contributions could be included; please refer to the full User Guide to read them in their entirety. I was responsible for the section on Managing Loans. |
Managing loans: loan
Budget Buddy comes with the ability for you to keep track of who owes you money and exactly how much they owe you. Never again allow those small sums you lend out to accumulate into a massive pile of forgotten gold. You can also record who you owe money to, saving you the embarrassment of being publicly reminded by your loan shark friends. Finally, it can help you calculate who owes who how much when you and said friends wake in the morning after an expensive night out.
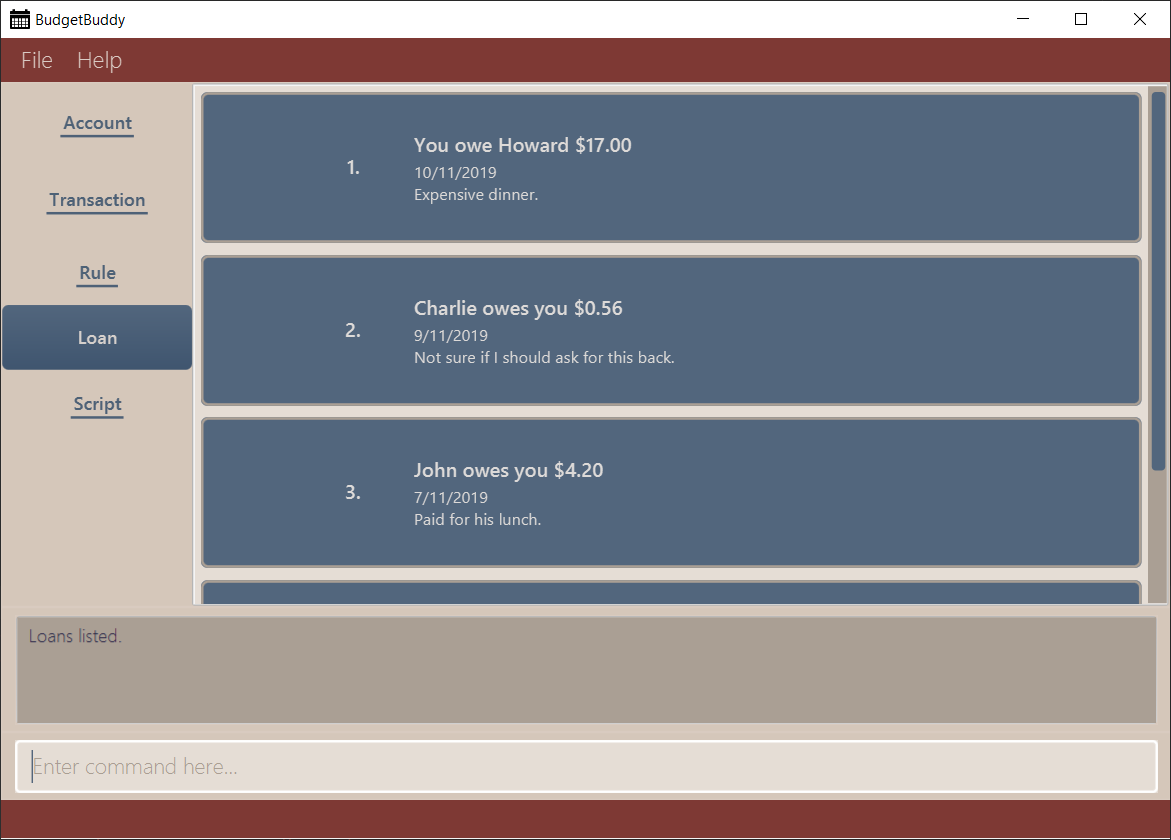
Your loans can be viewed in the Loan tab, as seen in the figure below:

Mark loan(s) as paid: loan paid
This command marks one or more loans in the list as paid. A paid loan can be visually distinguished by a large "tick" icon to the left of its index:

Multiple loans can be marked at once. This can be done by specifying several indices or at least one person to target. The format of the command is as follows.
Format: loan paid [<index …>] [<p/person …>]
Examples:
-
loan list
loan paid 1 2 3
Lists all loans, then marks the first three loans in the list as paid. -
loan paid p/John p/Adam
Marks all loans pertaining to John and Adam as paid.
Calculate loans: loan split
This command takes a group of persons and a list of amounts each person has paid, before calculating which persons need to pay which other persons such that the total amount paid is split equally among all the group’s members.
For example, let’s say you’re out for dinner with two friends.
When the hundred-dollar bill arrives, you pay for the first sixty and one of your two friends pays for the remaining forty.
The loan split command can now help you to calculate how much your two friends owe you,
such that the hundred-dollar bill is split equally among you three.
This command comes with many optional arguments, all of which are explained below. The format of the command is as follows.
Format: loan split p/<person> x/<amount paid> [max/<limit>] … [me/<your name> [w/<date>] [d/<description>]]
To switch between your loan list and split list, press Ctrl+D (or Cmd+D for Mac) while on the Loan tab.
| The split list will initially be empty, but once a list is calculated it will persist in the Loan tab across sessions (until a new calculation is made). |
Examples:
-
loan split p/John x/0 p/Mary x/40 p/Peter x/60
Calculates the money owed betweenJohn,MaryandPeterfor a scenario where (initially)Marypaid40andPeterpaid60. The resulting display should show thatJohnowesMary$6.66 and also owesPeter$26.67, as seen in the image below.

-
loan split p/John x/0 max/10 p/Mary x/10 p/Peter x/90 me/Mary d/Dinner.
In this scenario,Marypaid10andPeterpaid90.max/10restricts the final amountJohnpays/owes to10, despite the total amount being0 + 10 + 90 = 100. Furthermore,me/MarymarksMaryas the user (you), so any debtsMaryowes/is owed will be added to the normal loan list with the descriptionDinner.. The resulting display should show thatJohnowesPeter$10 andYouowePeter$35, as seen below.

The latter debt will also have been added to your loan list,
which can be checked using the command loan list or by pressing the hotkey mentioned above.
Contributions to the Developer Guide
Given below are a few sections I contributed to the Developer Guide. They showcase my ability to write technical documentation and the technical depth of my contributions to the project. Due to limited space, not all my contributions could be included; please refer to the full Developer Guide to read them in their entirety. I was responsible for the section detailing the Loans Feature. |
Loans Feature
Implementation
The Loans feature exists outside of the Account/Transaction mechanisms.
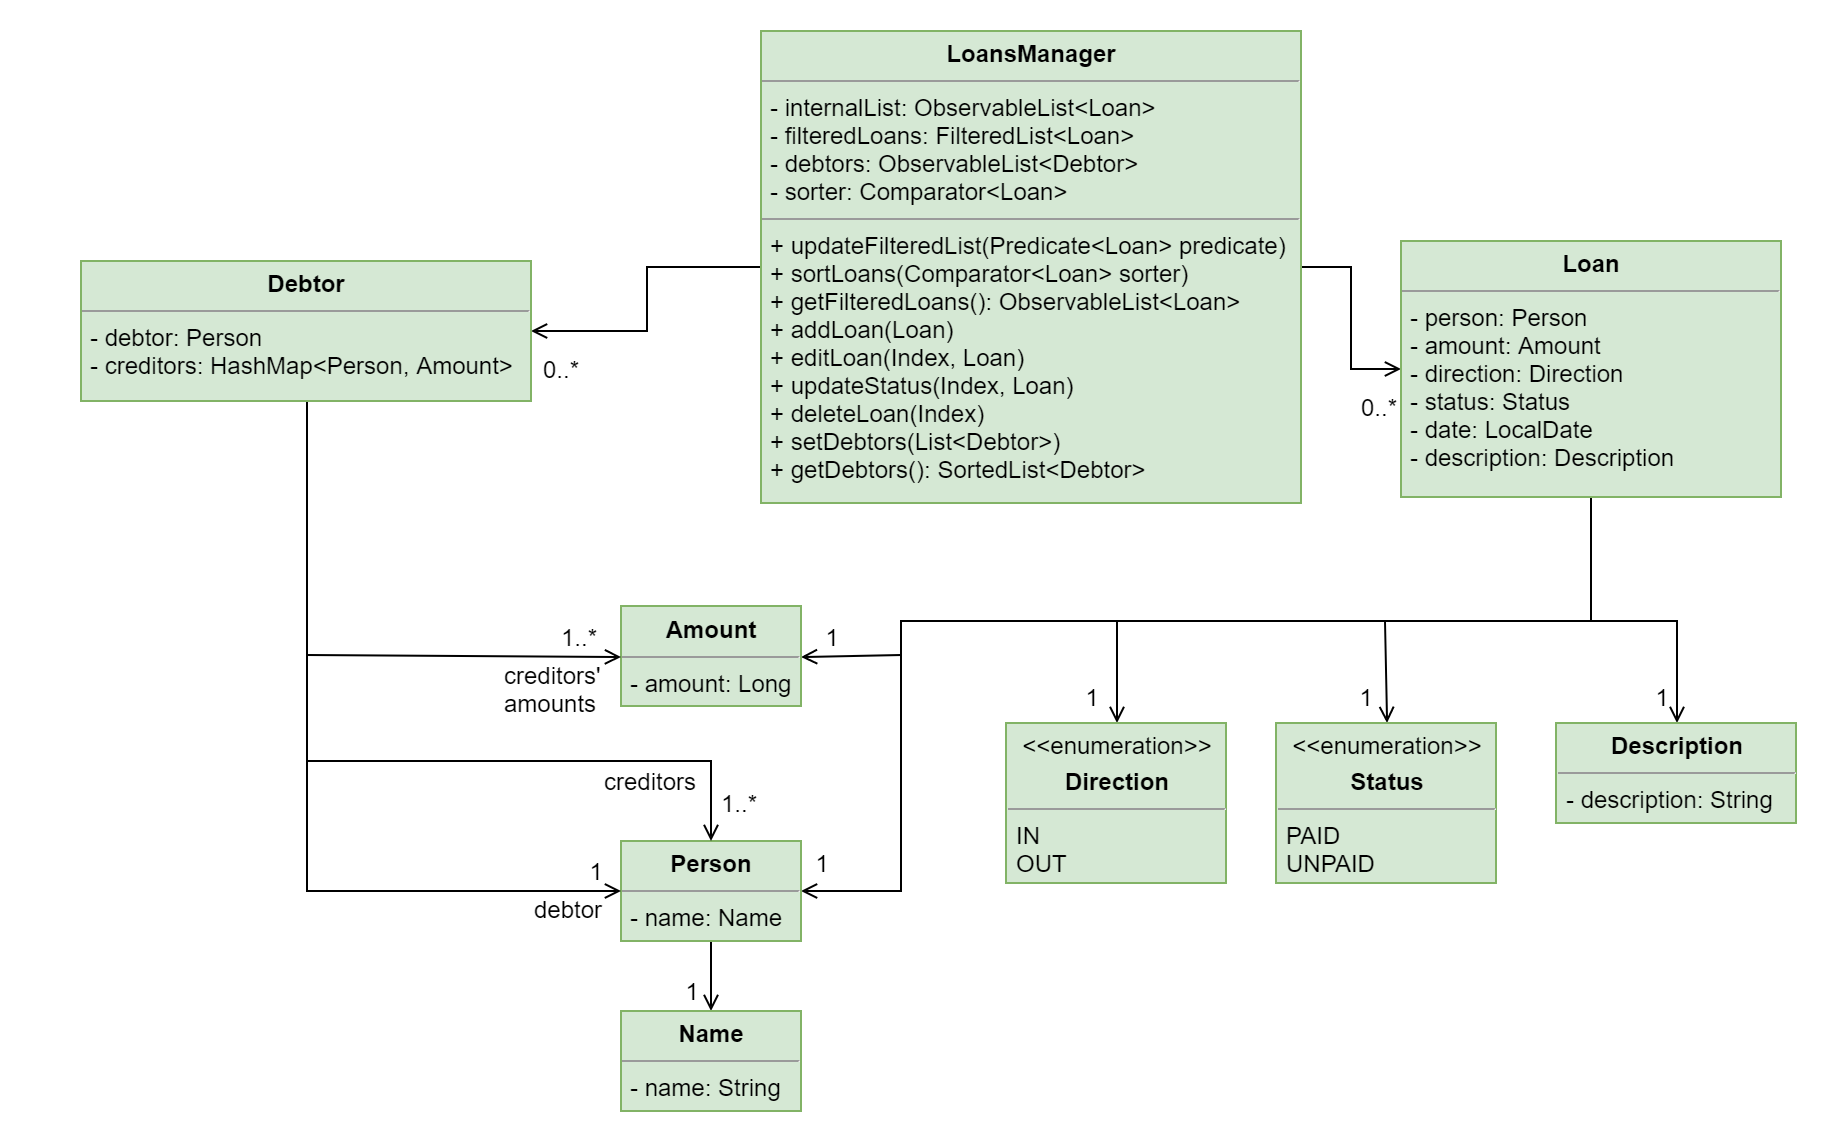
It adds a separate LoansManager alongside the main AccountsManager, with Loan objects stored internally in an internalList.
The following class diagram demonstrates the association between the LoansManager and Loan objects.
Miscellaneous methods (such as LoansManager#getLoans and LoansManager#getLoansCount) are omitted.

Given below is an example usage scenario and how the LoansManager behaves at each step.
Step 1.
The user launches the application.
If loans.json exists on the hard disk, its data is loaded into internalList.
Otherwise, loans.json is created and the LoansManager initializes with an internalList containing a few sample loans.
Step 2.
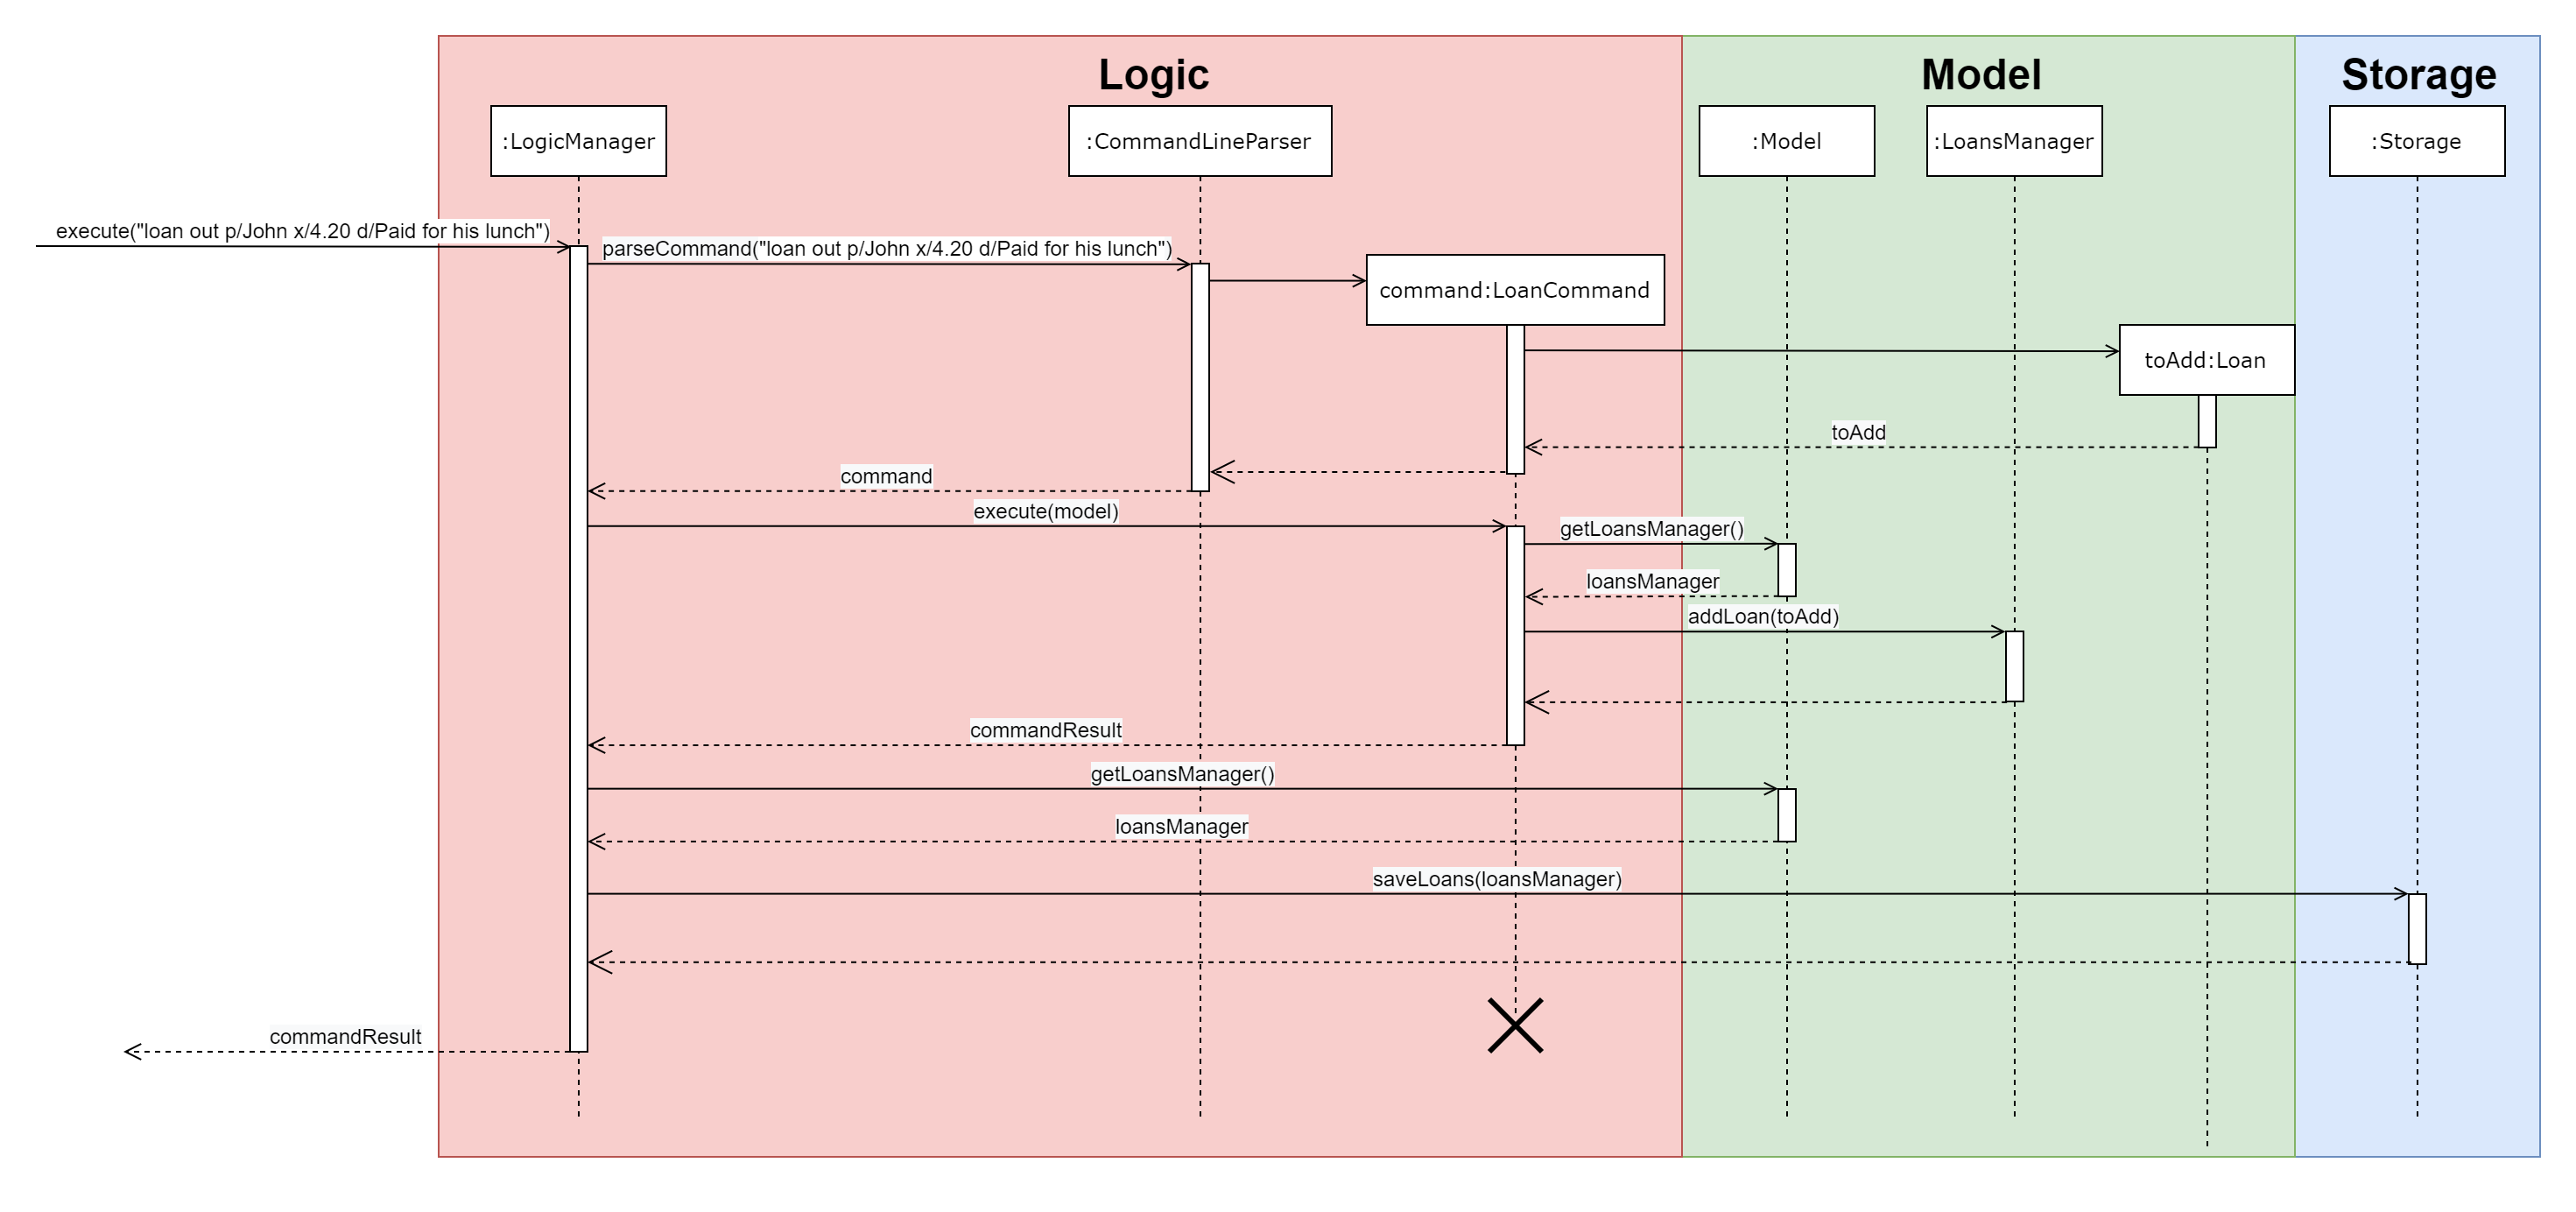
The user executes the command loan out p/John x/4.20 d/Paid for his lunch to add a new loan.
This creates a new loan toAdd of amount 4.20 out to the person John, with the description Paid for his lunch.
Since the user did not provide a date, the current system date is used for the date of toAdd.
LoansManager#addLoan(Loan toAdd) is called and
(after verifying that toAdd does not already exist in internalList)
toAdd is added to internalList.
The following sequence diagram illustrates the process of adding a loan:

In general, the rest of the operations work using a similar sequence of steps.
Some commands might create a new Loan object (as shown above) while others might just use the Index of a loan (e.g. loan delete).
Multi-Loan Targeting
The user can target and act on multiple loans with a single command.
For example, loan paid 1 3 4 can be used to mark the first, third and fourth loans in internalList as PAID.
Alternatively or additionally, loan paid p/John p/Mary can also be used
to mark all the loans of the persons John and Mary in internalList.
The LoansManager handles this by executing the appropriate operation repeatedly.
In the case of loan paid 1 3 4, LoansManager#editLoan is called once for each of the three loans.
To account for the fact that the list size might change after each operation, the size of the list before and after each operation is compared. If it has changed, the targeted indices are adjusted accordingly.
If any of the target loan indices cannot be found by the LoansManager in internalList,
they are added to a missingLoanIndices list.
Similarly, target persons that cannot be found are added to a missingPersons list.
Both lists are displayed to the user after other target loans that are in internalList have been acted upon,
notifying the user that the target indices/persons could not be found.
Multi-loan targeting is implemented for the commands loan paid, loan unpaid and loan delete.
Loan Splitting
Loan splitting exists as a command that the user can execute. Its purpose is to split a large, initially unbalanced group payment equally among the group’s members. The following example scenario should clarify the purpose of the command:
John, Mary and Peter go out for dinner. The meal costs $100, so Peter pays $90 and Mary covers the remaining $10. However, the three want to split the bill equally among themselves.
John executes the command loan split p/John p/Mary p/Peter x/0 x/10 x/90.
Budget Buddy then outputs a list of the necessary payments between the three.
From this list, John can now see that he owes Peter $33.33 and that Mary owes Peter $23.33.
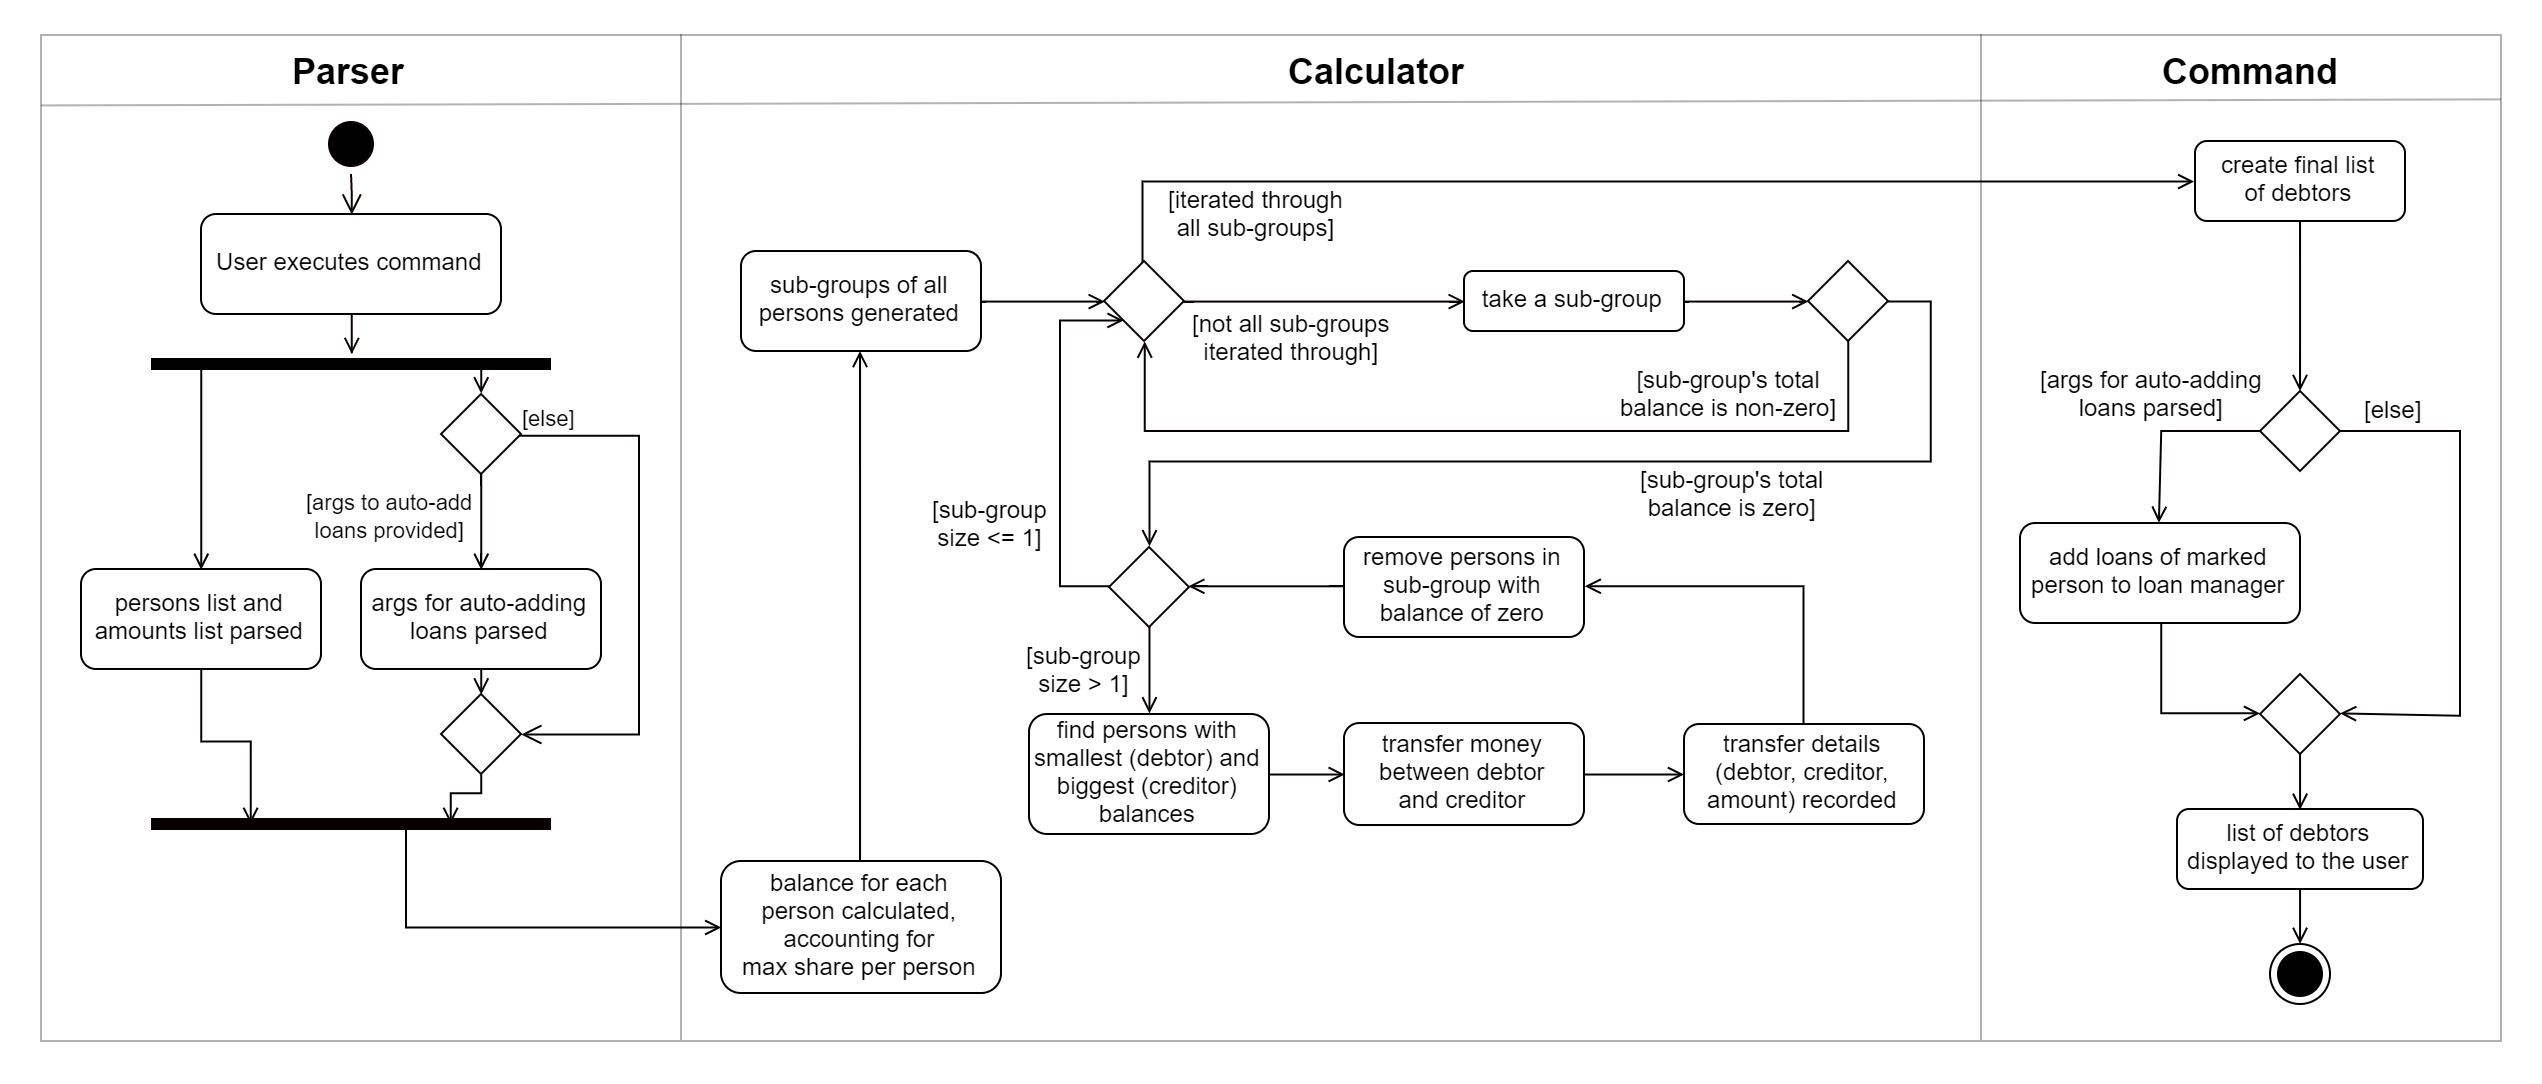
Given below is an example scenario to demonstrate how the final list is calculated. The algorithm as a whole can be summarized in the activity diagram below, which might prove helpful for following the steps in the example scenario:

Step 1.
The user executes the command loan split p/Ben p/Duke p/Adam p/Zed x/0 x/20 x/80 x/50 max/10 me/Ben d/Dinner.
In this scenario, out of the total bill of $150,
Ben has paid $0,
Duke has paid $20,
Adam has paid $80
and Zed has paid $50.
Furthermore, max/10 specifies that Ben should only pay/owe up to $10 overall.
Finally, me/Ben marks Ben as the user;
all debts involving Ben should be added to the normal loan list with the description Dinner.
Step 2.
LoanSplitCommandParser parses the persons, amounts, and max shares into List<Person>, List<Amount> and List<Long> respectively.
me/Ben and d/Dinner are parsed into Optional<Person> and Optional<Description>.
A new LoanSplitCommand is instantiated with the lists and optional objects.
Step 3.
LoanSplitCommand replaces Ben in List<Person> with a Person with the Name You.
Using the static methods of a LoanSplitCalculator class, it then begins executing the following algorithm:
-
The
defaultSharePerPersonis calculated. In this scenario, $150 should be split among the 4 persons. However, asBenhas a max share of $10, the other 3 persons must divide $140 among themselves, resulting in adefaultSharePerPersonof $46.66. -
Each person in
List<Person>is given abalance, calculated using the amount they paid initially (fromList<Amount>) minus either thedefaultSharePerPersonor their max share if present. -
A list of all possible sub-groups (combinations) of persons is generated. In this scenario, the number of sub-groups for the 4 persons would be 16.
-
For each sub-group, if the sum of their balances is zero, then the following steps are performed:
-
Take the persons with the smallest and biggest balances: the
debtorandcreditorrespectively. -
Transfer money between the two such that one or both of their balances reaches zero. The person(s) with a balance of zero are then removed from the group, and a record of the
debtor,creditorandamountTransferredis stored in aList<DebtorCreditorAmount>. -
Repeat until the sub-group contains less than two persons.
-
-
After every sub-group has been processed,
List<DebtorCreditorAmount>is used to create the finalList<Debtor>stored inLoansManager.
Step 4.
All debts involving the person You in List<Person>
are used to create loans with the description Dinner.
These loans are added to internalList in LoansManager using LoansManager#addLoan.
Step 5. The list of debtors in LoansManager is displayed to the user.
In this scenario, the display will show that
Duke owes Adam $26.66
and You (Ben, the user) owe Zed and Adam $3.32 and $6.68 respectively.